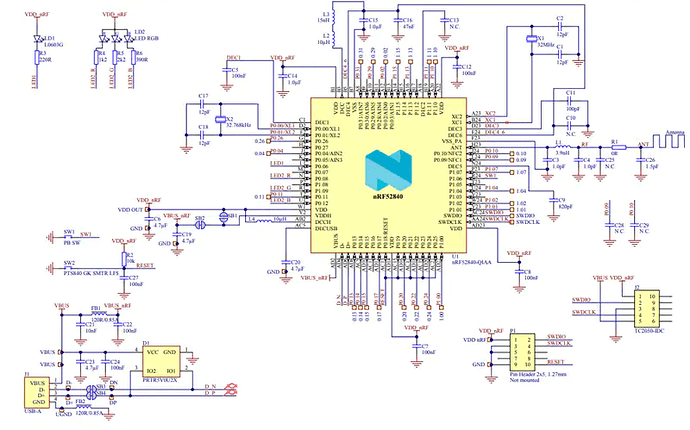
Like if you have an nRF52840: Nordic USB dongle, Arduino Nano 33 BLE, Adafruit, Sparkfun, April, Makerdairy, Fanstel, Particle or any other

Like if you have or are interested in any of these nRF52840 boards:

I have several Particle Xenon’s, Argon’s.

I have some Nordic nrf52840 USB Dongles, along with Makerdairy nRF52840 and Fanstel.

And some Arduino Nano 33 BLE Sense boards.

I may also purchase a Sparkfun and Adafruit Feather or an April nRF52840 board.

I have a Github blog about the boards here and a Particle blog about OpenThread.io and the boards here and a general blog about teaching with Particle Mesh Devices here

Why all this interest in the nRF52840 SOC made by Nordic?

It just kind of bugs me that Bluetooth Low Energy BLE5 is standardized and yet all these boards have their own way to compile and install their own example programs making an already confusing system even more confusing. I think PlatformIO.org is the key to working with all these boards and using their different strengths to our advantage.

The PaltformIO Github about these boards is at GitHub - platformio/platform-nordicnrf52: Nordic nRF52: development platform for PlatformIO

It looks like the “develop” Github branch already has entries for these boards

96b_nitrogen.json
adafruit_cplaynrf52840.json
adafruit_feather_nrf52832.json
adafruit_feather_nrf52840.json
adafruit_itsybitsy_nrf52840.json
adafruit_metro_nrf52840.json
bluey.json
delta_dfbm_nq620.json
electronut_blip.json
electronut_papyr.json
hackaBLE.json
holyiot_yj16019.json
laird_bl652_dvk.json
laird_bl654_dvk.json
nano33ble.json
nrf52832_mdk.json
nrf52840_dk.json
nrf52840_dk_adafruit.json
nrf52840_mdk.json
nrf52_dk.json
particle_argon.json
particle_boron.json
particle_xenon.json
redbear_blenano2.json
redbear_blend2.json
sdt52832b.json
stct_nrf52_minidev.json
thingy_52.json
ublox_evk_nina_b1.json
vbluno52.json


And finally I have made an online Docker that works in the browser using Gitpod.io, with pre-loaded Nordic sdk examples, PlatformIO core and Openthread.io in a Debian Linux distribution with the gcc-arm compiler also pre-installed. Yes Gitpods are amazing ! The Github is here and the Snapshot is :

Open in Gitpod

First thing I am trying to do is find a good bootloader to load onto the various devices, see forum entry here

Anyone had much success with any of these?
Once again, please like if you have any of these boards or are interested in this topic.
4 Likes

I have a handful of those boards in my stash to have a play with - the NRF52 seems like it needs to be in my back pocket for future projects, but I don’t have much experience, so this interests me greatly.

Also I have no experience with gitpod, so thanks for putting that together! Can’t wait to have a go with both the devices and the toolchain!

2 Likes

So I have got a few boards, which I will try to put a few bootloaders on (I am leaning towards putting the arduino nano 33 BLE bootloader on everything, but will be open to other ideas):

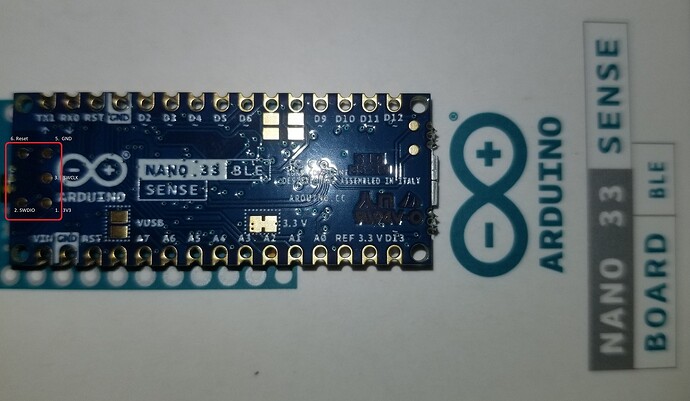
  1. The Arduino Nano 33 BLE Sense. I have a broken one (my fault) and a new one

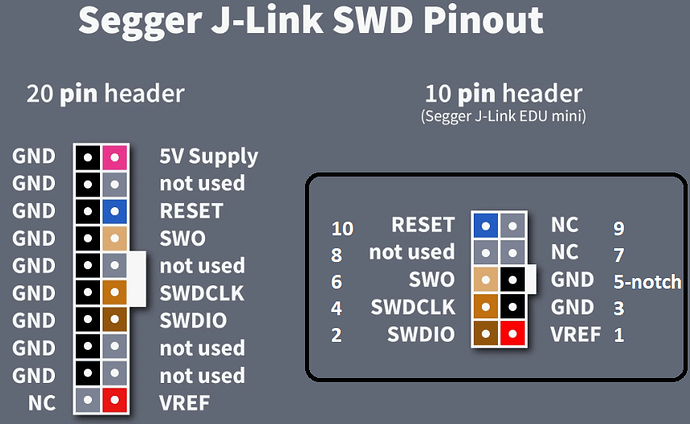
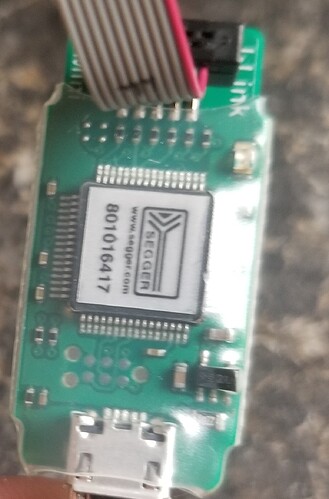
I have a Segger Mini Edu debugger

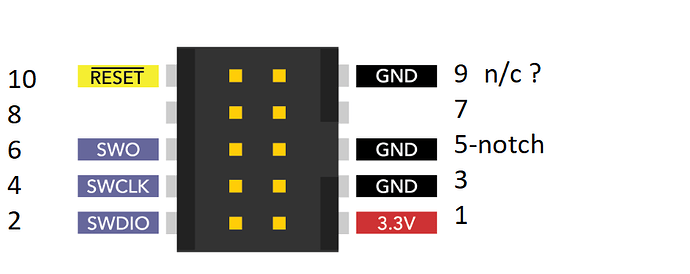
I think these are the correct 10 pin debugger layout, for the particle Xenon and Argon debugger connector

Here is another image

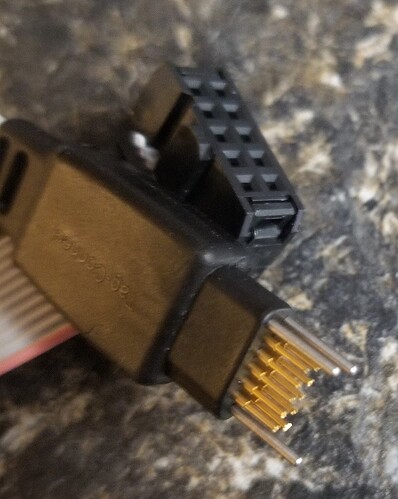
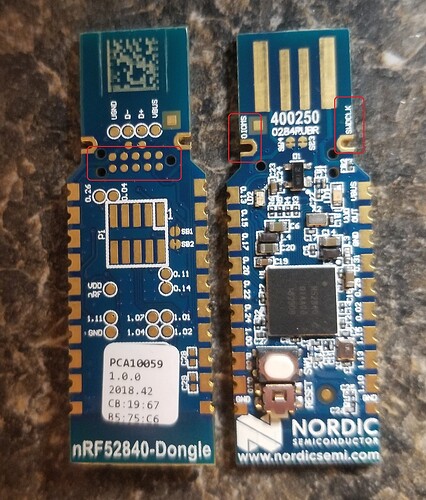
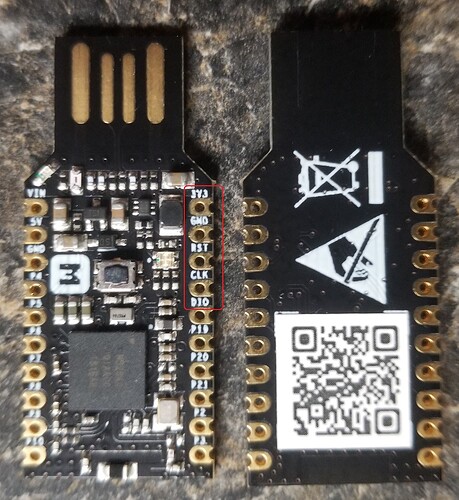
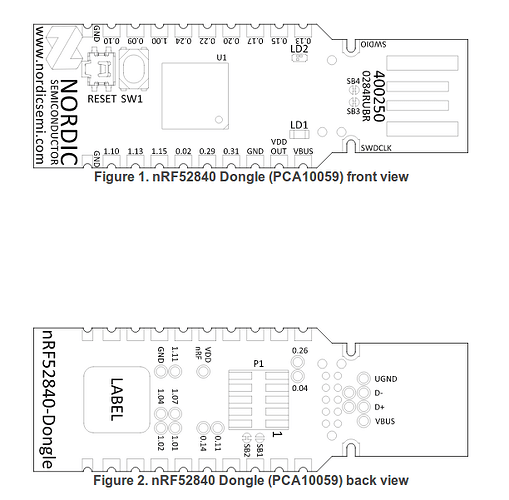
I have a 10 pin connector cable for the Nordic dongle, which unfortunately does not fit the segger mini 10 pin connector. I might not use it as the Nordic dongle seems to have side pins for SWDCLK and SWDIO. see second image.

The Nordic nrf52840 dongle.

The Makerdiary nrf52840 dongle, seems to have swdclk and swdIO as pins on the board. see image.

Really important. changing Platformio.ini file to include

upload_protocol = nrfjprog

With the segger mini debugger dongle and both boards plugged in for power seems to work.

I just need to do a bit more testing. Anyone with any experience is welcome to add their views on how to get these boards running.

Weird note here. the below code seemed to sort of work with zephyr spelt with a capital “Z” as in the documentation. Then it ran very different with the small “z”. Still not fully working, but has some promise for the Particle Photon.


[env:development]
platform = https://github.com/platformio/platform-nordicnrf52.git
board = particle_argon
framework = zephyr
upload_protocol = nrfjprog


Honestly, I don’t really understand what you are trying to do and where you need help. But you might be interested in how I connect a debugger to the Arduino Nano BLE 33.

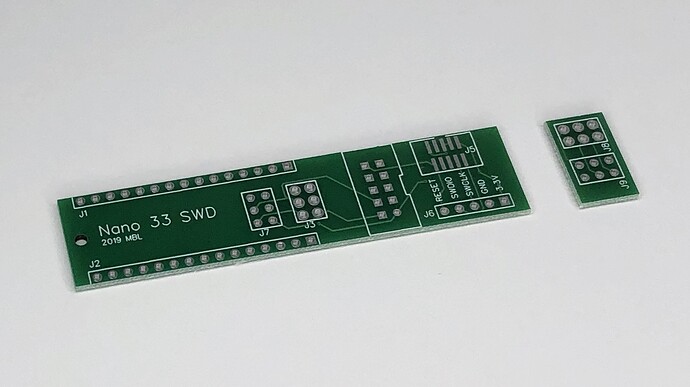
I started off with soldering wires to the debug pins (https://medium.com/@manuel.bl/arduino-in-circuit-debugging-with-platformio-9f699da57ddc). Later I had a PCB made:

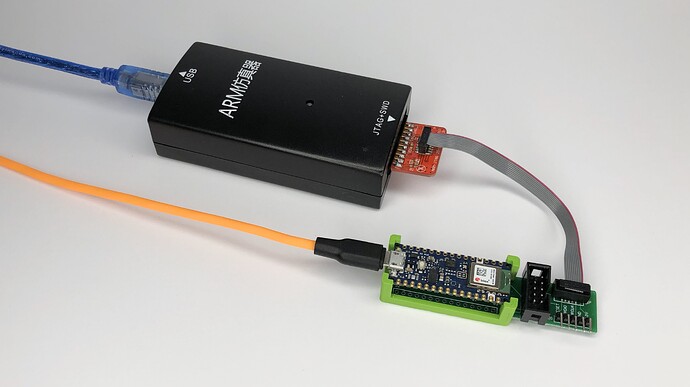
It can either be used with a 3D printed bracket holding the Arduino Nano…

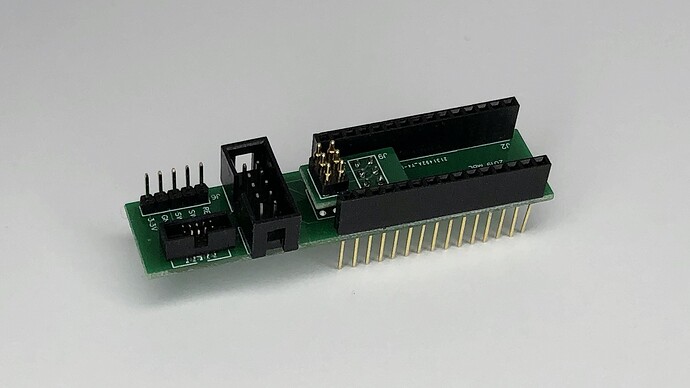
… or – in case pin headers have been soldered to the board – with stackable headers:

In both cases, the connection is made with a 6 pin connecter with spring-loaded pogo pins.

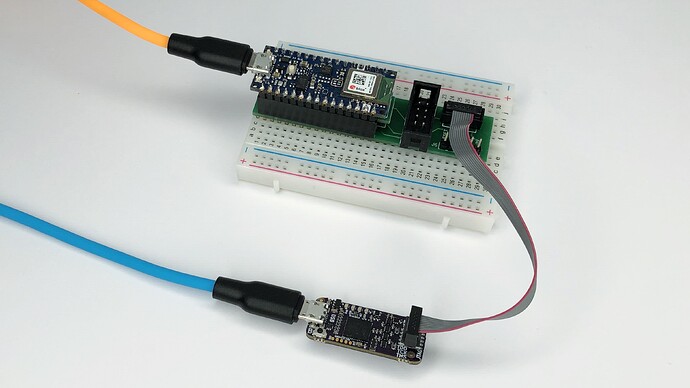
The adapter with stackable headers can be used on a breadboard:

The PCB has Cortex 10-pin connectors fitted. So it can be easily connected to a Black Magic Probe or to a J-Link (using an inexpensive adapter).

And as for your broken Nano 33 BLE: If it is just the bootloader that no longer works, it can be restored…

1 Like

@manuelbl that is great. I wish I could whip up a nice board like that. I will probably just solder the SWDCLK and SWDIO connections and use the boards GND and RESET and plugin the board for 3V3. That should be enough for what I am trying to do.

Really glad you shared what you do. Great to know that PlatformIO can do some serious debugging. I am not at that point yet, but really good to know it is an option.

.

.

Yes I should be able to fix my broken Nano 33 BLE Sense by restoring the bootloader, (I flashed working Nordic software to it but missed the step in the .ld file to put the bootloader at the correct address :woozy_face: )


MEMORY
{
  FLASH (rx) : ORIGIN = 0x10000, LENGTH = 0xf0000
  RAM (rwx) :  ORIGIN = 0x20000000, LENGTH = 0x40000
}


.

.

I am just trying to simplify the workflow for anyone wanting to use various nrf52840 boards.

The Nordic board is cheap and connects well to Openthread. The Arduino Nano 33 BLE Sense board has all those sensors. The Particle boards simply because I have a class set of them. (The Particle Xenon is just another cheap BLE board, but the Argon has an ESP32 with the nRF52840 SOC giving a few more interesting options.)

Ideally when PlatformIO has all of these working that solves the problem, however in the mean time I am going to look into trying different bootloaders and seeing what I can get working. The final result might be as boring as: use Arduino for Arduino, Nordic for Nordic, Particle for Particle Mesh.

Or things might get more interesting such as the Arduino bootloader works on all three with a few pin reassignments and go from there.

Anyway thanks @manuelbl for posting, what you have made with all it’s connectors would make a nice little build for a class or small group assignment. Got any extra boards?

Do you know what the origin of the Arduino bootloader is? I can’t find the source code online. Is it proprietary software by Nordic Semiconductor or u-blox (as the nRF52840 is part of a u-blox module)?

And to restore the Arduino Nano 33 BLE bootloader:

  • Solder some wires to the SWDCLK and SWDIO pads and connect GND as proposed by you. It usually works without connecting RESET.
  • Connect a debug adapter (ST-Link, BMP, J-Link etc.)
  • Use the matching flash tool (st-flash, gdb, JFlash Lite etc.) and write the file ~/platformio/packages/framework-arduino-nrf52-mbedos/bootloaders/nano33ble/bootloader.(bin|elf|hex) to address 0x00000000

Done. The board will be back in business…

1 Like

I do not know. Until you mentioned it, I kind of thought bootloaders, like windows drivers were magically formed. I did find this link for the Adafruit nrf52 bootloader GitHub - adafruit/Adafruit_nRF52_Bootloader: USB-enabled bootloaders for the nRF52 BLE SoC chips

Which is kind of a cool python drag and drop your code to a usb folder program installation bootloader, not really my interest area but looks like this can be put on the Nordic Dongle so I will look into it.

.

.

As far as the Arduino Nano 33 BLE bootloader this issue seems to address if it is closed or open source Bootloader source code · Issue #23 · arduino/ArduinoCore-nRF528x-mbedos · GitHub

leaving the issues area will get to the main github.

Every once in a while, with computers, things work well. For me it is about once every 5 years, I have been doing this for 40 years. Today was a good day.

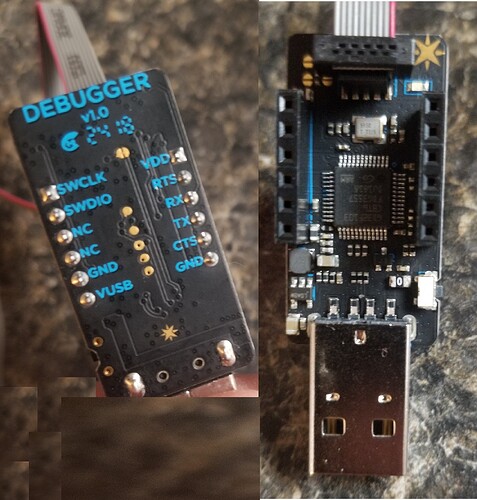
So I purchased a Particle debugger but could not get it working.

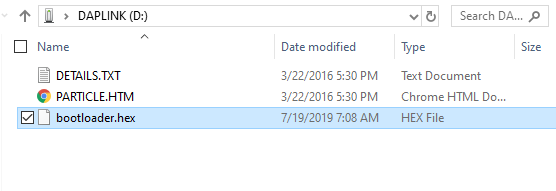
Since it has headers I thought I would use it to connect my SWDIO, GND and SWDCLK from my Nordic, Makerdiary and Broken Nano33BLE to my segger edu mini to try to put the arduino nano 33 BLE bootloader on them. Well each time I insert the Particle Debugger this irritating window pops up that advertises Particles webpage.

daplink01

So I looked up DAPlink and it appears to be a drag and drop hex, bin installation program folder. So I hooked the debugger up to my Particle Xenons and tried to drop particle .bin bootloaders and softdevices but nothing worked. Drop the file on the folder and it disappears and returns with a fail.txt file when things don’t work.

Somewhere I had an old particle.hex file so I tried that and it did not fail, but didn’t do anything.

So I tried a nordic bootloader. It also did not fail.

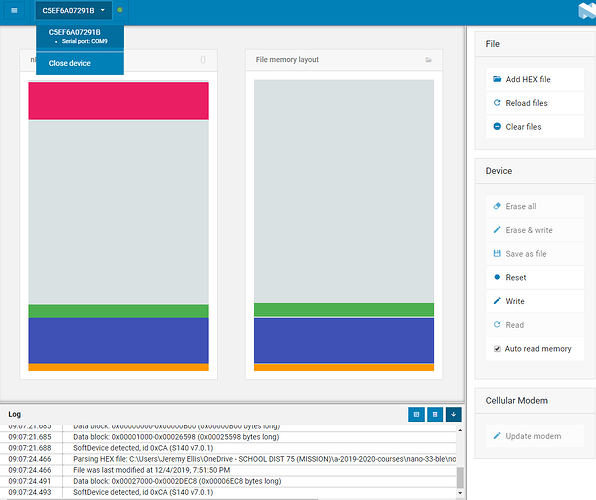
Trying nordic nrf-connect for desktop I was able to install blinky without any errors. Probably the LED assignment is different

but the Xenon did not show any response. however touching the mode button seemed to reset the serial connection and I was getting no errors.

So I tried the Arduino nano 33 BLE bootloader.hex file. (Will write this up better another day) and it also installed using the DAPlink. Showing a very bright red LED which in the Particle world means something is broken.

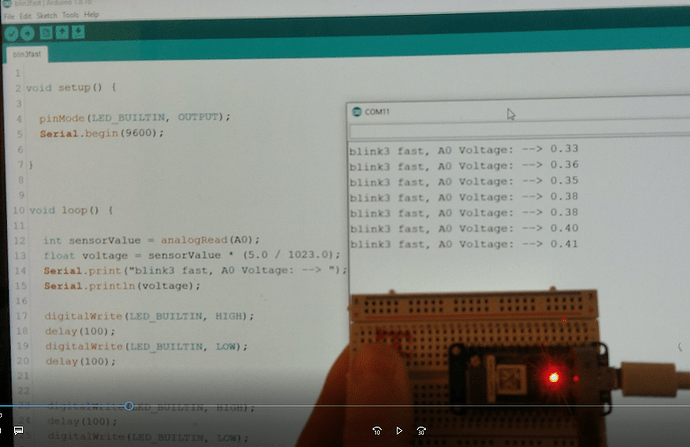
Loaded Arduino IDE and it found the Xenon as a Nano33BLE on port COM10

Tried to upload my A0 serial print and LED flash test program. Compiled it but it would not install. Double pressed the mode button, windows installed new driver and it uploaded. Bright red LED started flashing 3 times as per program. Had to fight a bit to find the COM port., I think I restarted it. Then the Arduino serial monitor started churning out A0 analog reading. (Nothing connected just testing)

I took a video of the red LED flashing but could not find my normal way to convert mp4’s to gif’s online.

I still need to test platformIO, but the first step is working. Getting a Particle Xenon working on the Arduino IDE.

1 Like

@manuelbl you are correct for the other boards to do SWD I just needed the SWDCLK, SWDIO and GND. I got my bricked Nano 33 BLE working and managed to load the Nano 33 BLE bootloader onto both the Nordic nrf52840 Dongle and the Makerdiary dongle. The problem is DFU mode. I could not figure out how to get the makerdiary dongle go into dfu mode. I need to find the correct pin to work with the button. For the Nordic nrf52840 dongle there are pins that will do it but I managed to hold the main button while tapping the reset button and it worked. (Got that trick from an Adafruit site )

I also tested the Nano 33 BLE on visual studio using PlatformIO and it worked great.

The Xenon seems a bit flaky, working sometimes and not others. The Nordic Dongle with the Nano 33 BLE bootloader seems very stable. My only confusion now is how to change the built in LED. The Nordic dongle looks like it is doing absolutely nothing, but I know it works since my serial connection shows an A0 reading.

Any Arduino users who could help re-define LED_BUITLIN?

This is probably the default defining PIN 13 for most Arduino boards

#define LED_BUILTIN    13

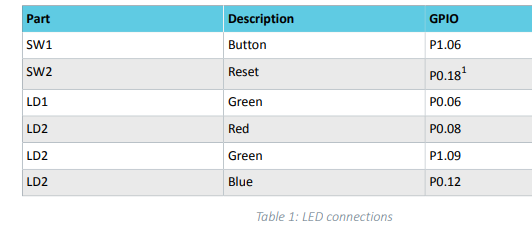
I found this info for the Nordic nrf52840 dongle. where SW1 and 2 are the two buttons, so LD1 and 2 should be the 2 very small on board LED’s. I don;t have any information for the main LED.

nordic-dongle-pins-for-led

but trying 6, 8, 9 or 12 does not seem to work . Also P0.06 does not compile. This should be easy but I seem to be stumped.

#define LED_BUILTIN    8

compiles but does not effect either of the 2 onboard LED’s

.

. So this is the nano33BLE pins_arduino.h file. That should give me something to work with.


#pragma once
#include "mbed_config.h"
#include <stdint.h>
#include <macros.h>

#ifndef __PINS_ARDUINO__
#define __PINS_ARDUINO__

// Frequency of the board main oscillator
#define VARIANT_MAINOSC (32768ul)

// Master clock frequency
#define VARIANT_MCK     (64000000ul)

// Pins
// ----

// Number of pins defined in PinDescription array
#ifdef __cplusplus
extern "C" unsigned int PINCOUNT_fn();
#endif
#define PINS_COUNT           (PINCOUNT_fn())
#define NUM_DIGITAL_PINS     (21u)
#define NUM_ANALOG_INPUTS    (7u)
#define NUM_ANALOG_OUTPUTS   (0u)

// LEDs
// ----
#define PIN_LED     (13u)
#define LED_BUILTIN PIN_LED
#define LEDR        (22u)
#define LEDG        (23u)
#define LEDB        (24u)
#define LED_PWR     (25u)

// Analog pins
// -----------
#define PIN_A0 (14u)
#define PIN_A1 (15u)
#define PIN_A2 (16u)
#define PIN_A3 (17u)
#define PIN_A4 (18u)
#define PIN_A5 (19u)
#define PIN_A6 (20u)
#define PIN_A7 (21u)
static const uint8_t A0  = PIN_A0;
static const uint8_t A1  = PIN_A1;
static const uint8_t A2  = PIN_A2;
static const uint8_t A3  = PIN_A3;
static const uint8_t A4  = PIN_A4;
static const uint8_t A5  = PIN_A5;
static const uint8_t A6  = PIN_A6;
static const uint8_t A7  = PIN_A7;
#define ADC_RESOLUTION 12

/*
 * Serial interfaces
 */
// Serial (EDBG)
#define PIN_SERIAL_RX (1ul)
#define PIN_SERIAL_TX (0ul)

// SPI
#define PIN_SPI_MISO  (12u)
#define PIN_SPI_MOSI  (11u)
#define PIN_SPI_SCK   (13u)
#define PIN_SPI_SS    (10u)

static const uint8_t SS   = PIN_SPI_SS;   // SPI Slave SS not used. Set here only for reference.
static const uint8_t MOSI = PIN_SPI_MOSI;
static const uint8_t MISO = PIN_SPI_MISO;
static const uint8_t SCK  = PIN_SPI_SCK;

// Wire
#define PIN_WIRE_SDA        (18u)
#define PIN_WIRE_SCL        (19u)

#define PIN_WIRE_SDA1       (30u)
#define PIN_WIRE_SCL1       (31u)

#define PIN_ENABLE_SENSORS_3V3     (32u)
#define PIN_ENABLE_I2C_PULLUP      (33u)

#define PIN_INT_APDS (26u)

// PDM Interfaces
// ---------------
#define PIN_PDM_PWR	 (27)
#define PIN_PDM_CLK	 (28)
#define PIN_PDM_DIN	 (29)

// These serial port names are intended to allow libraries and architecture-neutral
// sketches to automatically default to the correct port name for a particular type
// of use.  For example, a GPS module would normally connect to SERIAL_PORT_HARDWARE_OPEN,
// the first hardware serial port whose RX/TX pins are not dedicated to another use.
//
// SERIAL_PORT_MONITOR        Port which normally prints to the Arduino Serial Monitor
//
// SERIAL_PORT_USBVIRTUAL     Port which is USB virtual serial
//
// SERIAL_PORT_LINUXBRIDGE    Port which connects to a Linux system via Bridge library
//
// SERIAL_PORT_HARDWARE       Hardware serial port, physical RX & TX pins.
//
// SERIAL_PORT_HARDWARE_OPEN  Hardware serial ports which are open for use.  Their RX & TX
//                            pins are NOT connected to anything by default.
#define SERIAL_PORT_USBVIRTUAL      SerialUSB
#define SERIAL_PORT_MONITOR         SerialUSB
#define SERIAL_PORT_HARDWARE        Serial1
#define SERIAL_PORT_HARDWARE_OPEN   Serial1


// Mbed specific defines
#define SERIAL_HOWMANY		1
#define SERIAL1_TX			(digitalPinToPinName(PIN_SERIAL_TX))
#define SERIAL1_RX			(digitalPinToPinName(PIN_SERIAL_RX))

#define SERIAL_CDC			1
#define HAS_UNIQUE_ISERIAL_DESCRIPTOR
#define BOARD_VENDORID		0x2341
#define BOARD_PRODUCTID		0x805a
#define BOARD_NAME			"Nano 33 BLE"

#define DFU_MAGIC_SERIAL_ONLY_RESET   0xb0

#define I2C_SDA				(digitalPinToPinName(PIN_WIRE_SDA))
#define I2C_SCL				(digitalPinToPinName(PIN_WIRE_SCL))
#define I2C_SDA1			(digitalPinToPinName(PIN_WIRE_SDA1))
#define I2C_SCL1			(digitalPinToPinName(PIN_WIRE_SCL1))

#define SPI_MISO			(digitalPinToPinName(PIN_SPI_MISO))
#define SPI_MOSI			(digitalPinToPinName(PIN_SPI_MOSI))
#define SPI_SCK				(digitalPinToPinName(PIN_SPI_SCK))

#define digitalPinToPort(P)		(digitalPinToPinName(P)/32)

uint8_t getUniqueSerialNumber(uint8_t* name);
void _ontouch1200bps_();

#endif //__PINS_ARDUINO__


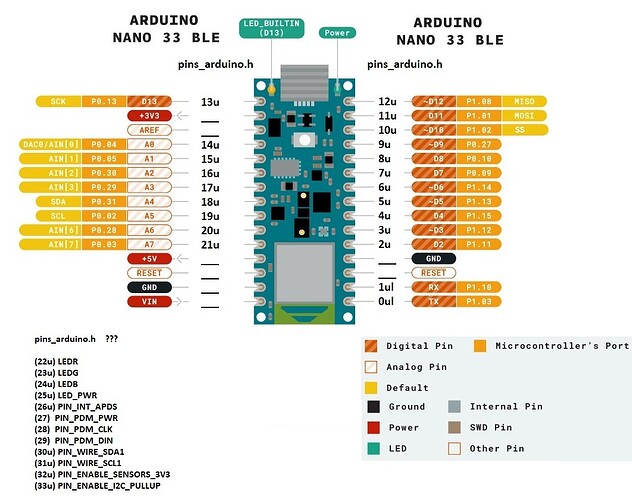
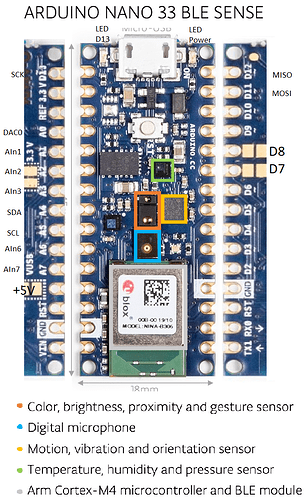
Also found a couple of datasheet/Diagrams:

Note: Strange that none of these have any of the numbers that the pins_arduino.h file uses. I might have to make my own diagrams listing the (13u) etc locations.

Nano 33 BLE Sense

.


.

.

Nordic nrf52840

FWIW, if you get the nordic nRF52840 SDK, it comes with an official J-Link on the board that can be used for programming not just that board but also any other nRF52840 that you wire to it, and it’s all done by simply dragging the hex file onto the j-link’s virtual driver.

If it were me, if there’s a bootloader that supports firmware updates over the air (FOTA), I’d pick that and ignore the rest. Nordic has one that’s highly secure but highly cumbersome to use. While commercial developers may need that high level of security, IMHO a less secure, but easier to use, FOTA would be a much better fit for students and hobbyists. Is there such a thing yet available? It’s been a while since I last checked. MyNewt claims to have a FOTA for the nRF52840 (Adafruit even has an nRF52840 board with it preloaded), but I haven’t tried it. FreeRTOS might be another, though I’m unsure as to its current nRF52840 development status. Are there any others to consider, or for now is that all there is to try? I could be wrong, but I don’t think mBed (which is what Arduino has adopted) has it, but this makes it seem a mechanism exists whereby you could add your own FOTA to mBed: BLE NRF52840 : Building Custom bootloader (FOTA/UART) for Cordio BLE applications. · Issue #9827 · ARMmbed/mbed-os · GitHub
and that would be my preference using Nordic’s so-called proprietary radio modes.

UPDATE: Looks as though mBed may have just fairly recently gotten some kind of customize-able bootloading working on the nRF52840: GitHub - PelionIoT/mbed-bootloader: Generic bootloader to be used in conjunction with Pelion Device Management Client, though it would greatly help if in addition there were some documented examples of exactly how to do it.

1 Like

Thanks @WhiteHare for the in depth information. Also here’s a quote of yours from Anyone have experience changing nrf52840 bootloaders?

I am kind of moving away from the other boards and will probably just stick to the Arduino Nano 33 IoT (BLE4.2 and Wifi) and Nano 33 BLE Sense (BLE5.0 and multiple sensors). As you have mentioned, I do just want to make my life easier. I should probably just toss away my class set of 15 Particle Xenons (BLE) and 15 Particle Argons (BLE and Wifi).

As far as over-the-air updates, that is not my major concern, the Wifi at my school is less than perfect (I have been teaching Robotics using the Particle Photon for 3 years and OTA is a real pain in a busy Wifi school) . The Arduino IDE and/or Visual Studio with PlatformIO and a usb cable work great for me. (Visual Studio even installs easily on locked down school computers so that is a bonus).

I will still tinker with the nRF52840 boards, but probably just to figure out which pins work and which don’t.

Can you share the design files for pcb and 3D?

So I am having some success with these boards at Same Bootloader, same softdevice different board different pins - #9 by rocksetta

Have found most of the Particle pins are equivalent to the Nano 33 BLE pins just in different order. see diagrams at the above link

Hi @manuelbl, I love the SWD adapter you made for the 33’s!

Would you be willing to share or sell your PCB design, or sell and send me a few PCB’s?

PCB in EsayEDA: https://easyeda.com/manuelbl/arduino-nano-debug-adapter

STL file for Arduino Nano 33 BLE: https://www.filebin.ca/5CykRVi6ar0j/Nano33SWDBracket.stl

STL file for Arudino Nano IoT: https://filebin.ca/5Cyl8Hgs0CIL/NanoIoTSWDBracket.stl

The Arduino Nano 33 BLE and IoT boards differ by about 1mm (in length). So they require two slightly different brackets

The 3D print needs to be quite precise. Otherwise the Arudino Nano has too much play and the pogo pins do not reliablily align with the contacts. I recommend to print it using a layer height of 0.1mm and use PLA or a material with a similar rigidity (Nylon is too flexible).

The pogo pins are from AliExpress: https://www.aliexpress.com/item/32883962541.html

If you use the raiser board (for the version with the pin headers with long pins), you will likely need create/print a jig so you can solder the raiser board at the exact height and without an angle.

1 Like