Hi all,
I would like to upload and debug a very simple program on the Arduino Due, using the Atmel JTAG-ICE and I have updated the .ini variable accordingly (see screenshot). I have previously uploaded code using Atmel Visual Studio, so I know that there is no hardware problem. However, the upload in VSCode fails due to some problems in .tcl scripts that I do not know the location of. Do you know what could be the issue here?
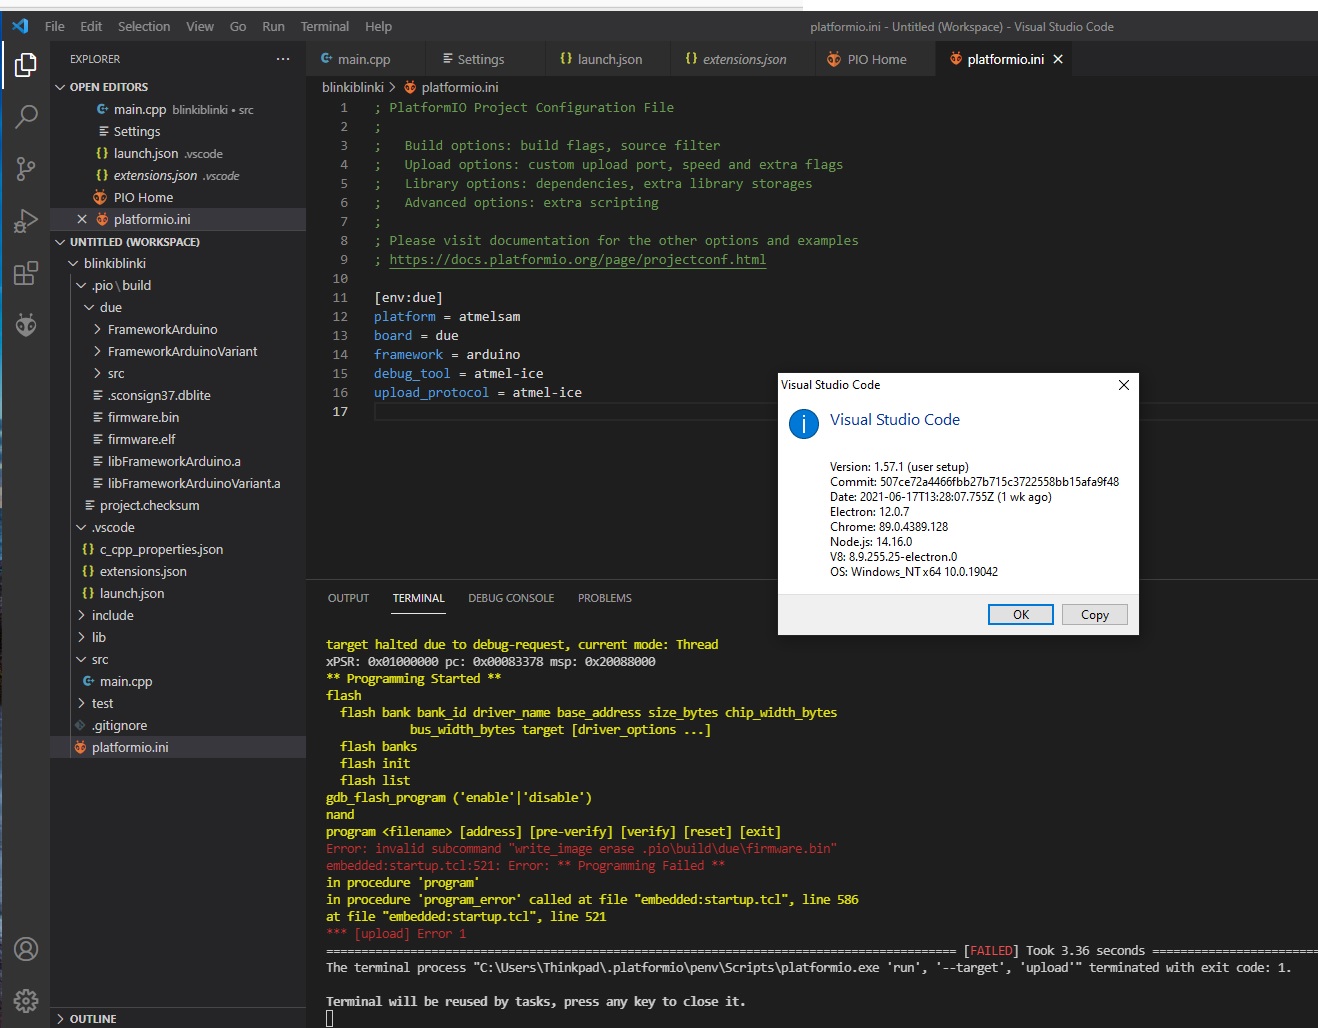
Right, so I have found an excellent thread where a solution was proposed.
Help with PIO Debugger using Atmel ICE and Arduino Due - #24 by maxgerhardt?
The problem lies in the OpenOCD uploader, which -if I understand correctly- tries to treat the .bin outptu t in the same way as the .elf and causes and error when erasing the chip. At any rate, the topic suggeted a custom script that would prepend OpenOCD options that allow an upload.
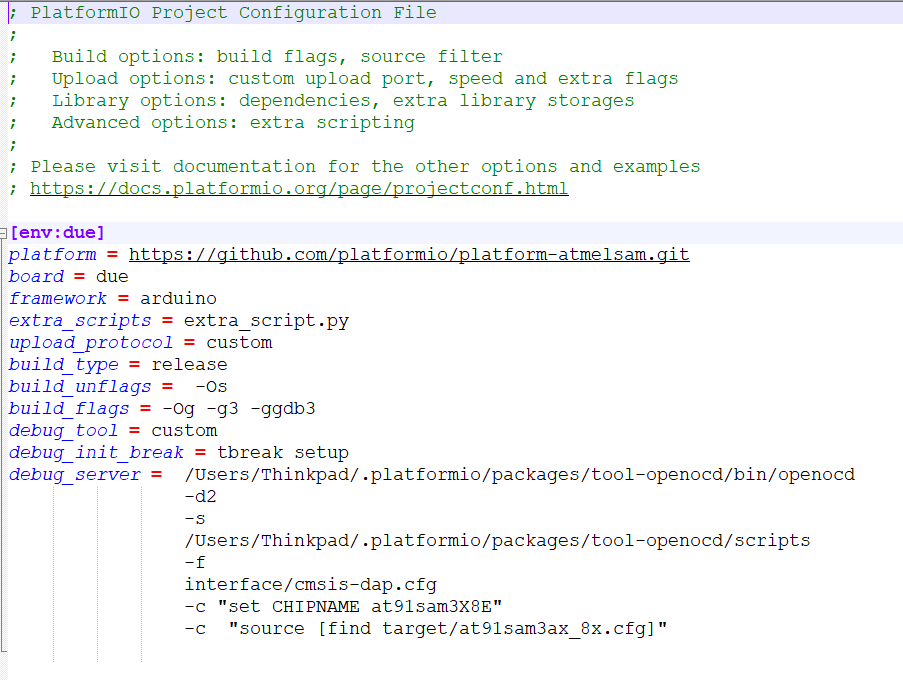
If you read towards the end of the topic you can see how the solution was obtained. My platformio.ini now looks like this:
[env:due]
platform = atmelsam
board = sainSmartDueUSB
framework = arduino
extra_script = extra_script.py
upload_protocol = custom
build_type = debug
build_unflags = -Os
build_flags = -Og -g3 -ggdb3
debug_tool = custom
debug_init_break = tbreak setup
debug_server =
/Users/Thinkpad/.platformio/packages/tool-openocd/bin/openocd
-d2
-s
/Users/Thinkpad/.platformio/packages/tool-openocd/scripts
-f
interface/cmsis-dap.cfg
-c “set CHIPNAME at91sam3X8E”
-c “source [find target/at91sam3ax_8x.cfg]”
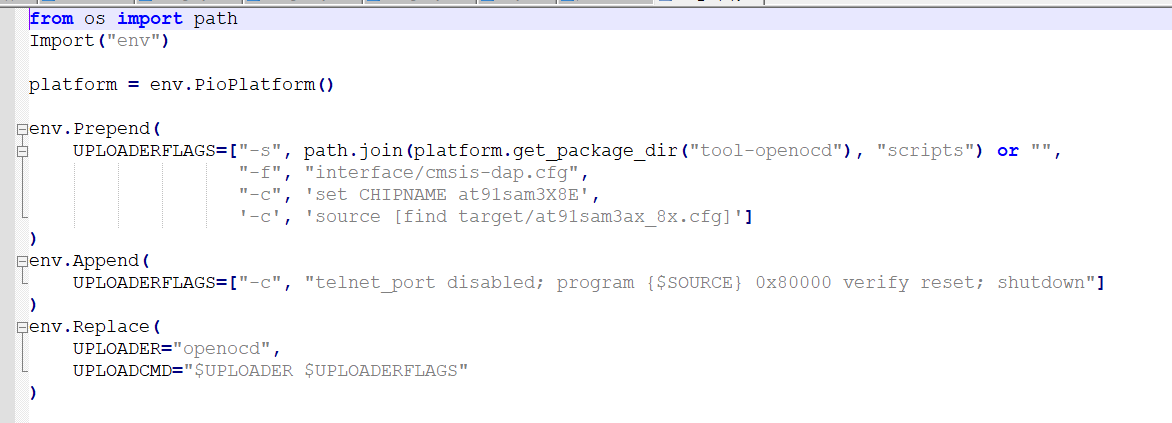
…and the extra_script.py looks as follows:
from os import path
Import(“env”)
platform = env.PioPlatform()
env.Prepend(
UPLOADERFLAGS=[“-s”, path.join(platform.get_package_dir(“tool-openocd”), “scripts”) or “”,
“-f”, “interface/cmsis-dap.cfg”,
“-c”, ‘set CHIPNAME at91sam3X8E’,
‘-c’, ‘source [find target/at91sam3ax_8x.cfg]’]
)
env.Append(
UPLOADERFLAGS=[“-”, “telnet_port disabled; program {$SOURCE} 0x80000 verify reset; shutdown”]
)
env.Replace(
UPLOADER=“openocd”,
UPLOADCMD=“$UPLOADER $UPLOADERFLAGS”
)
If this is still not fixed in the platform code, which it should be ideally, please open an issue in GitHub - platformio/platform-atmelsam: Atmel SAM: development platform for PlatformIO.
Thank you, I will do that tomorrow.
On a different note, I am trying to build my current project that I was building with the Arduino IDE without problems. But now I am getting a cryptic linker error at the linking stage of the build, and it seems to be related to multiple definition of a virtual function (defined in some libraries, not used by myself). The build settings do not seem to have any influence on that. Currently the language setting is C11, do you think that this has something to do with new features that were introduced in C17, like re-definition of virtual functions / abstract classes or something exotic?

A library file trying to implement the __cxa_pure_virtual function seems very weird. Check lib/NFC/new.cpp and remove the implementation therein. The Arduino core code should provide it.
It may be possible that your sketch built with a different version of that NFC library or had an older core installed in which that was necessary what the library did.
Wow, this did the job, finally I can compile my project! Let me just state that I am very impressed with, and grateful for your support. Because of that I am actually sold on using VSCode/PlatformIO henceforth. I was have been quite overwhelmed and sceptical (a platform from experts for experts…) in the beginning, but with the community platform’s support I believe that I can move forward now.
Getting back to the virtual function multiple definition I have now learned that this particular guard is used to avoid directly calling (non-implemented?) virtual functions and that this had not been implemented in the Arduino toolchain. This was the likely reason for the library’s author to include the definition. The PlatformIO’s underlying AtmelSam toochain seems a bit different, as it defines said guard. On this matter, I would really like to know what is going on “under the bonnet”, i.e. which compilers are called with which settings and how the platform determines all the switches and where are the core files located? I know that some .json files that show some of that information are created automatically and should not be changed by the user. Is the platformio.ini the only file where one can and should change all relevant build settings? Although I might not need to change anything, what if I decided one day to use a completely different toolchain, how would I do that?
I can explain some things high-level and by example, and then link to some further documentation. PlatformIO is an extensive piece of software, so please read this first as a general terminology introduction.
And actually I’ve always been bugged by how much is not documented well, so I’m explaining it more extensively for others as future reference, too, as a “How does PlatformIO work internally”.
Also one may note that in general, a PlatformIO doesn’t have to understand all of this to develop a firmware, the the general docs regarding e.g. platformio.ini, libraries etc. totally suffice. For more advanced stuff, Advanced Scripting is also well-explained with templates that can be copied and adapted without having to understand all underlying things in too much detail. It is however important for people looking to create custom PlatformIO extensions, such as, own platforms, own board definitions, support for other frameworks, etc.
The inner workings of PlatformIO
Involved entities
For reference, these will be explained later on. All these ‘things’ have something to do with the build process.
- the PlatformIO core code, https://github.com/platformio/platformio-core/. It is based on the SCons build system, written in Python (https://github.com/SCons/scons), just as PlatformIO.
- the platform, e.g. https://github.com/platformio/platform-atmelsam
- the compiler, e.g. https://developer.arm.com/tools-and-software/open-source-software/developer-tools/gnu-toolchain/gnu-rm/downloads
- the framework source code, e.g. https://github.com/arduino/ArduinoCore-sam, https://github.com/arduino/ArduinoCore-samd and https://github.com/adafruit/ArduinoCore-samd
- upload tools, e.g. https://github.com/xpack-dev-tools/openocd-xpack/, https://github.com/shumatech/BOSSA
Packages
So for PlatformIO, the compiler, the framework, uploader tools etc. is a ‘package’. At the start of compilation, PlatformIO prints the used pacakges, e.g.
HARDWARE: AT91SAM3X8E 84MHz, 96KB RAM, 512KB Flash
DEBUG: Current (atmel-ice) External (atmel-ice, blackmagic, jlink, stlink)
PACKAGES:
 - framework-arduino-sam 1.6.12
 - framework-cmsis 1.40500.0 (4.5.0)
 - framework-cmsis-atmel 1.2.2
 - toolchain-gccarmnoneeabi 1.70201.0 (7.2.1)
LDF: Library Dependency Finder -> http://bit.ly/configure-pio-ldf
The packages are stored in your home directory (C:\Users\<user>\ or /home/<user>) and then .platformio/packages/<package name>. Note that there might be multiple packages with the same name but different versions, this will be indicated by a @<version> at the end of the folder name.
All packages must have a package.json file which declares needed meta-information. For example, with which architecutre the package is compatible with (for packages containing binaries compiled for a specific arch & OS, e.g. Windows x64), the version (more below), the name, where it was sourced from, etc.. For decoding the version numbers (e.g., 1.70201.0) see Find the mbed version which was used before a backup? - #4 by maxgerhardt and the notes on Semantic Versioning.
So the local compiler might e.g. be in C:\Users\<user>\.platformio\packages\toolchain-gccarmnoneeabi\bin\arm-none-eabi-gcc (and related). The same for the other packages like the Arduino core or accomanying CMSIS files.
PlatformIO sources the content of these packages from its internal registiry (PlatformIO trusted registry). The PlatformIO staff, and also users, can upload packages (aka .tar.gz or .zip files) to this registry. The PlatformIO staff in turn gets the content for the package from the vendor’s official websites (like, ARM GCC, the framework code, etc…), as indicated in the url info of the package.json . See here for how to search the registry. An example where you can see what versions of toolchain-gccarmnoneeabi has built-in is e.g. here. Examples of a package.json should be sourced from the official PlatformIO pacakges (see e.g. locally in C:\Users\<user>\.platformio\packages\toolchain-gccarmnoneeabi\package.json). Here is also an example of mine.
Using the platformio.ini directive platform_packages can be used to easily manipulate the source or version of a pacakge.
Let’s e.g. say that I’m not happy that the standard Arduino Due project is using a ARM GCC compiler of version 7.2.1. I have multiple options. First, I can take a look at what other versions the PlatformIO staff has for toolchain-gccarmnoneeabi, as linked above. This will lead me to e.g. discover that there is a package version 1.90301.200702, which per above link encodes GCC 9.3.1, datecode 2020, June 2nd. So, I can add
platform_packages =
   toolchain-gccarmnoneeabi@1.90301.200702
to my platformio.ini to tell PlatformIO to use that package. Recompilation of the project will now download the compiler (if not already present) and show
PACKAGES:
 - framework-arduino-sam 1.6.12
 - framework-cmsis 1.40500.0 (4.5.0)
 - framework-cmsis-atmel 1.2.2
 - toolchain-gccarmnoneeabi 1.90301.200702 (9.3.1)
the appropriate new compiler being used. 2 simple lines in conjuction with info from the registry.
Let’s say the PlatformIO registry does not have the compiler version I want. I want to e.g. use the latest-greatest GCC 10. So, I go ahead and download gcc-arm-none-eabi-10-2020-q4-major-win32.zip for my OS from the official website and unpack it somewhere on my computer. To make it usable with PlatformIO, the unpacked folder needs a package.json. I source that from the previos package.json located on my computer per above (or download an example package from the registry) and just modify the version field, encoding the inner version (10.2.1) and date. That gives me e.g.
{
  "name": "toolchain-gccarmnoneeabi",
  "version": "1.100201.201103",
  "description": "GNU toolchain for Arm Cortex-M and Cortex-R processors",
  "keywords": [
    "toolchain",
    "build tools",
    "compiler",
    "assembler",
    "linker",
    "preprocessor",
    "arm"
  ],
  "homepage": "https://developer.arm.com/tools-and-software/open-source-software/developer-tools/gnu-toolchain/gnu-rm",
  "license": "GPL-2.0-or-later",
  "system": [
    "windows_amd64"
  ],
  "repository": {
    "type": "git",
    "url": "https://gcc.gnu.org/git/gcc.git"
  }
}
This file is put in the extract compiler package. Now I can go ahead and again use platform_packages to make use of it. Note that the source accepts all different kinds of URLs too, just like with library installs. So one possibility is using the file:// pseudo-protocol to refer to my downloaded package.
So for me, I’m using
platform_packages =
   toolchain-gccarmnoneeabi@file://C:\Users\Max\Downloads\gcc-arm-none-eabi-10-2020-q4-major
in my platformio.ini to refer to that compiler. On the next recompile of the project, that package will be copied into the internal package folder (<home>/.platformio/packages/), verified and used.
>pio run -e due
Processing due (platform: atmelsam; board: due; framework: arduino)
-----------------------------------------------------------------------------------------------------------------------------------------------------------------------------------------------------------------
Tool Manager: Installing file://C:\Users\Max\Downloads\gcc-arm-none-eabi-10-2020-q4-major
Tool Manager: toolchain-gccarmnoneeabi @ 1.100201.201103 has been installed!
Verbose mode can be enabled via `-v, --verbose` option
CONFIGURATION: https://docs.platformio.org/page/boards/atmelsam/due.html
PLATFORM: Atmel SAM (6.2.0) > Arduino Due (Programming Port)
HARDWARE: AT91SAM3X8E 84MHz, 96KB RAM, 512KB Flash
DEBUG: Current (atmel-ice) External (atmel-ice, blackmagic, jlink, stlink)
PACKAGES:
 - framework-arduino-sam 1.6.12
 - framework-cmsis 1.40500.0 (4.5.0)
 - framework-cmsis-atmel 1.2.2
 - toolchain-gccarmnoneeabi 1.100201.201103 (10.2.1)
LDF: Library Dependency Finder -> http://bit.ly/configure-pio-ldf
..
RAM:   [          ]   2.6% (used 2544 bytes from 98304 bytes)
Flash: [          ]   2.0% (used 10508 bytes from 524288 bytes)
Building .pio\build\due\firmware.bin
============== [SUCCESS] Took 50.56 seconds ==============
Of course, to make it better repeatable, one could use the command line tools associated with packages, specifically pio package pack to create a compressed toolchain-gccarmnoneeabi-<version>.tar.gz file, which can then be uploaded wherever (e.g., on a webserver or git) and then referred to via that URL.
Many Arduino-specific frameworks e.g. already have a package.json file in them, e.g. Arduino-ESP32. So to get the laster master branch version of that, it’s as simple as saying
platform_packages =
   framework-arduinoespressif32@https://github.com/espressif/arduino-esp32.git
in the platformio.ini, additionally with #branch at the end of the URL. PlatformIO recognizes this as a git url and will invoke git to clone the repo and start the installation procedure.
Some others don’t have a package.json. For these, an easy way to use them would be to fork them and add the package.json, then refer to the forked repo.
Note however that changing the compiler should be done with care, most frameworks or Arduino cores are written with only the compiler in mind that they’re using in the Arduino IDE, and other compilers might break things.
Notes on SCons
Scons is the build system, implemented in Python, on which PlatformIO is based. One could say that PIO is very advanced extension on top of SCons. In order to understand the PlatformIO build process, we need to understand a little bot of SCons. Specifically, PlatformIO uses SCons 4.1 per currently per this.
Scons can also be used a standalone tool. For a project, a small Python script can be written which conveys to the SCons build system how the source code for the project shall be built. I recommend reading through this mini introduction. The full documentation is at https://scons.org/doc/4.1.0/HTML/scons-design/ and https://scons.org/doc/4.1.0/HTML/scons-user.html.
As a short info to kinda be on the same level, some take away infos are:
- SCons always thinks in the context of a construction environment, (Python class
Environment), see docs. To construct on, in pure SCons, one would doenv = Environment(). - SCons has classes for
Program,Library,SharedLibraryto control what the build output is - compiler options are modified through special variables in the environment object, the so called
Construction Variables(Appendix A of above scons-user doc). These are accessed via e.g.env["CC"], as a Python dictionary, or more conveniently withenv.Append()andenv.Replace() - Important options to know would e.g. be
env["CC"]is the C compiler executableenv["CXX"]is the C++ compiler executable- same or
AS(assembler),AR(archiver), etc. env["CXXFLAGS"]for options affecting only the C++ compilerenv["CFLAGS"]for options affecting only the C compilerenv["CCFLAGS"]for options affecting both the C and C++ compilerenv["CPPPATH"]for specifying include directoriesenv["CPPDEFINES"]for storing a key-value (or just value) list for-Ddefines, applying to eveyrthing using the C preprocessor (thus also C and C++ compiler invocations)- etc., etc..
So a simple SCons script to build a program hello.c with some options would e.g. look like
# construct a environment with underlying compiler MinGW GCC
# (would otherwise use microsoft visual c compiler on my Windows system)
env = Environment(tools = ['mingw'])
# add GCC-specific compiler info and a macro value
env.Append(CCFLAGS= ["-march=native"])
env.Append(CPPDEFINES= [("MY_VALUE", 1)])
env.Program('hello.c')
save in a new directory as build.py and then with the hello.c code
#include <stdio.h>
int main() {
  printf("MY_VALUE is %d\n", MY_VALUE);
  return 0;
}
I e.g. get
>C:\Users\Max\.platformio\packages\tool-scons\scons.bat --sconstruct=build.py -Q
gcc -o hello.o -c -march=native -DMY_VALUE=1 hello.c
gcc -o hello.exe hello.o
>hello.exe
MY_VALUE is 1
So, SCons works pretty nicely and has used the compiler options given to it to produce the hello.exe program.
Platform
Used packages, platform.json
Which exact packages are used and of which version they are used depend on platform code and manifest. A platform is e.g. platform-atmelsam, for all Atmel SAM type microcontrollers. It contains a platform.json which declares the packages to be pulled from the PlatformIO trusted registry (or some other source), e.g. the compiler.
Note however that with scripting, the to-be-used package can also be exchanged dynamically. See e.g. this code in which the compiler package version is adapted for a specific framework.
Platforms are stored locally in <user directory>/.platformio/platforms.
The platform.json also stores a mapping of the possible framework values (e.g. arduino, mbed, ..) to the SCons builder script needed to build them, see e.g. here.
Board definitions, boards/
A board definition (official doc) is a JSON file from which the PlatformIO core and the builder scripts will pull information in the build process. They are stored in the boards/ folder of the platform (example for atmelsam). The file names in there (e.g. adafruit_feather_m0.json) are example the possible usable board = xyz value that can be used in the platformio.ini, without the .json extension. Note that per above documentation, a project can also have boards/ directory which will be additionally searched for by PlatformIO, so projects can have needed custom board definitions directly in the project folder.
The board definition file has a few sections, most notablly build for build information, debug for information needed for debug probes, frameworks as the list of supported framework = .. values, name and upload for configuration of upload tools.
How these values are used depends on the code in the PlatformIO core and the platform code. For example, using the Python code board = env.BoardConfig() to get the board config and then board.get(), these values can be extracted and used. An example for that is here, where the code confingures the C compiler flag -mcpu= in accordance to what is stored in the "cpu" attribute of the "build" section.
platform.py
This script is optional (default behavior is applied then), but many platforms make use of it.
This Python script is loaded by the core when it encounters that a project is using a certain platform = xyz value. So e.g. for a project using platform = atmelsam, PlatformIO will know to download the atmelsam platform from the registry if no present, and then run the <home>/.platformio/platforms/atmelsam/platform.py script.
The task of the platform.py script in general is to expose a class (in this case AtmelsamPlatform) that derives from the PlatformIO core’s PlatformBase class while implementing certain functions. These functions get called from the core, whcich are
The platform.py script for AtmelSAM implements these functions, along with some helper functions. Basically:
configure_default_packages()checks the board information for which Arduino core implememtation is used (switchable bybuild.core) and activates that specific package (in the form offramework-arduino-<core name>), it sets the correct compiler versions that each individual Arduino core needs, activates the packages for specific uploader programs needed for the boards and disables the unused packages. This is necessary because the Atmel SAM supports a large set of frameworks and boards, and for each them the right package must be used.get_boards()just calls intoPlatformBase.get_boards()and then calls the_add_default_debug_tools()helper function which adds board-specific debug server information to each board object. The function has the task of returning an array of all boards supported by the platform, or a specific board if theidparameter is set._add_default_debug_tools()is a function setting up thedebug["tools"]array of the board information object with information on how to start or use a certain debug tool with that board. By default, for every Atmel SAM board, the ability to debug (and upload) via the methods"blackmagic", "jlink", "atmel-ice", "cmsis-dap", "stlink"as added. You can see e.g. in the JLink exaple that a dictionarydebug["tools"]["jlink"]is set up, with information on what the package is in which the debug tool is located (tool-jlink), what the main executable is (executable,JLinkGDBServerCL.exe), and with what arguments to call this executable (arguments), made possible with information pulled from the board manifest. See e.g. how"-device", debug.get("jlink_device"))is added as one argument, with thejlink_deviceinformation coming from the board manifestconfigure_debug_options()is used to allow a slight reconfiguration of the debug options with info pulled from dynamic changes to the board manifest, as one can do via theplatformio.ini, or info from theplatformio.iniconfiguration in general. Here e.g. for adding the-speed <speed>option for JLink, pulled from here.
builder/main.py
This script must be there. It is invoked by the core as the first main SCons build script.
The builder/main.py for Atmel SAM is quite typical of all these scripts. A rough overview of the important steps: It
- Obtains the variables for the SCons enviroment (
env), the PlatformIO platform object (platform) and the board here - Sets up the to-be-used compiler executable here
- Sets up a construct of “builders”, that is converter commands that e.g. convert from the final elf file to a
.binor a.hexfile, usingobjcopyhere. - If no
framework = ..line is specified, invoke the_bare.pybuilder program here. More about framework builder scripts below. - Declares the main firmware build target (
${PROGNAME}.elf) here - Sets up uploaders. This is distinct from debuggers. Uploaders only have the ability to upload a program (think e.g., upload via bossac or avrdude) but cannot always debug a firmware. On the reverse, a debugger tool can always be used to upload a program (think e.g.,
openocdcan be used to establish a debug connection to the board and push a firmware on it). Specifically, it sets up theenvvariablesUPLOADER,UPLOADERFLAGSandUPLOADCMDwhich will later be used by PlatformIO to invoke the uploader program. Done here.
Framework builder script (e.g. frameworks/arduino.py )
After the builder/main.py, if a framework = .. has been declared in the project’s platformio.ini., the builder file corresponding to it (set via the platform.json) is invoked.
So for Arduino projects, this will e.g. be builder/frameworks/arduino.py and related.
The main task of that file is to:
- figure out which actual builder script to use (remember:different boards may use different Arduino core implementations, and each might need a different builder script) and invoke it in-line, done here
- set up the SCons build environment variables regarding compiler flags, linker flags, include directories, etc, e.g. here and here
- setup linker script
- tell SCons which source files to build, e.g. the board-specific variant code and the actual Arduino core code
The actual implementation of that can e.g. be very different from framework to framework. In some cases, this is even chained with other build system, e.g., the builder script for the ESP-IDF framework calls into ESP-IDF’s native CMake build system to extract out the build commands. For mbed-os builds, Python functionality from the mbed-cli build system and mbed-os is used. For all Arduino cores though, a builder script is written that mimicks what the Arduino IDE would do based on the compiler options found in the platform.txt file of the Arduino core (example). That’s of course the only way to stay compatible with th Arduino IDE, by having the same compiler settings and used compiler, for a given core version.
Switching platform versions and their effect
Above we could see all the things contained in the platform – board definitions, platform script and builder scripts to build stuff, and the platform.json for used packages declaration. So, using one particular version of the platform will freeze all of that. At e.g. https://github.com/platformio/platform-atmelsam/releases we can see the released versions and what changed in them. We can use these version numbers in a platform = xyz@<version> version expression in the platformio.ini to make PlatformIO use that specific version. This is very useful for freezing a project’s used versions and thus ensuring a developed firmware works, even if underlying, platform and package updates are released.
Let’s e.g. say that my project needs the Adafruit Arduino core version 1.7.2, introduced per above in platform version 6.1.0, and the project must not use the newer 1.8.3 core version, introduced with platform version 6.2.0. Then I can write
platform = atmelsam@6.1.0
to freeze the used platform. This includes all of the above, also the package.json which declares the used package version. So with this, the project will use the platform of exactly that version, all the packages it declared at that version, board definition files, builder scripts etc.
There may be special cases in which wants platform updates (for e.g. build script fixes or features) but a lower / different package version for something (e.g. the Arduino core). Then a platform_packages declaration should be used per above.
The PlatformIO core
The core lives at https://github.com/platformio/platformio-core and implements the pio commandline tool as well as all the base classes for everything else (platforms, packages, etc..). If one is interested one can read a bit through its code, I’ve already linked to important places in the core where it interacts with a platform above. Other notable parts are e.g. this where the project is basically built, in accordance with platformio.ini options like build_flags (feed into SCons as env.ProcessFlags(env.get("BUILD_FLAGS"))), build_unflags etc.
2 Likes
A Guided Tour through a Build Execution
Finally I want to make a guided tour of how exactly the compiler options are collected for a simple PlatformIO Arduino project.
We start a standard project created by pio init -b due for the Arduino Due board, that gives the platformio.ini of
[env:due]
platform = atmelsam
board = due
framework = arduino
and an empty src\main.cpp sketch with
#include <Arduino.h>
void setup() {}
void loop() {}
Per above we already know that that will then be using platform-atmelsam together with the Due’s due.json board definition file. Note some important options in there like "core": "arduino", "mcu": "at91sam3x8e", "cpu": "cortex-m3", "extra_flags": "-D__SAM3X8E__ -DARDUINO_SAM_DUE", "variant": "arduino_due_x", (upload) "protocol": "sam-ba". They will be referred to later.
Upon building of the project (pio run), the platform’s platform.py will be invoked. Most notabaly we setup the needed framework package
Which, with the info given above, will be framework-arduino-sam.
Next, the builder/main.py of the platform is invoked.
Note that the toolchain package (toolchain-gccarmnoneeabi) is not modified, so the standard version will apply.
We first grab create / grab some variables from SCons and PlatformIO
We then go on to tell the SCons construction environment what our compiler and other tools are. Refer to the above chapter about SCons and its documentation to understand that better.
We teach SCons how to convert from a .elf to a .bin file. This will be important later as the upload programm will need a .bin file, not an .elf. We do so using $OBJCOPY, which, through SCons’s variable substition, will go to arm-none-eabi-objcopy.
We tell SCons that we want the firmware (as ELF) and additionally the .bin from it (remember upload_protocol = "sam-ba")
We also inject variables in the SCons environment needed for uploading the project, triggering this code
with a small addition.
That completes main.py. Then, since we specified framework = arduino, and the platform.json has mapped
we will now be executing arduino.py.
This wrapper script will check what sub-SCons-script to execute
leading us into arduino-sam.py.
One of the first things that script will do is execute arduino-common.py.
In that file then, we start doing actual compiler flags setup with flags that are apparently common to all the Arduino cores that AtmelSAM will be compiling.
(click above to see the full code). This includes CCFLAGS for C and C++ options, CXXFLAGS, CPPDEFINES and `CFLAGS´.
It continues with some library path and linker settings. These will be used in the final link command. We can e.g. see that it links agsinst libm (math) by default. It also sets up the libraries/ folder, in which an Arduino core typically has the list of all its internal libraries, to LIBSOURCE_DIRS.
Due to the attributes set in the board definition file, we will also be triggering this code
which sets up our linker script as flash.ld from the due’s variant folder.
and again since the board definition file has the needed flags for USB, we will be hitting this code
That finishes execution of arduino-common.py, so we are back in arduino-sam.py.
In there, we add more CPPPATH (include folders!), CPPDEFINES, LINKFLAGS and LIBS, just like the original Arduino core would do.
We finish up by adding a reference to the source code of the Arduino core variant (arduino_due_x) source files, typically variant.cpp and friends, using env.BuildLibrary() and modifications to env.
And finally, the Arduino core files (source) are added to the build system.
Now the SCons environment is set up. Additionally, per links above, PlatformIO now processes special platformio.ini like build_flags for additional compiler flags, discovers used libraries and adds those to the build system etc. In this projects we are having none of those. PlatformIO will however add the extra_flags attribute of the board JSON file as flags, as listed above.
With all of this, SCons / PlatformIO can finally start building the firmware. In a verbose compilation (pio run -v), we see all the flags we have collected.
arm-none-eabi-g++ -o .pio\build\due\src\main.cpp.o -c -fno-rtti -fno-exceptions -std=gnu++11 -fno-threadsafe-statics -Os -ffunction-sections -fdata-sections -Wall -mcpu=cortex-m3 -mthumb -nostdlib --param max-inline-insns-single=500 -DPLATFORMIO=50200 -D__SAM3X8E__ -DARDUINO_SAM_DUE -DARDUINO=10805 -DF_CPU=84000000L -DUSBCON -DUSB_VID=0x2341 -DUSB_PID=0x003E “-DUSB_PRODUCT="Arduino Due"” -DUSB_MANUFACTURER="Arduino" -DARDUINO_ARCH_SAM -Iinclude -Isrc -IC:\Users\Max\.platformio\packages\framework-arduino-sam\cores\arduino -IC:\Users\Max\.platformio\packages\framework-arduino-sam\system\libsam -IC:\Users\Max\.platformio\packages\framework-arduino-sam\system\CMSIS\CMSIS\Include -IC:\Users\Max\.platformio\packages\framework-arduino-sam\system\CMSIS\Device\ATMEL -IC:\Users\Max\.platformio\packages\framework-arduino-sam\variants\arduino_due_x src\main.cpp
Is e.g. the invocation for building the main.cpp, all others are equivalent to that. You can go ahead and double check that every single compilation option listed here really comes from the pieces of code discussed above.
The final linker command would be
arm-none-eabi-g++ -o .pio\build\due\firmware.elf -T flash.ld -Os -mcpu=cortex-m3 -mthumb -Wl,–gc-sections -Wl,–check-sections -Wl,–unresolved-symbols=report-all -Wl,–warn-common -Wl,–warn-section-align -Wl,–entry=Reset_Handler -u _sbrk -u link -u _close -u _fstat -u _isatty -u _lseek -u _read -u _write -u _exit -u kill -u _getpid .pio\build\due\src\main.cpp.o -L.pio\build\due -LC:\Users\Max.platformio\packages\framework-arduino-sam\variants\arduino_due_x\linker_scripts\gcc -LC:\Users\Max.platformio\packages\framework-arduino-sam\variants\arduino_due_x -Wl,–start-group .pio\build\due\libFrameworkArduinoVariant.a .pio\build\due\libFrameworkArduino.a -lm -lsam_sam3x8e_gcc_rel -lgcc -Wl,–end-group
Which again matches what we’ve seen above, e.g. regarding the LIBS and link flags, etc.
As for uploading, when we do a pio run -t upload -v (verbose upload), we see
Auto-detected: COM13
Forcing reset using 1200bps open/close on port COM13
bossac --info --debug --port “COM13” --write --verify --reset --erase -U false --boot .pio\build\due\firmware.bin
As the upload command. The first bit is about the PlatformIO core using COM port autodetection (and reset into bootloader mode), the second part is, as defined by the main.py code, the invocation for bossac as configured for that board.
Do I need to understand all this to develop with PlatformIO?
No. I’d say in 99% of cases, users do need to know how PlatformIO works internally, beyond how it is described in the documentation. Having to touch a platform manifest, platform script, a builder script or board definition file is rare. Most things can be solved with simple platformio.ini instructions without ever touching those things above. For more advanced use cases, scripting is also supported.
- Don’t like a particular compiler flag that the builder script set for you?
build_unflagsit. - Want a particular compiler flag (e.g., a define, include directory, optimization flag, ..) that the builder script didn’t set for you? Add it via
build_flags. - Don’t like a specific attribute that was set it the board definition file? Change it dynamically using
board_<section>.<attribute> = <value>(example). - Need to exclude certain files from the build that were auto-included?
srcFilterthem. - Need to add a flag to the upload execution?
upload_flags. - Need to modify the SCons environment (and thus have access to all the compiler settings via a script) for some really specially stuff? Use
extra_scriptsand Advanced Scripting. - You want to do something special in the project’s build process, like executing some action before or after a file is compiled? Use above Advanced Scripting with Pre- and Post actions.
- Need some custom upload method that PlatformIO does not implement by default? Use the
upload_commandin theplatformio.inior Advanced Scripting. - Need to invoke some custom debug server with flags that PlatformIO doesn’t implement? Use
debug_serverand friends. - Don’t like the package version or source that the build script gives you? Use
platform_packagesor specify a different version of platform. - Your library needs to be built in a special way (e.g., compiler flags, linking precompiled file, custom logic at each compilation,..)? Use a library.json, which also has the possibility to use advanced scripting.
- etc., etc..
Documentation and further reading
Refer to the official documentation
platform_packages- Custom Platform (explains well how in general platforms work)
- Custom boards
- using different releases of a platform, e.g. Atmel SAM
- Advanced Scripting
- Platform configuration options
- Framework configuration options
And these topics
- Custom framework? or platform? - #2 by maxgerhardt
- How to specify desired version of an installed framework? - #6 by maxgerhardt
- the lower half of Help Creating Custom Platform that builds and uploads custom firmware - #4 by maxgerhardt
- How to import/use custom arduino board for STM32L4 - #5 by maxgerhardt
And of course the source code for the linked entities, such as the PlatformIO core, platforms, builder scripts, etc, for a more info on these specific topics.
2 Likes
Thank you very much for the very detailed information, this -and the guided tour through a build execution- is most helpful!
Hi Max Gerhardt,
It has been a while since I have been in touch. You have helped me successfully last year to setup the correct settings in platformio for debugging code on my SAM3x8e.
I am developing firmware for a medical device, and so far it has been safer to stick to the tools that I have been working with. However, there has come a situation where I am forced to switch to platformio for good, as I need to have full control over the processor configuration.
In particular, we have ordered a number of sam3x4e processors, due to a shortage of sam3x8e. They are completely identical apart from their flash memory size, which is half (2x128kB) for the sam3x4e. The compiled code is only 65k and still works if compiled via the Arduino IDE, but I cannot write and read from flash using some Arduino libraries.
What would I need to do in order to change the description from sam3x8e to sam3x4e, would I only need to update platform.ini and my custom script with the chip name and maximum memory? The attached screeen shots are for my sam3x8e, which do work well.
Many thanks,
Clemens
My first thoughts would be to create a new board JSON that basically copies the due.json but adapts the chip name and macros accordingly. But if the identifying macro is changed (-D__SAM3X8E__) one would probably also need a custom version of GitHub - arduino/ArduinoCore-sam so that possibly existing sanity checks (ifndef __SAM3X8E__) don’t trigger. If really all peripherals are the same and only flash size is different, one might get away with a way cheaper on-the-fly modificaitons of just the flash size while leaving all original macros intact.
; size limit by PlatformIO
board_build.maximum_size = 262144
; adapted debug server for 4x instead of 8x
; (if OpenOCD scripts exist)
notice that the original linker script values would be unaffected by that, this is just a PlatformIO failsafe. If you want to do it cleanly, create a new variant (aka copy of arduino_due_x with all chip-specific changes done).
They may index the flash out-of-bounds with the SAM3x8e flash size hardcoded. What exact library are you using? You might be able to correct that one.
build_type = release with build_flags = -Og and build_unflags = -Os is odd. -Og is debug optimization which is used then. If you have a smaller flash size, better keep the default -Os optimization for space savings.
Hi Max,
thanks a lot for your fast reply, that is really impressive!
With regards to the Flash library, I am using the Due Flash storage
DueFlashStorage/DueFlashStorage.h at master · sebnil/DueFlashStorage · GitHub
I am sure that some header #defines for the memory size/ start addresses can be redefined, but I am anyhow tending now to switch from flash storage to external EEPROM storage (which we do happen to have on an RFID chip) as I like to keep them separated. I only need a few bytes for configuration purposes.
I believe that I will stick to the easier solution (for adapting to the sam3x4e) and just limit the maximum flash memory size. I do not want to change compiler switches as I do not want to “rig” the settings once they work. The memory requirement of the code is really small, so I will not need any size optimization.
Best regards,
Clemens
Likely
is wrong because IFLASH1_SIZE is wrong. And IFLASH1_SIZE is wrong because the Atmel CMSIS headers return the wrong value for it when __SAM3X8E__ is defined and not __SAM3X4E__.
vs
You could fork the library and just modify IFLASH_LAST_PAGE_ADDRESS though if needed.
Hi Max,
that makes perfect sense. So I thought about adding something like this into the flash_efc header
(except for the #define 3SAM4XE, which I intend to put into the main program):
// Choose Processor Variant SAM3x4/8
#define SAM3X4E
//#define SAM3X8E
#ifdef SAM3X4E
#undef IFLASH1_SIZE
#define IFLASH1_SIZE (0x20000u)
#endif
/* Last page start address. */
#define IFLASH_LAST_PAGE_ADDRESS (IFLASH1_ADDR + IFLASH1_SIZE - IFLASH1_PAGE_SIZE)
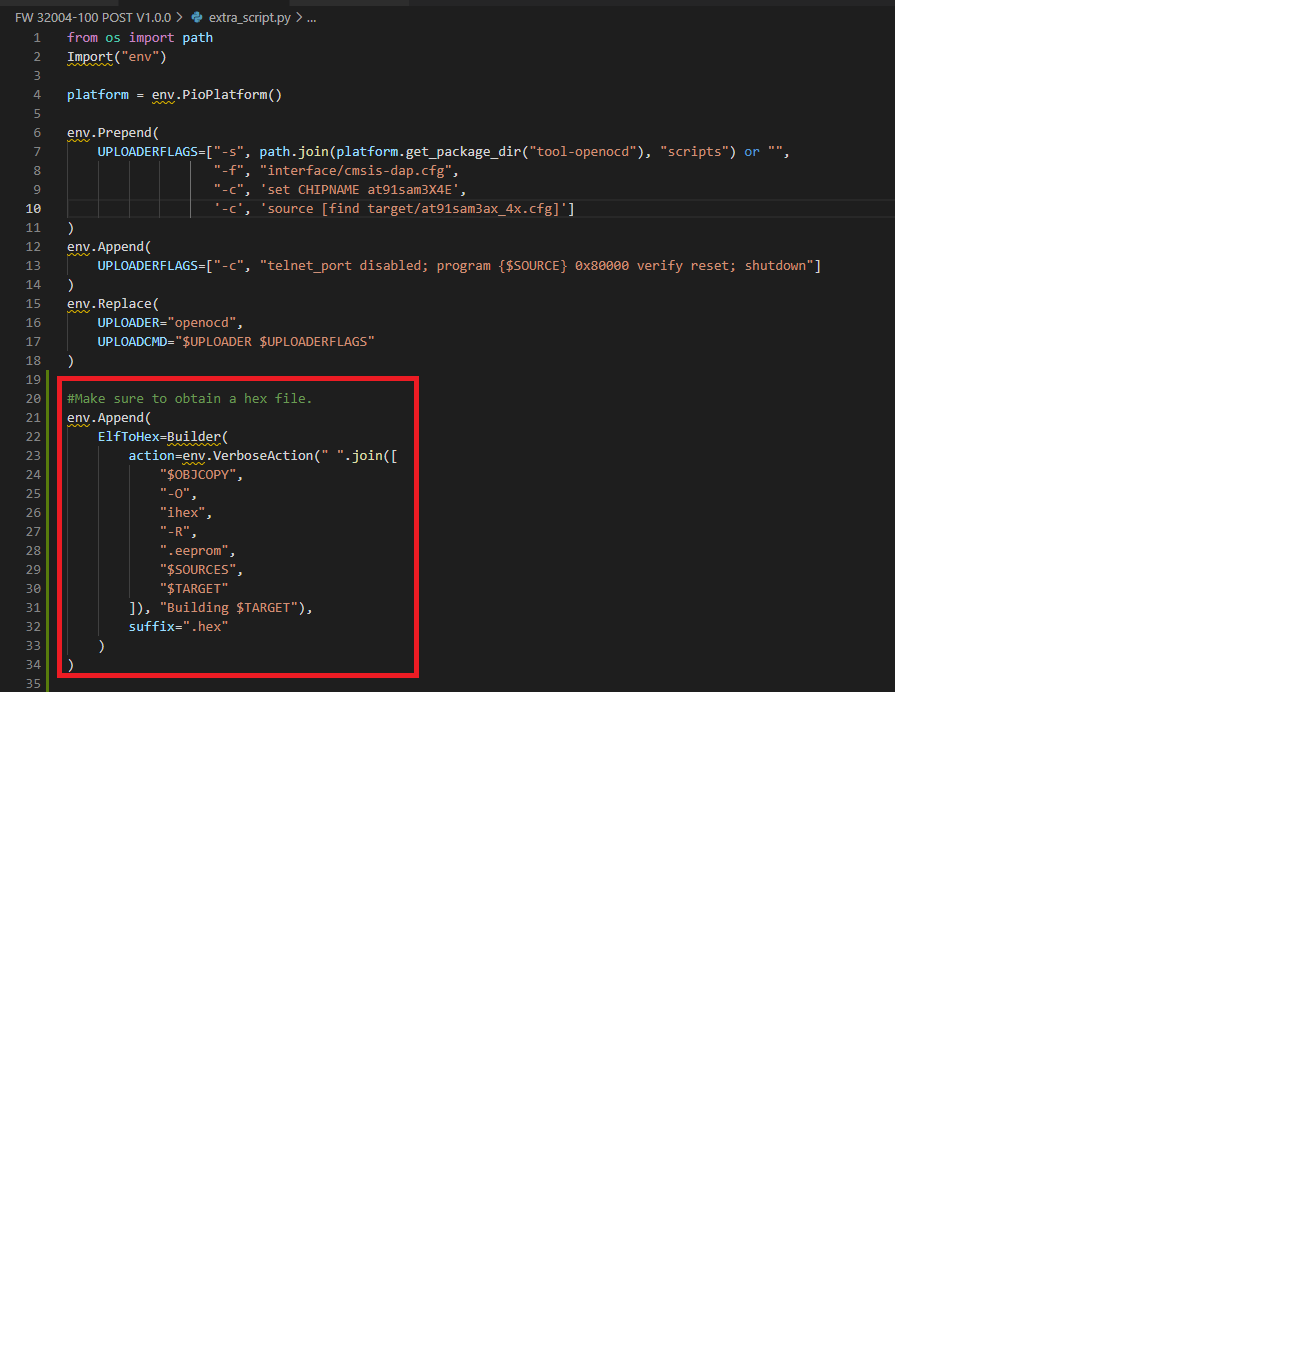
I have gone through your explanation for the internals of Platformio again and I have tried to be “smart”. I wanted to tell the environment to use objcopy to convert a hex file form the resulting elf. I must have misunderstood something, because to me it does not seem to be clear where that information had to be entered, and at which time. To me the “env” seems like a giant object that contains everything there is to know about the build job, and which can be amended in any script from which. It should represent a memory construct such as an instantiated class in C++, and env.append would just append that information during runtime (okay all is runtime, as Python is a script). So I have added the last box in red to my “extra_script.py” which is referenced in platformio.ini. The question is : Why did the builder ignore that instruction? Did it come at the wrong time or in the wrong location?
Sorry, can you open a new topic about this with the used scripts and platformio.ini etc. copied as texts instead of screenshots? As to not go too far from the original topic.
Sure. I’ll open a new topic.