Hi, It’s really nice but… How we can use it when we try to work with external libraries at main which must be used by splited files?
I’m not sure what you mean by that. It means the external lib has some header file and it needs to be used in multiple source files in the src/ folder? Can you give a concrete example?
Buenas noches.
Creo que lo que intenta decir Poleg, es algo parecido a lo que me pasaba a mí, cuando hice la transformación de los programas del ROV, del entorno Arduino al entorno VSC, que hay bastantes librerías que se utilizan con normalidad en el entorno Arduino, que aun no están convalidadas a VSC + PIO. Sin embargo Poleg ya tiene los archivos divididos.
Supongo que quiere decir, que tiene que haber una manera de decirle al programa que busque las librerías en alguna carpeta, incluso cuando el programa está dividido.
Maxgerhardt, me dio la solución, para poder utilizar las bibliotecas de Arduino, pero mi programa no estaba dividido.
Si Poleg pudiera ser un poco más preciso, e indicar con que librerías concretas tiene problemas, a lo mejor sería más fácil poder ayudarle.
Esta es la respuesta que me diste, supongo que abra que adaptarla a cuando un programa ya esta dividido.
Blockquote
asesorplaza1:
src \ main.cpp: 154: 54: error fatal: PS2X_lib.h: No existe tal archivo o directorio
La biblioteca PS2X aún no está registrada en PlatformIO: le sugiero que vaya a GitHub - simondlevy/PS2X_lib: Arduino Playstation2 library with compiler warnings fixed , descargue el archivo ZIP ( https://github.com/simondlevy/PS2X_lib/archive/master.zip ) , a continuación, crear una nueva carpeta en la lib/ llamada PS2X_lib donde se coloca en los archivos del archivo ZIP de modo que la estructura es …
lib/
PS2X_lib/
PS2X_lib.cpp
PS2X_lib.h
...
luego agrega la línea
lib_deps =
PS2X_lib
en el platformio.ini para que PlatformIO busque la biblioteca.
Blockquote
Un saludo.
Good night.
I think what Poleg is trying to say is something like what happened to me, when I did the transformation of the ROV programs, from the Arduino environment to the VSC environment, that there are quite a few libraries that are used normally in the Arduino environment, which are not yet validated to VSC + PIO. However Poleg already has the files split.
I suppose it means, there has to be a way to tell the program to look for libraries in some folder, even when the program is split.
Maxgerhardt, gave me the solution, to be able to use the Arduino libraries, but my program was not divided.
If Poleg could be a little more accurate, and indicate which specific libraries have problems with, it might be easier to help you.
This is the answer you gave me, I suppose I open it to adapt it to when a program is already divided.
asesorplaza1:
src\main.cpp:154:54: fatal error: PS2X_lib.h: No such file or directory
The PS2X library is not yet registered with PlatformIO – I suggest you go to GitHub - simondlevy/PS2X_lib: Arduino Playstation2 library with compiler warnings fixed, download the ZIP file (https://github.com/simondlevy/PS2X_lib/archive/master.zip), then create a new folder in lib/ called PS2X_lib where you put in the files from the ZIP file so that the structure is …
lib/
PS2X_lib/
PS2X_lib.cpp
PS2X_lib.h
...
then add the line
lib_deps =
PS2X_lib
into the platformio.ini so that the library is looked for by PlatformIO.
Blockquote
Greetings.
Pues os comento, el proyecto en sí es un combinación de usos para la utlización del MFRC522 (Lector RFID)
La idea es tener el main en el que estén el setup y el loop. En el loop aparece la petición de modo de trabajo, y tras la introducción por parte del usuario se hace la llamada a uno de los archivos divididos.
El problema es que los objetos creados en el main y deben usarse en los dividos da error
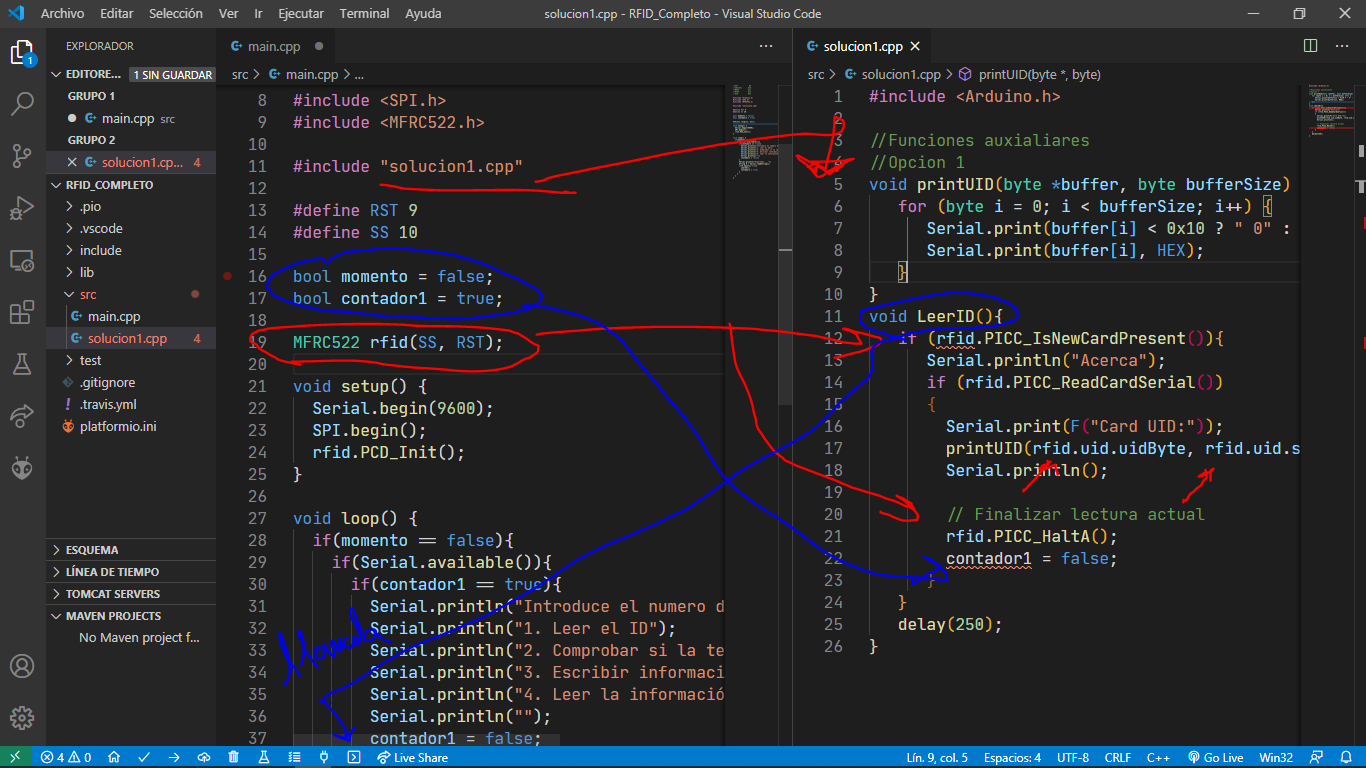
So you have created global variables in your main.cpp and need to use them in your solucion1.cpp.
Your problem is that these global variables are not known to your main.cpp and also that you #include a CPP FILE in another cp file. That will lead to double-definition behaviours.
To resolve it, do:
- remove
#include solucion1.cppfrommain.cpp - create the new file
src/global_vars.hwith the content
#ifndef GLOBAL_VARS_H
#define GLOBAL_VARS_H

/* types for global vars */
#include <MFRC522.h>
/* global vars */
extern MFRC522 rfid;
extern bool momento;
extern bool contador1;

#endif
- in
solucion1.cpp, add a#include "global_vars.h"
Now your global variables have been declared extern in a header file which every other cpp file can include.
This is the exact same technique as outlined in all the posts above.
1 Like
Mmmmmm I thought in that, but I didn’t know the concept “extern” thanks a lot…
But, where I initialize extern variables and objets?
And… I should make an #include "solucion1.cpp" at main? Because I need some functions that are coded there
You do not include the implementation (the source code which implements the function), only the function or variable declaration. So no #include "solucion1.cpp".
In one .cpp file only. The extern keyword makes a simple declaration “the exists a variable of this type and name somewhere”. It doesn’t create the variable or define its value. In fact, if you declare the existence of a variable which is never defined, you get an undefined reference error.
See e.g. variable declaration - When to use extern in C++ - Stack Overflow
2 Likes
So how I should do it? I cant see it, sorry
The post above shows you how to create a header file which declares all your global variables and use them in your other cpp file. That’s the solution.
1 Like
ok, thanks for your time
Hi alll, i’m quite a beginner in programming world; i would like to show here an example code to understand if i have well learned splitting principles:
main.cpp
#include "Arduino.h"
#include "main.h"

int delay_ms= 250;

// Set LED_BUILTIN if it is not defined by Arduino framework
// #define LED_BUILTIN 13

void setup()
{
  // initialize LED digital pin as an output.
  pinMode(LED_BUILTIN, OUTPUT);
}

void loop()
{
  blink();
}
main.h
#ifndef MAIN_H
#define MAIN_H

/* types for global vars */

/* global vars */

extern int delay_ms;

// prototypes don't need named attributes in the .h file

void blink();

#endif
blink.cpp
#include "Arduino.h"
#include "main.h"

void blink(void)
{
  // turn the LED on (HIGH is the voltage level)
  digitalWrite(LED_BUILTIN, HIGH);

  // wait for a second
  delay(delay_ms);

  // turn the LED off by making the voltage LOW
  digitalWrite(LED_BUILTIN, LOW);

   // wait for a second
  delay(delay_ms);
}
This code works but i have a doubt: is it all ok? Syntax and form are correct? There is something that can be done in a better way?
The example is syntactically correct indeed. You’ve splitted the function and the global variables accross the files correctly.
Now, this are are purely subjective “style” comments but it is general aggreed that global variables should only be used very sparingly (Why global variables are evil). The global variable used in the blink function in that case seems like a bad idea, style wise, since it’s not necessary. You can remove the global state dependency by making the delay_ms an argument of the function. You could also make the pin then an argument of the function. The less global state the better.
Of course, it still makes sense in some cases to have global variables: Like global objects for a e.g. display object, sensor object etc. But parameters which only matter to one function should be taken as an argument.
2 Likes
Thank you!, very clear and concise explanation, even for me 
Then I will study also best practices as soon as possible.
It certainly looks like you got the idea. I would suggest that instead of calling the header main.h to call it blink.h (updating the include guard, etc, naturally), since it seems to relate to the blink.cpp code, rather than the main.cpp code.
The people who learned C first and then Arduino don’t understand what the Arduino-> PlatformIO migrants are going through.
Arduino doesn’t teach us what they’re doing behind the curtain, what you learned in class and from talking to other programmer peers. I’m trying to learn C well enough to use ESP-IDF, but I’m learning along the way that there are a lot of things I don’t understand- things I didn’t know were things. Holes have opened under my feet, along a path I’ve walked a thousand times.
I support the posters who want dedicated tutorials for the Arduino literate. I’m reading and using online reference guides, and I’m learning, but there are too many unknown unknowns to make this a graceful transition- and this is the transition EVERYONE is going to have to make. You reach the edges of Arduino.
What I really want is someone starting with a moderately complex .ino file- something with a few functions beyond loop and setup and some includes and definitions, and convert it to a proper .cpp source file. How do you rewrite this stuff, so you don’t use all the Arduino build-ins?
Please show me how to declare an OLED for example, because what I’m doing doesn’t work.
4 Likes
I have no idea if this will prove useful to those hoping for an example of converting an Arduino Sketch to PlatformIO, but maybe it will help Arduino converts to understand why things are not as simple as at first expected.
The Arduino system does a “shed load” (technical term) of stuff in the background. I have a book on the internals of the Arduino Software - which I’m not going to mention here - if you need further information.
The IDE will open all *.ino, *.cpp, *.h and *.c files that it finds in the sketch directory. These files will be opened on separate tabs in the editor. When you compile a sketch the following happens:
Preprocessing:
A temporary directory is created, on the sketch’s very first compilation, in the Operating System’s “temp” area. This is /tmp on Linux (and MacOS?) or something like c:\users\YOUR_NAME\AppData\Local\Temp\arduino_build_SOME_NUMBER on Windows. From here on in, I shall refer to this location as $TMP.
If the sketch has a number of *.ino files, all of them are concatenated into a single file with the extension .ino.cpp in the $TMP/Sketch subdirectory. The first file added to this working file, is the main *.ino - the one with the same name as the sketch’s own directory.
The remainder of the *.ino files are appended to the working file in alphabetical order.
If the sketch only has one *.ino file, it is processed as above, by itself, into the working file.
At the top of the working file, #include <Arduino.h> is added, if it was not already found in the original sketch.
Any libraries used by the sketch are detected and the include path for those are discovered. This is done by running a dummy compilation, discarding the output - to the nul device on Windows or the /dev/null on Linux - but processing any relevant error messages.
Function prototypes are generated for all the functions found in the working *.ino.cpp file. Occasionally, this is not possible for all functions, so the programmer has to add one, manually, to the main sketch *.ino file, to get it to compile.
The *.ino.cpp working file is preprocessed to add various #line and #file directives so that any subsequent error messages will reference the correct source file and line numbers within, rather than referencing the full, working *.ino.cpp file’s name and line numbers.
The Arduino Preprocessor carries out all these actions and it can be found on GitHub at GitHub - arduino/arduino-preprocessor: Parses an Arduino Sketch and converts it into valid C++ source code - if you are interested.
Build:
After preprocessing, the Arduino Build tool takes over. It too lives on GitHub at GitHub - arduino/arduino-builder: A command line tool for compiling Arduino sketches - again, if you are interested.
The build process starts by compiling the working *.ino.cpp file in the temporary directory created earlier. This is compiled into an object file named *.ino.cpp.o and stored/written to the $TMP/Sketch subdirectory.
Any additional *.c and *.cpp files in the Sketch’s original directory are now compiled into separate object files in the $TMP/Sketch subdirectory. This may not be necessary if the various source files have not been edited since the previous compilation. The existing *.o files will be reused.
All the libraries used will be compiled into multiple *.o files and written to the $TMP/Libraries subdirectory.
Next up, all the Arduino “core” files are compiled as *.o files and written to the $TMP/core subdirectory. One of the files compiled here is the one which supplies the main() function. You never need to write a main() function in a sketch.
After compiling all the source files, library files and core files, a static library, core.a, is built in the $TMP/core subdirectory.
An ELF format file is then created by linking all the *.o files in $TMP/Sketch and $TMP/Libraries with the core.a static library created above. This file is written to the $TMP directory and named as SKETCH_NAME.ino.elf.
SKETCH_NAME.ino.elf is then processed to create SKETCH_NAME.ino.eep which holds any data defined as being required to be written to the AVR’s EEPROM. Sadly, the Arduino IDE cannot (yet) upload *.eep files to the EEPROM, so this is a bit of a waste of time.
SKETCH_NAME.ino.elf is then processed again to create SKETCH_NAME.ino.hex which is, finally, the code that will be uploaded to the Arduino.
So, there you have it. A lot of work goes on in the background and is hidden from you by the Arduino system. Real C++ programs require you to declare function prototypes before use so that the compiler can set up the correct stack frames to call and return from same, and to return the correct data types from non void functions. The Arduino attempts to do all this for you so that you don’t have to worry about it.
Edited to correct abysmal spelling!
HTH
Cheers,
Norm.
7 Likes
I contributed earlier, but I now have a more comprehensive understanding of the Arduino-PIO transition. Some of it is ‘how we do stuff here’ stuff you just have get yelled at you by the nerds.
None of the differences are tangible to the Arduino newcomer. I plan to post something that I’d like to end up being that Arduino Migration Tutorial mentioned in the first lines of this post. Please look for it. I’m going to actually write it offline, proofread it and then share it. And hopefully we can destroy all the errors before anyone sees it. Just you and me, right?
Have a great weekend.
1 Like
I’ve been working on this, on and off, for a while. Other things got in the way but it’s now done. This is a small (contrived) tutorial on how to make a multi-file Arduino Sketch into a proper C+ project. Enjoy.
The Arduino Sketch
The multi-file Arduino sketch I’m using for this brief(!) tutorial is made up of a number of different *.ino files. These are, somewhat contrived, but it’s a small example. The sketch is called Blink_multifile and the files are:
Blink_multifile.inoloop.inosetupPins.inoflashLED.ino
The main file, Blink_multifile.ino is as simple as this:
void setup() {
  setupPins();
  flashLED(4, 125);
}
As you can see, there’s nothing here except the setup() function which calls out to the other functions required to do all the setting up for the sketch.
The loop() function is found in loop.ino surprisingly enough, which looks like this:
void loop() {
    flashLED(1, 1000);
}
As you can see, there’s not much going on here either. The loop function calls out to yet another function, flashLED() passing two parameters. The flashLED() function lives in flashLED.ino which has the following code in it:
void flashLED(byte flashCount, int delayMS) {
    if (!flashCount)
        return;

    for (byte x = 0; x < flashCount; x++) {
        digitalWrite(LED_BUILTIN, HIGH);
        delay(delayMS);
        digitalWrite(LED_BUILTIN, LOW);
        delay(delayMS);
    }
}
That’s looking better, we can see that the first parameter is the number of times a flash is required, while the second is the delay, in microseconds, between flashes. All that’s left now is the setupPins() function which lives in setupPins.ino:
void setupPins() {
    pinMode(LED_BUILTIN, OUTPUT);
}
That’s all there is to it. The built in LED is defined as an OUTPUT pin.
The sketch can be compiled and will run as the usual “Blink” example, with the addition of 4 quick flashes executed from the setup() function.
The next step is to import this sketch, unchanged, into PlatformIO.
Conversion to PlatformIO
In VSCode, if the “PlatformIO Home” page is not open, click on the “alien” head on the far left toolbar to open the PlatformIO Quick Access task list. Then, under “PIO Home” in the list of available tasks, select “open” and the PlatformIO Home page will open.
Import Arduino Project
On the PlatformIO Home page, click the “Import Arduino Project” button. Select a board, in my case it was an Uno, so I typed “uno” (without quotes) and it listed Arduino Uno.
Now navigate to where the Blink_multifile sketch lives and click the “Import” button. Wait a second or two and the sketch will be imported. It will be given a name similar to yymmdd-hhmmss-uno. You can save it with a different name later. The project will have been imported into your default location for PlatformIO projects.
If you open the src folder, you will see all the same files from the original sketch, with the same names.
Build Arduino Project
Click the normal toolbutton to build a sketch. It’s a “tick” or “checkmark” depending on where you live in the world. The sketch will compile quite happily and without any errors. You can upload it now to test the conversion, but we know it works already, so I’m not going to!
Convert ino files to cpp
This is easy! In VSCode, on the left side, open the file explorer if it isn’t already open. Right click each file in turn and rename it from *.ino to *.cpp. Ignore the prompt from VSCode that it doesn’t understand ino files and the offer to load an extension to make your life easier. It won’t!
That was easy, run another build to see if we have broken anything…
> Executing task in folder 201003-171408-uno: platformio run --target upload <

Processing uno (platform: atmelavr; board: uno; framework: arduino)
----------------------------------------------------------------------------------------------------------------------------------------
Verbose mode can be enabled via `-v, --verbose` option
CONFIGURATION: https://docs.platformio.org/page/boards/atmelavr/uno.html
PLATFORM: Atmel AVR (2.2.0) > Arduino Uno
HARDWARE: ATMEGA328P 16MHz, 2KB RAM, 31.50KB Flash
DEBUG: Current (simavr) On-board (simavr)
PACKAGES:
 - framework-arduino-avr 5.0.0
 - tool-avrdude 1.60300.200527 (6.3.0)
 - toolchain-atmelavr 1.50400.190710 (5.4.0)
LDF: Library Dependency Finder -> http://bit.ly/configure-pio-ldf
LDF Modes: Finder ~ chain, Compatibility ~ soft
Found 5 compatible libraries
Scanning dependencies...
No dependencies
Building in release mode
Compiling .pio/build/uno/src/Blink_multifile.cpp.o
Compiling .pio/build/uno/src/flashLED.cpp.o
src/Blink_multifile.cpp: In function 'void setup()':
src/Blink_multifile.cpp:2:13: error: 'setupPins' was not declared in this scope
   setupPins();
             ^
src/Blink_multifile.cpp:3:18: error: 'flashLED' was not declared in this scope
   flashLED(4, 125);
                  ^
*** [.pio/build/uno/src/Blink_multifile.cpp.o] Error 1
src/flashLED.cpp:1:15: error: variable or field 'flashLED' declared void
 void flashLED(byte flashCount, int delayMS) {
               ^
src/flashLED.cpp:1:15: error: 'byte' was not declared in this scope
src/flashLED.cpp:1:32: error: expected primary-expression before 'int'
 void flashLED(byte flashCount, int delayMS) {
                                ^
*** [.pio/build/uno/src/flashLED.cpp.o] Error 1
====================================================== [FAILED] Took 0.73 seconds ======================================================
The terminal process "platformio 'run', '--target', 'upload'" terminated with exit code: 1.
That was unexpected, what happened? The Arduino happened, that’s what! Double click on Blink_multifile.cpp to open it in the editor and add these lines to the very top:
void setup();
void loop();
void setupPins();
void flashLED(byte flashCount, int delayMS);
Save and build again.
Compiling .pio/build/uno/src/flashLED.cpp.o
src/Blink_multifile.cpp:4:15: error: variable or field 'flashLED' declared void
 void flashLED(byte flashCount, int delayMS);
               ^
src/Blink_multifile.cpp:4:15: error: 'byte' was not declared in this scope
src/Blink_multifile.cpp:4:32: error: expected primary-expression before 'int'
 void flashLED(byte flashCount, int delayMS);
                                ^
src/Blink_multifile.cpp: In function 'void setup()':
src/Blink_multifile.cpp:8:18: error: 'flashLED' was not declared in this scope
   flashLED(4, 125);
                  ^
*** [.pio/build/uno/src/Blink_multifile.cpp.o] Error 1
src/flashLED.cpp:1:15: error: variable or field 'flashLED' declared void
 void flashLED(byte flashCount, int delayMS) {
               ^
src/flashLED.cpp:1:15: error: 'byte' was not declared in this scope
src/flashLED.cpp:1:32: error: expected primary-expression before 'int'
 void flashLED(byte flashCount, int delayMS) {
                                ^
*** [.pio/build/uno/src/flashLED.cpp.o] Error 1
Still a few errors. The first is in the file flashLED.cpp – the listed file name is flashLED.cpp.o but that’s the name of the object file that the compiler is creating. The source file is the given filename without the .o on the end.
Double-click on flashLED.cpp to open it in the editor.
The error is indicating that byte is not known. This is true, in C++ there isn’t a standard data type known as byte, it’s an Arduino thing. Add this line to the top of flashLED.cpp:
#include <stdint.h>
The angle brackets are required as this file is supplied with the compiler, and is a “system” header file.
Change the function header to the following:
void flashLED(int8_t flashCount, int delayMS)
We have replaced byte which is an 8 bit signed data type, with int8_t which is another, standard, 8 bit signed data type.
Edit Blink_multifile.cpp and make the same changes, add the #include and change the declaration of flashLED() to match the change above.
Save the file before running another build. We still have errors, the first of which is:
src/flashLED.cpp: In function 'void flashLED(int8_t, int)':
src/flashLED.cpp:7:10: error: 'byte' was not declared in this scope
     for (byte x = 0; x < flashCount; x++) {
Silly me, I forgot to check for more bytes. Edit flashLED.cpp again, and change byte to int8_t as before, then build again. More errors:
Compiling .pio/build/uno/src/loop.cpp.o
src/flashLED.cpp: In function 'void flashLED(int8_t, int)':
src/flashLED.cpp:8:22: error: 'LED_BUILTIN' was not declared in this scope
         digitalWrite(LED_BUILTIN, HIGH);
                      ^
src/flashLED.cpp:8:35: error: 'HIGH' was not declared in this scope
         digitalWrite(LED_BUILTIN, HIGH);
                                   ^
src/flashLED.cpp:8:39: error: 'digitalWrite' was not declared in this scope
         digitalWrite(LED_BUILTIN, HIGH);
                                       ^
src/flashLED.cpp:9:22: error: 'delay' was not declared in this scope
         delay(delayMS);
                      ^
src/flashLED.cpp:10:35: error: 'LOW' was not declared in this scope
         digitalWrite(LED_BUILTIN, LOW);
Now it looks like the compiler has forgotten what all the Arduino Language is about. Why is this?
One of the things that the Arduino IDE and Language hide from you is the fact that certain header files need to be #include'd. One of these is Arduino.h, so add the following line to flashLED.cpp just below the existing #include <stdint.h> line.
#include "Arduino.h"
This time, the file name is in double quotes as this is not a compiler supplied system header. This time, we appear to have a single error:
Compiling .pio/build/uno/src/loop.cpp.o
src/loop.cpp: In function 'void loop()':
src/loop.cpp:2:21: error: 'flashLED' was not declared in this scope
     flashLED(1, 1000);
                     ^
*** [.pio/build/uno/src/loop.cpp.o] Error 1
And it’s in loop.cpp this time. What’s up? Double-click to open the file.
The problem is, while we told Blink_multifile.cpp about all the other functions, we didn’t tell the other files about the functions. We need a new file, lets call it functions.h. Click the VSCode button for a new file (or File -> New File).
When the new empty tab appears, cut the #include <stdint.h> and the list of functions from Blink_multifile.cpp and paste them into the new tab. Save the file as functions.h in the PlatformIO project’s include folder, not in the original Arduino project. (Ask me how I know!)
Now edit `functions.h`` to make it look as follows:
#ifndef FUNCTIONS_H
#define FUNCTIONS_H

#include <stdint.h>
#include "Arduino.h"

void setup();
void loop();
void setupPins();
void flashLED(int8_t flashCount, int delayMS);

#endif  // FUNCTIONS_H
We’ve added the stdint.h and Arduino.h headers into this file too, for convenience.
Blink_multifile.cpp should be edited to look like this:
#include "functions.h"

void setup() {
  setupPins();
  flashLED(4, 125);
}
Loop.cpp also needs to be edited to resemble this:
#include "functions.h"

void loop() {
    flashLED(1, 1000);
}
Try another build. Let’s see how we are doing… still errors.
Building in release mode
Compiling .pio/build/uno/src/Blink_multifile.cpp.o
Compiling .pio/build/uno/src/flashLED.cpp.o
src/flashLED.cpp:3:15: error: variable or field 'flashLED' declared void
 void flashLED(int8_t flashCount, int delayMS) {
               ^
src/flashLED.cpp:3:15: error: 'int8_t' was not declared in this scope
src/flashLED.cpp:3:34: error: expected primary-expression before 'int'
 void flashLED(int8_t flashCount, int delayMS) {
                                  ^
*** [.pio/build/uno/src/flashLED.cpp.o] Error 1
It seems I forgot to tell flashLED.cpp about the stdint.h header file. As I’ve added that into functions.h, we might as well include that. Edit flashLED.h to resemble the following:
#include "functions.h"

void flashLED(int8_t flashCount, int delayMS) {
    if (!flashCount)
        return;

    for (int8_t x = 0; x < flashCount; x++) {
        digitalWrite(LED_BUILTIN, HIGH);
        delay(delayMS);
        digitalWrite(LED_BUILTIN, LOW);
        delay(delayMS);
    }
}
Another build is called for I think. More errors, sigh!
Building in release mode
Compiling .pio/build/uno/src/flashLED.cpp.o
Compiling .pio/build/uno/src/loop.cpp.o
Compiling .pio/build/uno/src/setupPins.cpp.o
Archiving .pio/build/uno/libFrameworkArduinoVariant.a
src/setupPins.cpp: In function 'void setupPins()':
src/setupPins.cpp:2:13: error: 'LED_BUILTIN' was not declared in this scope
     pinMode(LED_BUILTIN, OUTPUT);
             ^
src/setupPins.cpp:2:26: error: 'OUTPUT' was not declared in this scope
     pinMode(LED_BUILTIN, OUTPUT);
                          ^
src/setupPins.cpp:2:32: error: 'pinMode' was not declared in this scope
     pinMode(LED_BUILTIN, OUTPUT);
                                ^
*** [.pio/build/uno/src/setupPins.cpp.o] Error 1
It looks like the setupPins() function has forgotten what LED_BUILTIN and OUTPUT are for. We need to add in the Arduino.h header in this file, to tell it. as we added that header file to our functions.h file, we can #include that here too. Edit setupPins.cpp and add the following line to the top:
#include "functions.h"
I wonder what will happen if we build it again?
Processing uno (platform: atmelavr; board: uno; framework: arduino)
----------------------------------------------------------------------------------------------------------------------------------------
Verbose mode can be enabled via `-v, --verbose` option
CONFIGURATION: https://docs.platformio.org/page/boards/atmelavr/uno.html
PLATFORM: Atmel AVR (2.2.0) > Arduino Uno
HARDWARE: ATMEGA328P 16MHz, 2KB RAM, 31.50KB Flash
DEBUG: Current (simavr) On-board (simavr)
PACKAGES:
 - framework-arduino-avr 5.0.0
 - toolchain-atmelavr 1.50400.190710 (5.4.0)
LDF: Library Dependency Finder -> http://bit.ly/configure-pio-ldf
LDF Modes: Finder ~ chain, Compatibility ~ soft
Found 5 compatible libraries
Scanning dependencies...
No dependencies
Building in release mode
Compiling .pio/build/uno/src/setupPins.cpp.o
Compiling .pio/build/uno/FrameworkArduino/CDC.cpp.o
Compiling .pio/build/uno/FrameworkArduino/HardwareSerial.cpp.o
Compiling .pio/build/uno/FrameworkArduino/HardwareSerial0.cpp.o
Compiling .pio/build/uno/FrameworkArduino/HardwareSerial1.cpp.o
Compiling .pio/build/uno/FrameworkArduino/HardwareSerial2.cpp.o
Compiling .pio/build/uno/FrameworkArduino/HardwareSerial3.cpp.o
Compiling .pio/build/uno/FrameworkArduino/IPAddress.cpp.o
Compiling .pio/build/uno/FrameworkArduino/PluggableUSB.cpp.o
Compiling .pio/build/uno/FrameworkArduino/Print.cpp.o
Compiling .pio/build/uno/FrameworkArduino/Stream.cpp.o
Compiling .pio/build/uno/FrameworkArduino/Tone.cpp.o
Compiling .pio/build/uno/FrameworkArduino/USBCore.cpp.o
Compiling .pio/build/uno/FrameworkArduino/WInterrupts.c.o
Compiling .pio/build/uno/FrameworkArduino/WMath.cpp.o
Compiling .pio/build/uno/FrameworkArduino/WString.cpp.o
Compiling .pio/build/uno/FrameworkArduino/abi.cpp.o
Compiling .pio/build/uno/FrameworkArduino/hooks.c.o
Compiling .pio/build/uno/FrameworkArduino/main.cpp.o
Compiling .pio/build/uno/FrameworkArduino/new.cpp.o
Compiling .pio/build/uno/FrameworkArduino/wiring.c.o
Compiling .pio/build/uno/FrameworkArduino/wiring_analog.c.o
Compiling .pio/build/uno/FrameworkArduino/wiring_digital.c.o
Compiling .pio/build/uno/FrameworkArduino/wiring_pulse.S.o
Compiling .pio/build/uno/FrameworkArduino/wiring_pulse.c.o
Compiling .pio/build/uno/FrameworkArduino/wiring_shift.c.o
Archiving .pio/build/uno/libFrameworkArduino.a
Indexing .pio/build/uno/libFrameworkArduino.a
Linking .pio/build/uno/firmware.elf
Building .pio/build/uno/firmware.hex
Checking size .pio/build/uno/firmware.elf
Advanced Memory Usage is available via "PlatformIO Home > Project Inspect"
RAM:   [          ]   0.4% (used 9 bytes from 2048 bytes)
Flash: [          ]   3.1% (used 1008 bytes from 32256 bytes)
===================================================== [SUCCESS] Took 2.62 seconds =====================================================
Hooray! after much wailing and gnashing of teeth, we have a build. Does it work? Try uploading, click the “->” toolbar button after plugging in your board of course. Of course it works!
Bonus - Convert to AVR C++
At this point, you can settle down and watch the LED blinking away every second if you wish, or, you can delve a little into the bowels of AVR C++. Before we head off, check this out:
Advanced Memory Usage is available via "PlatformIO Home > Project Inspect"
RAM:   [          ]   0.4% (used 9 bytes from 2048 bytes)
Flash: [          ]   3.1% (used 1008 bytes from 32256 bytes)
The Arduino sketch used 9 bytes of Static RAM, plus 1,008 bytes of Flash RAM. It’s not a lot I admit, especially when we have 2 Kb Static RAM and 32 Kb Flash RAM to play with, but sometimes it’s too much. People with 3D printers running Marlin often have to decide which features to leave out to fit in some new feature that they absolutely must have, space is limited, even with 32 Kb to fill.
Edit the Header File
Open functions.h and change it to resemble the following:
#ifndef FUNCTIONS_H
#define FUNCTIONS_H

#include <stdint.h>

// We need this to get the ATmega328p's register and pin names.
#include "avr/io.h"

// We are no longer in Arduino land.
#define LED_BUILTIN 13

void setup();
void loop();
void setupPins();
void flashLED(int8_t flashCount, int delayMS);

#endif  // FUNCTIONS_H
You will note a serious lack of a semicolon at the end of the #define, that is correct!
Edit setupPins.cpp
The setupPins.cpp file is next for editing. Currently it looks like this:
#include "functions.h"

void setupPins() {
    pinMode(LED_BUILTIN, OUTPUT);
}
Change it to the following:
#include "functions.h"

void setupPins() {
    DDRB |= (1 << DDB5);
}
Don’t ask questions at the back, all will become clear.
Edit flashLED.cpp
It’s time to change flashLED.cpp now, it currently looks like this:
#include "functions.h"

void flashLED(int8_t flashCount, int delayMS) {
    if (!flashCount)
        return;

    for (int8_t x = 0; x < flashCount; x++) {
        digitalWrite(LED_BUILTIN, HIGH);
        delay(delayMS);
        digitalWrite(LED_BUILTIN, LOW);
        delay(delayMS);
    }
}
It has lots of Arduino specific language there, we need to remove it all. Edit away and keep editing until it looks like this instead:
#include "functions.h"
#include "util/delay.h"

void flashLED(int8_t flashCount, int delayMS) {
    if (!flashCount)
        return;

    for (int8_t x = 0; x < (flashCount * 2); x++) {
        PINB |= (1 << PINB5);
        _delay_ms(delayMS);
    }
}
You will see that we have changed the for loop to double the supplied flashCount value. I’ll explain in a bit.
First Build
Build the new version of our sketch. I see these errors:
Building in release mode
Compiling .pio/build/uno/src/Blink_multifile.cpp.o
Compiling .pio/build/uno/src/flashLED.cpp.o
Compiling .pio/build/uno/src/loop.cpp.o
Compiling .pio/build/uno/src/setupPins.cpp.o
Linking .pio/build/uno/firmware.elf
/tmp/ccDTBT41.ltrans0.ltrans.o: In function `main':
<artificial>:(.text.startup+0x86): undefined reference to `setup'
<artificial>:(.text.startup+0x8e): undefined reference to `loop'
collect2: error: ld returned 1 exit status
*** [.pio/build/uno/firmware.elf] Error 1
So, what’s going on? Setup() and loop() are Arduino functions, and we are no longer using the Arduino framework. Well, actually, we still are, and the Arduino supplied main() function is still linked with our sketch code, and is calling both the setup() and loop() functions.
The use of the Arduino framework is defined in platformio.ini, so we need to change that file to inform PlatformIO that we no longer wish to use that framework. Edit platformio.ini file and remove the framework = arduino line. It should look like this, with all comments removed as well:
[env:uno]
platform = atmelavr
board = uno
Now we are running with the wolves and using plain AVR C++ as opposed to any framework language. Let’s do another build and see what happens:
Building in release mode
Compiling .pio/build/uno/src/Blink_multifile.o
Compiling .pio/build/uno/src/flashLED.o
Compiling .pio/build/uno/src/loop.o
Compiling .pio/build/uno/src/setupPins.o
Linking .pio/build/uno/firmware.elf
/home/norman/.platformio/packages/toolchain-atmelavr/bin/../lib/gcc/avr/5.4.0/../../../../avr/lib/avr5/crtatmega328p.o:(.init9+0x0): undefined reference to `main'
collect2: error: ld returned 1 exit status
*** [.pio/build/uno/firmware.elf] Error 1
We took away the Arduino supplied main() function when we omitted the Arduino framework, but we didn’t replace it. We still have the setup() and loop() functions lying around, so lets now create a replacement main() function and include those as best we can.
Edit Blink_multifile.cpp.
Edit the Blink_multifile.cpp file and make it look like this:
#include "functions.h"


int main() {
    // Setup here
    setupPins();
    flashLED(4, 125);

    // Loop here
    loop();
}
The old setup() function is gone, but the contents remain. The Arduino supplied loop() function gets called in a, ahem, loop, where it is called, exits, called again, exists again, over and over. The setup and breakdown of the function call is a tad excessive. In this version, we call loop() once. That means that loop() itself has to do the looping for us.
Edit loop.cpp
Edit the loop.cpp file and change it to the following:
#include "functions.h"

void loop() {
    while (1) {
        flashLED(1, 1000);
    }
}
You can see that I have added a simple while loop. I could have made this even more efficient by increasing the number of flashes in each call, but I leave that as an “exercise for the reader”! as we authors say when we feel a cop out coming on! 
Final Build
Build the project again. It will compile without error. But look at the stats at the end:
Advanced Memory Usage is available via "PlatformIO Home > Project Inspect"
RAM:   [          ]   0.0% (used 0 bytes from 2048 bytes)
Flash: [          ]   0.6% (used 202 bytes from 32256 bytes)
We have used zero bytes of Static RAM and only 202 bytes of Flash Ram. That’s down from 9 Static RAM bytes and 1,008 Flash Ram bytes. Sometimes this makes the difference between getting a sketch to fit your board, or not.
Ok, I could get it even smaller by merging loop.cpp and flashLED.cpp into the main loop in the Blink_multifile.cpp but that’s another exercise for the user!
What Did I do?
Look away now if you don’t want the technical details…
The Arduino Function pinMode() tells a single pin whether it is to be an input or an output pin. Input pins can have the options of enabling the pullup resistors. PinMode() does a lot of additional work in the background to disconnect certain pins from timers (for PWM) and so on. There is a bit of error checking going on as well.
In the end, pinMode() boils down to setting a single bit in one of the ATmega328’s “DDR” registers. The builtin LED pin, D13, is actually the Atmega328p’s pin 5 on the PORTB port. Each GPIO pin on the microcontroller has one of each of these registers hidden away internally:
- A data Direction Register (DDRx);
- A PORTx register for output pins;
- A PINx register for input pins.
To make a pin an output, we set its corresponding bit in the DDR register for it’s PORT. In the case of D13, we are pin 5 on PORTB, so bit 5 in DDRB needs to be set to a 1. That is all that setupPins() now has to do.
There are two ways to flash an LED attached to an output pin. The first is to set the correct bit in the PORT register to a 1, wait a little while, then clear the same bit back to a 0 and delay again. That’s too much like hard work but would resemble this for D13:
PORTB |= (1 << PORTB5);
_delay_ms(1000);
PORTB &= ~(1 << PORTB5);
_delay_ms(1000);
The first command ORs a 1 into the correct bit position, bit 5 in the PORTB register. Then we delay, then we AND a 0 into the same bit position. then another delay. These two operations, and delays, flash the LED once.
As I said, too much work. The designers of the ATmega328p decided that as the PIN register is not needed for an output pin, it can be used for other things. If you write a 1 to the correct bit in the pin’s PIN register, the pin will toggle. If it was on, it will be off and if it was off, it will turn on. To flash an LED, you need to turn it on then off, so this is what flashLED() now does, and is why I had to double the flashCount value. To get one flash of the LED, we need two toggles of the pin.
The code:
PINB |= (1 << PINB5);
_delay_ms(delayMS);
toggles the pin and delays a bit. If we do this twice we get one flash. Job done.
The Arduino function digitalWrite() takes a lot of instructions to do error checking and so on, before it gets down to the nitty gritty of turning the pin on or off. The above PINB |= (1 << PINB5) instruction does it in one step. This vastly reduces the size of your compiled sketch and allows more code to be fitted into the board.
The End.
Just before I go, this version of Blink_multifile.cpp is actually all you need. The other files can be deleted.
#include "util/delay.h"

int main() {
    // Setup here
    DDRB |= (1 << DDB5);

    for (uint8_t x = 0; x < 8; x++) {
        PINB |= (1 << PINB5);
        _delay_ms(125);
    }

    // Loop here
    while (1) {
        PINB |= (1 << PINB5);
        _delay_ms(1000);
    }
}
This version compiles down to:
Advanced Memory Usage is available via "PlatformIO Home > Project Inspect"
RAM:   [          ]   0.0% (used 0 bytes from 2048 bytes)
Flash: [          ]   0.6% (used 182 bytes from 32256 bytes)
We are now down to 182 bytes of Flash RAM from 202. Not bad considering is still does what the original sketch did.
HTH
Cheers,
Norm.
14 Likes
@normandunbar — great job in taking the time to capture these very informative posts! I am certain that they will prove to be an extremely helpful reference for those transitioning their projects between development environments and eager to understand the mechanics of the Arduino build process.
3 Likes
@normandunbar thank you so much for taking the time and effort to write this up. I read every word, it makes sense and I understand the reasoning as you explained it. Sooooo helpful. Thank You 
1 Like