Should be easily possible. I’ll write a quick tutorial here that should cover all cases. I’ll also assume 0 before-knowledge. And show how to make it maximally comfortable for PlatformIO users.
Creating and using precompiled libraries in PlatformIO projects
Creating the library project
I’ll be using a project for an Arduino Uno in the Atmel-AVR platform as example. This information applies in general to all other platforms too, like e.g. ARM based ones. Just the toolchain changes, from e.g. avr-gcc to arm-none-eabi-gcc and friends.
Let’s first inspect the PlatformIO build prcess, and what it generates and how we can use or build upon what is generated.
Project setup
We’ll write a short calculator application. The platformio.ini of the project is standard
[env:uno]
platform = atmelavr
board = uno
framework = arduino
Adding library code and firmware test code
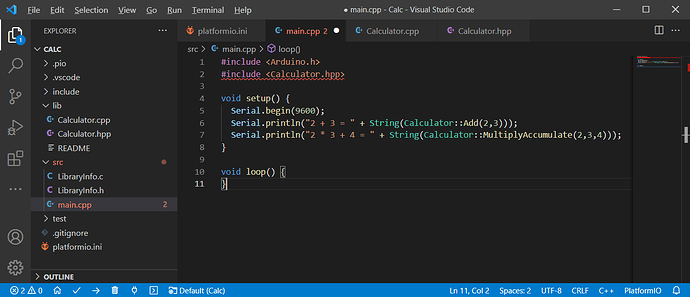
We’ll write a calculator function library. I create a new a folder in lib/ and put the files Calculator.hpp and Calculator.cpp in it. (The process is identical if writing a C library instead of C++).
The contents are
Calculator.hpp
#include <stdint.h>

class Calculator {
public:
    /* a + b */
    static int Add(int a, int b);
    /* a * b */
    static int Mul(int a, int b);
    /* a * b + c */
    static int MultiplyAccumulate(int a, int b, int c);
};
and Calculator.cpp
#include "Calculator.hpp"

int Calculator::Add(int a, int b) {
    return a + b;
}

int Calculator::Mul(int a, int b) {
    return a * b;
}

int Calculator::MultiplyAccumulate(int a, int b, int c) {
    return (a * b) + c;
}
further a src\main.cpp is added which calls these functions.
#include <Arduino.h>
#include <Calculator.hpp>

void setup() {
  Serial.begin(9600);
  Serial.println("2 + 3 = " + String(Calculator::Add(2,3)));
  Serial.println("2 * 3 + 4 = " + String(Calculator::MultiplyAccumulate(2,3,4)));
}

void loop() {
}
As an additional, we also write a piece of code in the src/ folder which we would like to re-use as a library, this time as C code. The file src\LibraryInfo.c has content
const char* GetLibraryAuthor() {
    return "Max Gerhardt";
}

int GetLibraryVersion() {
    return 10;
}
with the header file src\LibraryInfo.h being
#ifndef LIBRARYINFO_H
#define LIBRARYINFO_H

#ifdef __cplusplus
extern "C" {
#endif

const char* GetLibraryAuthor();
int GetLibraryVersion();

#ifdef __cplusplus
}
#endif

#endif
The header file is standard also contains the right content to directly use it from C++ code – since the underlying library code is written in C, we have to declare all functions as extern "C" when importing it in C++ code, due to name mangling.
Building the library project
Let’s now build the project.
Processing uno (platform: atmelavr; board: uno; framework: arduino)
-----------------------------------------------------------------------------------------------------------------------------------------------------------------------------------------------------------------------------------------Verbose mode can be enabled via `-v, --verbose` option
CONFIGURATION: https://docs.platformio.org/page/boards/atmelavr/uno.html
PLATFORM: Atmel AVR (3.0.0) > Arduino Uno
HARDWARE: ATMEGA328P 16MHz, 2KB RAM, 31.50KB Flash
DEBUG: Current (avr-stub) On-board (avr-stub, simavr)
PACKAGES:
 - framework-arduino-avr 5.1.0
 - toolchain-atmelavr 1.50400.190710 (5.4.0)
LDF: Library Dependency Finder -> http://bit.ly/configure-pio-ldf
LDF Modes: Finder ~ chain, Compatibility ~ soft
Found 11 compatible libraries
Scanning dependencies...
Dependency Graph
|-- <Calculator>
Building in release mode
Compiling .pio\build\uno\src\LibraryInfo.c.o
Compiling .pio\build\uno\src\main.cpp.o
Compiling .pio\build\uno\lib952\Calculator\Calculator.cpp.o
Archiving .pio\build\uno\libFrameworkArduinoVariant.a
Compiling .pio\build\uno\FrameworkArduino\CDC.cpp.o
Compiling .pio\build\uno\FrameworkArduino\HardwareSerial.cpp.o
Compiling .pio\build\uno\FrameworkArduino\HardwareSerial0.cpp.o
Compiling .pio\build\uno\FrameworkArduino\HardwareSerial1.cpp.o
Compiling .pio\build\uno\FrameworkArduino\HardwareSerial2.cpp.o
Compiling .pio\build\uno\FrameworkArduino\HardwareSerial3.cpp.o
Compiling .pio\build\uno\FrameworkArduino\IPAddress.cpp.o
Compiling .pio\build\uno\FrameworkArduino\PluggableUSB.cpp.o
Compiling .pio\build\uno\FrameworkArduino\Print.cpp.o
Indexing .pio\build\uno\libFrameworkArduinoVariant.a
Compiling .pio\build\uno\FrameworkArduino\Stream.cpp.o
Compiling .pio\build\uno\FrameworkArduino\Tone.cpp.o
Compiling .pio\build\uno\FrameworkArduino\USBCore.cpp.o
Compiling .pio\build\uno\FrameworkArduino\WInterrupts.c.o
Archiving .pio\build\uno\lib952\libCalculator.a
Compiling .pio\build\uno\FrameworkArduino\WMath.cpp.o
Compiling .pio\build\uno\FrameworkArduino\WString.cpp.o
Compiling .pio\build\uno\FrameworkArduino\abi.cpp.o
Compiling .pio\build\uno\FrameworkArduino\hooks.c.o
Indexing .pio\build\uno\lib952\libCalculator.a
Compiling .pio\build\uno\FrameworkArduino\main.cpp.o
Compiling .pio\build\uno\FrameworkArduino\new.cpp.o
Compiling .pio\build\uno\FrameworkArduino\wiring.c.o
Compiling .pio\build\uno\FrameworkArduino\wiring_analog.c.o
Compiling .pio\build\uno\FrameworkArduino\wiring_digital.c.o
Compiling .pio\build\uno\FrameworkArduino\wiring_pulse.S.o
Compiling .pio\build\uno\FrameworkArduino\wiring_pulse.c.o
Compiling .pio\build\uno\FrameworkArduino\wiring_shift.c.o
Archiving .pio\build\uno\libFrameworkArduino.a
Indexing .pio\build\uno\libFrameworkArduino.a
Linking .pio\build\uno\firmware.elf
Checking size .pio\build\uno\firmware.elf
Building .pio\build\uno\firmware.hex
Advanced Memory Usage is available via "PlatformIO Home > Project Inspect"
RAM:   [=         ]  10.7% (used 220 bytes from 2048 bytes)
Flash: [=         ]  10.5% (used 3380 bytes from 32256 bytes)
Understanding the build process
An there’s already a few things that we can look at. First of all, we can see exactly how each of our c or cpp files (or the files of the Arduino framework) are being compiled into object files. This holds the compiled, binary version of the source code, specific for the configuration (platform: Atmel AVR, CPU: ATMega328P) we’re compiling for.
Compiling .pio\build\uno\src\LibraryInfo.c.o
Compiling .pio\build\uno\src\main.cpp.o
Compiling .pio\build\uno\lib952\Calculator\Calculator.cpp.o
Compiling is done, as one can see when using the “Advanced → Verbose Build” task, by running the compiler, avr-g++ or avr-gcc in this case, on the source code file with special flags (most importantly -c to generate object file without linking) to generate an output file (designated via the -o <output file> flag). Example:
avr-gcc -o .pio\build\uno\src\LibraryInfo.c.o -c -std=gnu11 -fno-fat-lto-objects -Os -Wall -ffunction-sections -fdata-sections -flto -mmcu=atmega328p -DPLATFORMIO=50101 -DARDUINO_AVR_UNO -DF_CPU=16000000L -DARDUINO_ARCH_AVR -DARDUINO=10808 -Iinclude -Isrc -Ilib\Calculator -IC:\Users\Max.platformio\packages\framework-arduino-avr\cores\arduino -IC:\Users\Max.platformio\packages\framework-arduino-avr\variants\standard src\LibraryInfo.c
Will generate the object file .pio\build\uno\src\LibraryInfo.c.o based on src\LibraryInfo.c with various options, defines (-D) and include paths (-I) given for compilation.
Also, some archives are created, in some cases. Archives are just collection of object files – think of them .zip files containing multiple .o files. For the Arduino framework, for the variant folder (that is seperate) and all libraries, archives are created. The source code in our main src/folder is however not converted to an archive. Example:
Archiving .pio\build\uno\lib952\libCalculator.a
Which is turn implemented by
avr-gcc-ar rc .pio\build\uno\lib952\libCalculator.a .pio\build\uno\lib952\Calculator\Calculator.cpp.o
Here the avr-gcc-ar tool is use to create the archive file libCalculator.a based on one or multiple object files, in this case only Calculator.cpp.o. See documentation for this tool.
Also, the step
Indexing .pio\build\uno\lib952\libCalculator.a
is done through
avr-gcc-ranlib .pio\build\uno\lib952\libCalculator.a
Which is the process of
[generating] an index to the contents of an archive and stores it in the archive.
An archive with such an index speeds up linking to the library and allows routines in the library to call each other without regard to their placement in the archive.
(These are technical details that are not super important, just as a side info that that is done).
As a last detail, we will look at the final build step: The linking. Linking links all previously compiled object files (or archive files) together to create the firmware image (an ELF file), from which then a pure binary image is produced that gets loaded into flash (the .bin file).
Linking is done in this case through
avr-g++ -o .pio\build\uno\firmware.elf -Os -mmcu=atmega328p -Wl,–gc-sections -flto -fuse-linker-plugin .pio\build\uno\src\LibraryInfo.c.o .pio\build\uno\src\main.cpp.o -L.pio\build\uno -Wl,–start-group .pio\build\uno\lib952\libCalculator.a .pio\build\uno\libFrameworkArduinoVariant.a .pio\build\uno\libFrameworkArduino.a -lm -Wl,–end-group
What we can see here is that firmware.elf will be generated, with some options regarding linker options or target MCU, but most importantly that is uses the files LibraryInfo.c.o, libCalculator.a, libFrameworkArduinoVariant.a and libFrameworkArduino.a as primary sources. There are also -l<name> flags in the command which also link against a library, in this case -lm for “lib math”, a compiler-builtin library.
For GCC, when linking, it needs to know which files you want to link and where they are. Most importantly per docs.
-l library or -llibrary will tell the linker that you want to link against a library called library. GCC will search for the file liblibrary.a (aka, lib prefix is implicit). So if I had downloaded a libSensor.a library from the internet and I’d like to use it, I’d use the flag -lSensor to refer to it.-Ldir: Adds a foler to the library search path. In PlatformIO, paths are relative to the project folder but can also be given as absolute. If you’d e.g. have a library file downloaded at C:\MyLibrary\libSensor.a, you can enable the linker to find the file you mean (when you refer to it via -lSensor) by giving it the search path -L "C:\MyLibrary\". In the case above you can see, that .pio\build\uno is aded to the library search path.
Inspecting build artefacts
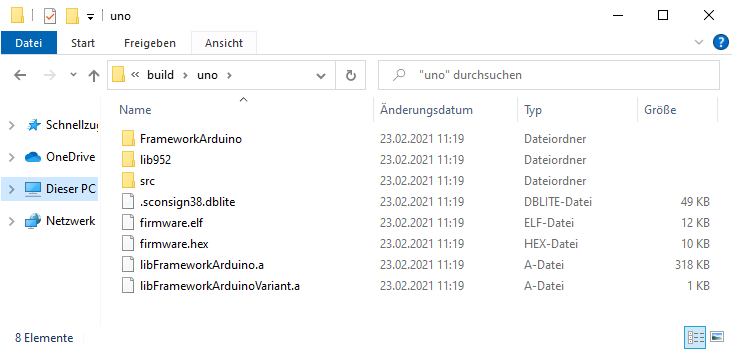
So, after compilation, all build artifacts of the project is saved in .pio\build\<environment name>. Let’s have a look.
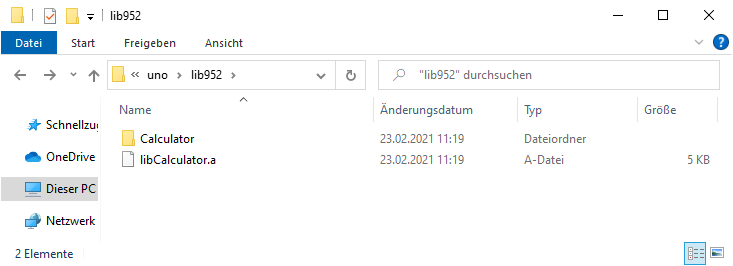
The top leel folder contains the .elf file and the two archive files for the Arduino framework.
The lib952 folder is our calculator library.
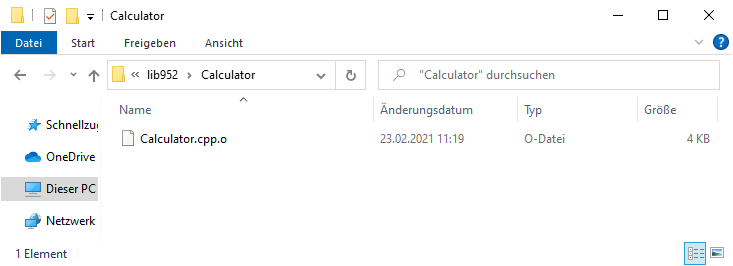
The subfolder contains the pure object file.
The src/ folder from above contains the two object files for main.cpp an our other library code.
Testing the library code
Now when we upload the firmware and look at the output it ofc works.
— Miniterm on COM14 9600,8,N,1 —
— Quit: Ctrl+C | Menu: Ctrl+T | Help: Ctrl+T followed by Ctrl+H —
2 + 3 = 5
2 * 3 + 4 = 10
(See code above to verify).
That completes the build of the library, one in a lib/ folder an one bit of code in the src/ folder.
Creating a project using the library
Let’s now create a new project where we wish to use the 2 libraries we have created previously. A new project atmel_lib_user with initially the same platformio.ini as above is created.
Let’s first write a new firmware source code which uses both libraries. Let src\main.cpp contain.
#include <Arduino.h>
#include <Calculator.hpp>
#include <LibraryInfo.h>

void setup() {
  Serial.begin(9600);
  Serial.println("5 + 1 = " + String(Calculator::Add(5,1)));
  Serial.println("5 * 2 + 1 = " + String(Calculator::MultiplyAccumulate(5,2,1)));

  Serial.println("Library written by \"" + String(GetLibraryAuthor()) + "\"");
  Serial.println("Library version " + String(GetLibraryVersion()));
}

void loop() {
}
Adding library header files
Now of course with just that code, build will fail since the project doesn’t contain the header files yet. So, we add both of them into the include foler now. (Note: Adding to src/ is also possible. We will also take a look at creating a dedicated library folder later).
With the 2 header files copied, there’s still the errors
C:\Users\Max\AppData\Local\Temp\ccXbzREZ.ltrans0.ltrans.o: In function `main':
<artificial>:(.text.startup+0x10c): undefined reference to `Calculator::Add(int, int)'
<artificial>:(.text.startup+0x154): undefined reference to `Calculator::MultiplyAccumulate(int, int, int)'
<artificial>:(.text.startup+0x190): undefined reference to `GetLibraryAuthor'
<artificial>:(.text.startup+0x202): undefined reference to `GetLibraryVersion'
collect2.exe: error: ld returned 1 exit status
of course. We’re missing the actual implementation / object file code that implements these functions. So how do we do that?
Adding library object files
For this, we can use both archive files (.a) and object files (.o) from our previous library build. (Note: It is more common to only have one .a file for a precompiled library – we will take a look at creating our own .a file later).
So, we copy the libCalculator.a and LibraryInfo.c.o somwhere in our project directory. I choose to create a new folder called precompiled_lib where I put these two files in, as an example. The total folder structure is
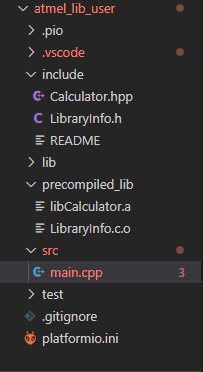
Now, rebuilding the library will ofc result in the same error. We have to tell the linker to actually use these files. Therefore I use a build_flags directive in the platformio.ini with the appropiate linker flags, as discussed previously.
build_flags =
    -L precompiled_lib
    -lcalculator
    -Wl,precompiled_lib/LibraryInfo.c.o
The -Wl,precompiled_lib/LibraryInfo.c.o is a little quirk. We have to add the object file as a pure argument to the linker so that it understands to in that file. -Wl, is prefix to say that the next thing is linker option (rather than a build flag option that is appended during every object file compilation – which we don’t want, we only want this during the final link). The -L and -l options are standard an as previously discussed – they’re usually the norm when dealing with precompiled libraries.
When we now press “Build”,
Linking .pio\build\uno\firmware.elf
Building .pio\build\uno\firmware.hex
Checking size .pio\build\uno\firmware.elf
Advanced Memory Usage is available via "PlatformIO Home > Project Inspect"
RAM:   [=         ]  13.2% (used 270 bytes from 2048 bytes)
Flash: [=         ]  11.2% (used 3608 bytes from 32256 bytes)
=========================== [SUCCESS] Took 2.08 seconds ===========================
Our firmware links successfully now.
Testing the precompiled library project
Uploading and monitoring gives
— Miniterm on COM14 9600,8,N,1 —
— Quit: Ctrl+C | Menu: Ctrl+T | Help: Ctrl+T followed by Ctrl+H —
5 + 1 = 6
5 * 2 + 1 = 11
Library written by “Max Gerhardt”
Library version 10
So we have successfully created a project with some library code, compiled, and used the resulting build artefacts in a new project, which we only gave the header files with the function declarations and the object or archive files, not the original source code.
So, they way I would recommend doing this when writing a library that’s supposed to be distributed and included as a precompiled static library is to just put the library code in a new folder in lib/ in some project, then it’ll be automatically compiled to a .a archive file which can be use with only two build flag additions very easily.
However, I’ll take a short moment to talk about some extended stuff.
Creating own archive files
One can create .a files from arbitrary .o files at any point. The commands and documentation were already shown above for avr-gcc-ar and avr-gcc-ranlib.
For example, we can turn our LibraryInfo.c.o file into an archive file. For that, I’ll open a command prompt. I’ll use the same avr-gcc tools that PlatformIO uses, which are locate in C:\Users\<user>\.platformio\packages\toolchain-atmelavr\bin in this case for Windows and the Atmel AVR case.
To create a new archive with only the LibraryInfo.c.o in it, I run (relative to project directory in the library project)
C:\Users\Max\.platformio\packages\toolchain-atmelavr\bin\avr-gcc-ar rc libLibraryInfo.a .\.pio\build\uno\src\LibraryInfo.c.o
Whereas “rc” means "add member to archive while replacing if needed, create archive. (See previous doc link). Next I’ll index the archive.
C:\Users\Max\.platformio\packages\toolchain-atmelavr\bin\avr-gcc-ranlib libLibraryInfo.a
I’ll then go into the library user project and remove the precompiled_lib\LibraryInfo.c.o file but put the libLibraryInfo.a file in the folder instead.
I then change the build_flags to
build_flags =
    -L precompiled_lib
    -lcalculator
    -lLibraryInfo
And the library links
Linking .pio\build\uno\firmware.elf
Checking size .pio\build\uno\firmware.elf
Building .pio\build\uno\firmware.hex
Advanced Memory Usage is available via "PlatformIO Home > Project Inspect"
RAM:   [=         ]  13.2% (used 270 bytes from 2048 bytes)
Flash: [=         ]  11.2% (used 3608 bytes from 32256 bytes)
=========================== [SUCCESS] Took 2.16 seconds ===========================
and works the same.
— Miniterm on COM14 9600,8,N,1 —
— Quit: Ctrl+C | Menu: Ctrl+T | Help: Ctrl+T followed by Ctrl+H —
5 + 1 = 6
5 * 2 + 1 = 11
Library written by “Max Gerhardt”
Library version 10
Thus you can use that to group arbitrary object files together and use that.
Creating PlatformIO libraries using a precompiled library
The next comfort level step is creating a library which can be used directly in a PlatformIO project, without having to adjust any build flags whatsoever. For that, we can create a library folder with our code, header, and a library.json information file, which will take care of library-specific build instructions.
Let us first create on big unified .a library file, with one .h and the library.json, in a folder UltraLibrary.
As a header, we simply merge everything into UltraLibrary.h
#ifndef ULTRALIBRARY_H
#define ULTRALIBRARY_H

#include <stdint.h>

class Calculator {
public:
    /* a + b */
    static int Add(int a, int b);
    /* a * b */
    static int Mul(int a, int b);
    /* a * b + c */
    static int MultiplyAccumulate(int a, int b, int c);
};

#ifdef __cplusplus
extern "C" {
#endif

const char* GetLibraryAuthor();
int GetLibraryVersion();

#ifdef __cplusplus
}
#endif

#endif
We’ll create a unified archive file from both the calculator code and the LibraryInfo code. I’ll simply use the two object files directly
C:\Users\Max\.platformio\packages\toolchain-atmelavr\bin\avr-gcc-ar rc libUltraLibrary.a .\.pio\build\uno\src\LibraryInfo.c.o .\.pio\build\uno\lib952\Calculator\Calculator.cpp.o
C:\Users\Max\.platformio\packages\toolchain-atmelavr\bin\avr-gcc-ranlib .\libUltraLibrary.a
Now I have one header file and one .a file with all the functions.
(Yes, if I had just set up the library project such that my library code was all in the lib/ folder there, I would have automatically gotten the .a file which I want to use. I’m just trying to show a more complicated case for general usage here. It’s of course also okay to use multiple include files in the library, and not unify them. Again, just for demonstration purposes).
However, sticking bot the .h file and the .a file in the UltraLibrary folder will not make it work directly – we have to create the library.json metainformation file, too. Most importantly, the build flags and compatibility information for building. See linked docs for full information.
I decide on the file
{
    "name": "UltraLibrary",
    "authors": {
        "name": "Max Gerhardt"
    },
    "version": "1.0.0",
    "platforms": [
        "atmelavr"
    ],
    "frameworks": "*",
    "build": {
        "flags": [
            "-L.",
            "-lUltraLibrary"
        ]
    }
}
Notes:
platforms is set to atmelavr (see platform = .. in the original library project) because that is the microarchitecture / platform that the precompiled code was built for- frameworks is set to “all” (
*) because the library does not use any Arduino specific code – theoritically it could be used anywhere. If I was using Arduino specific functions in there, I’d have to declared it as "arduino".
- the build flags add the library folder itself to the library search path (
"." refers the current directory, the library folder in this case) and the -l flag so that libUltraLibrary.a will be linked
Now the user project looks like
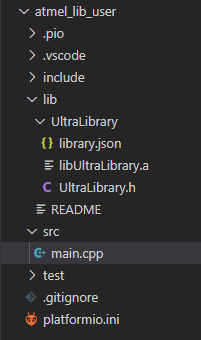
(The UltraLibrary folder can ofc be used anywhere else to and is not specific to the user project).
Now I can change the firmware test code to
#include <Arduino.h>
#include <UltraLibrary.h>

void setup() {
  Serial.begin(9600);
  Serial.println("5 + 1 = " + String(Calculator::Add(5,1)));
  Serial.println("5 * 2 + 1 = " + String(Calculator::MultiplyAccumulate(5,2,1)));

  Serial.println("Library written by \"" + String(GetLibraryAuthor()) + "\"");
  Serial.println("Library version " + String(GetLibraryVersion()));
}

void loop() {
}
And the, the platformio.ini can be absolute standard.
[env:uno]
platform = atmelavr
board = uno
framework = arduino
without build flags. I don’t even have to delcare lib_deps = UltraLibrary in this case because PlatformIO will pick up the usage of the folder in lib/ automatically. If the folder weren’t there but a user would like to use a published library, this is where the library declaration like lib_deps = someOwner/someLibrary@^1.0.0 would go.
The firmware links and uploads and executes as normal.
Processing uno (platform: atmelavr; board: uno; framework: arduino)
-----------------------------------------------------------------------------------------------------------------------------------------------------------------------------------------------------------------------------------------Verbose mode can be enabled via `-v, --verbose` option
CONFIGURATION: https://docs.platformio.org/page/boards/atmelavr/uno.html
PLATFORM: Atmel AVR (3.0.0) > Arduino Uno
HARDWARE: ATMEGA328P 16MHz, 2KB RAM, 31.50KB Flash
DEBUG: Current (avr-stub) On-board (avr-stub, simavr)
PACKAGES:
 - framework-arduino-avr 5.1.0
 - tool-avrdude 1.60300.200527 (6.3.0)
 - toolchain-atmelavr 1.50400.190710 (5.4.0)
LDF: Library Dependency Finder -> http://bit.ly/configure-pio-ldf
LDF Modes: Finder ~ chain, Compatibility ~ soft
Found 11 compatible libraries
Scanning dependencies...
Dependency Graph
|-- <UltraLibrary> 1.0.0
Building in release mode
Compiling .pio\build\uno\src\main.cpp.o
...
Linking .pio\build\uno\firmware.elf
Building .pio\build\uno\firmware.hex
Checking size .pio\build\uno\firmware.elf
Advanced Memory Usage is available via "PlatformIO Home > Project Inspect"
RAM:   [=         ]  13.2% (used 270 bytes from 2048 bytes)
Flash: [=         ]  11.2% (used 3608 bytes from 32256 bytes)
Configuring upload protocol...
..
--- Miniterm on COM14  9600,8,N,1 ---
--- Quit: Ctrl+C | Menu: Ctrl+T | Help: Ctrl+T followed by Ctrl+H ---
5 + 1 = 6
5 * 2 + 1 = 11
Library written by "Max Gerhardt"
Library version 10
And that’s now created a completely unified library folder with one big precompiled library code blob, one big header file which declares all the functions in there, an the library.json needed to automatically build and link this library correctly, without the user having to adjust the build_flags of the project himself for linkage.
The library folder would also be ready for distribution in the PlatformIO library registers with pio package publish <path to UltraLibrary folder>. (Docs).
Automated Build, CI, Testing (is not covered)
The final automation and comfortness level step would be ofc automated building in e.g. Github or Gitlab, where you commit or modify the library code, and out pops the .a file or better, the complete library folder (or zip archive thereof) containing the header file, library file and library.json file, ready to be used directly.
This is not covered here as I don’t have much experience with it, but PlatformIO has good docs for it. A lot in these systems is scriptable, with shell scripts or python scripts, so really anything can be done there to create such a library folder or file for an arbitrary library project structure.
As said, the easiest way is to let PlatformIO handle the most part – the path of
- putting the to-be-distributed code in a folder in
lib/ (so that the .a file is generated automatically),
- starting a normal build (or CI build),
- then creating a new folder where all original header files, plus the generated
.a files and a premade library.json is copied into
should be most comfortable.
After that, one can think about taking the created library folder (or zip file) and running it through further CI test projects that use this library. The sky is the limit here.


 I haven’t quite understood the steps of what to do after zipping the folder with the .a, .h and .json files. I will deal with that tomorrow. Do you have another tip for me?