How do I use "cout << "Hello World!/n";

I am back. My progress continues yet does not. I am moving on from

I need to format my output so that I can understand what it is telling me. My thought is to use the advanced terminal characters (commands) to create a static form with dynamic values. I am working with the following code sample.

#include <Arduino.h>;
//#include <iostream>;
//#include <stdio>;
#include <BufferedSerial>;
using namespace std;

int main()
{
std::cout &lt;&lt; "Hello World!\n";`
return 0;
}

void setup() {
// put your setup code here, to run once:
}

void loop() {
// put your main code here, to run repeatedly:
}

However, I cannot get the library correct. Mostly the problem seems to be concerned with "iostream.h", "iostream", "stdio.h" or "stdio". I have been to the library registry, but have not found the correct one. A search of "iostream" shows several results, but none solve the problem.

Please. What am I missing?

image

1 Like

Well the Arduino-way would be to Serial.println("Hello World!"); and not use C++ stdlib. Also needs a call to Serial.begin() with the wanted baud rate, e.g. 9600 or 115200.

No semicolons after #include

The lib_deps are weird. You’re compiling for the ATMega 2560 and the Arduino framework, but want mbed-drivers? mbed-os is a different framework. Also BufferedSerial is a library for mbed, not Arduino, so it won’t work here. And the stdio library doesn’t exist.

My recommendation would be to code it the Arduino way (Serial.print and friends). If you really have to use the C++ standard library, you first need to install a library that emulates it, since the Arduino framework does not even come close to fully supporting the entire C++ standard lib. See GitHub - mike-matera/ArduinoSTL: An STL and iostream implementation based on uClibc++ that supports my CS-11M class. For such a project.

In addition to what Max said, I think the basic error you are making here is not understanding how Arduino works to begin with. You can’t just grab some random C++ “hello world” example that was meant for another framework (i.e. PC) and expect it to work as things are different. If you are searching for stuff, make sure to include Arduino as a keyword!

If for some reason you want access to the streaming << operators with Arduino, either look at ArduinoSTL, or Streaming. But you would be better off sticking with the built-in Sterial.print/ln operators (for both understanding and memory usage).

Thank you both for your comments. Sometimes Google just does not give the best answer.

First: Copying from the PlatformIO window re-formats the printed characters.

Not withstanding, I have done the Arduino-way thing, and am used to doing things that way. My idea of an interactive terminal send me to places I have never been. I have accidentally touched the special escape characters in a Python program. I am hoping to put them to good use in a C++ program.

Is the iostream-cout process Arduino or real C++ or both? Mostly C++

Do I need to use the iostream-cout way or can i just use print statements? I think not.

Is one better than the other? The Arduino way is more direct on an Arduino.

Some of the information that I am finding from Google is old and outdated(depreciated).

I am struggling to find something that has been done before but is not done the same way anymore. I assume that it is still possible but is done in a way that I have never seen. The error message that I get is “iostream not found”. I have gone through the PlatformIO library and Google to look for possibilities but run into references to extinct software and software out of my framework…

I am using an Arduino Mega 2560 clone in the Arduino framework.

And yes. Now that I am venturing away from pure Arduino I am just starting to see the differences from real C++.

Specifically, it now seems that the following library may for the C++ proper language and not Arduino C.

Thank You. THANK YOU! THANK YOU! for you comments.

To take what I have read and learned to the Arduino next step, I have come up with the following program.
This should print “hello” followed by a blinking “A”.

void setup(){
  Serial.begin(115200);
  int bytesSent = Serial.write("hello"); //send the string "hello" and return the length of the string.
}

void loop(){
  Serial.print("A");
  delay(1000);
  Serial.write(27);  // send ESC
  Serial.write(91);  // send [
  Serial.write(68);  // send D
  Serial.print(" ");
  delay(1000);
  }
1 Like

Correct - unless you first set up the code block before pasting your code. So put the two lots of triple back ticks (```) in above and below where you are going to past the code and then paste it in, and the editor will know to not try to make the code HTML/web safe.

iostream is C++, which is what Arduino builds on. But, as far as I know, Atmel never implemented iostream because it’s not appropriate for these devices.

I have no idea what you’re trying to do with with the LoopPerfect/rxterm, as that is a terminal library for code you would run on a PC, not a microcontroller like the ATmega2560!

It’s great to see you’re finally starting getting it to do what you want it to do though :wink:

So, what you’re actually trying to do is send the ANSI escape codes to control the output to whatever terminal software you are using. That’s probably where you were coming unstuck… you simply (simple, right?) needed to know how to send those… :wink:

For what you are doing with the ‘hello’ text, Serial.write and Serial.print should behave the same way, but it won’t if you send numbers - since write is sending the binary number, and you are decoding it as ASCII text, the ASCII value for “45” is a hyphen. :wink: And, btw, you don’t need to put the function return value into bytesSent unless you want to do something with it. So depending on exactly what you are doing, it is probably better to use the Serial.print syntax for numbers and text.

But Serial.writes will would be the best way to send the ANSI control codes as you can be sure you’re sending the right codes ;0

I am trying to use running sample code to start. bytesSent was in the original sample code. I do not need it.

My original idea comes from a Python program on the RaspberryPi to use the keyboard arrow keys. The key codes are one byte. But the arrow key codes are three byte escape sequences. I accidentally printed an arrow key byte sequence and the virtual TERMINAL applied the function. Can I reproduce this action with Arduino? Does the Arduino SERIAL MONITOR have the terminal functions? Or any advanced functions that would allow the user to control the cursor position?

No, as far as I know, the Arduino serial monitor does not support ansi control codes (i.e. cursor movement) - was actually the topic of some discusttion developer mailing list 4-5 months ago, but I doubt things will change. The mini serial console that PlatformIO uses might though. Otherwise, if you use different terminal software such as RealTerm on windows (set it to ANSI). I’m not sure what others would work, but they are around.

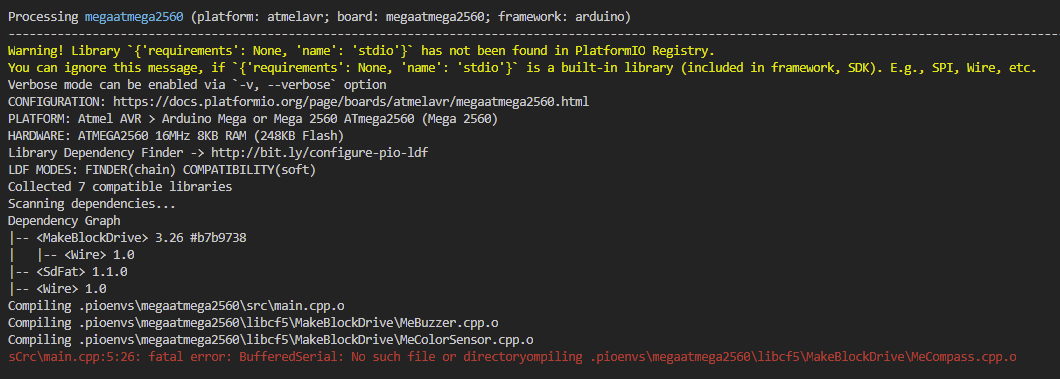
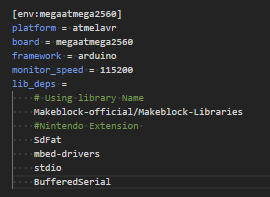
The MakeBlock self-balancing software(firmware) works so great that I am only trying to add a Nintendo nunchuck. My addition amounts to 4 or 5 lines of code. But somehow, I do not seem to have it right. Yes, I do need to solder my connections to remove an intermittent connection problem. It is quite annoying.

The physical robot has only two wheels. It is the most stable left to right. So, code for left-right turn is not critical. My quick-and-dirty code worked first time out of the box. I had one polish and was done. The robot has minimum stability forward and backward, so the speed code must have maximum accuracy. The nunchuck has both a vertical and horizontal parameter. Left-right work for the robot. So, my vertical hardware and vertical software is the correct match. Though he direction could be wrong. That is where I lose progress. My best guess is that the speed code is fighting with the balance code.

Because it is a real-time process, I cannot step through the code with debug. The Arduino way is to use a lot of PRINT statements. This too can interfere with performance. And the SERIAL MONITOR flashes by so fast that I cannot read it. If I were using a fully functional ANSI terminal, I could at least create a static form with dynamic values.

When I did the balancing robot on Lego in Java, as the robot was balancing, I would store the values in an array. Then. I found out that Java is a Just-in-time (JIT) process. So, when the compiler kicked in, the robot fell. (The JIT can be turned off, however that is advanced Java. And this is not primarily a Java project.) And then, I would print the array. The array would remember the last of the balance process.

Here I am at a loss as to how to proceed. I know that the nunchuck forward-backward is connected to the robot forward-backward. If I kick the nunchuck forward-backward the robot jumps forward-backward. But it will not actually change location on my desk.

I understand 99% of this code. Perfecting this last 1% is the hard part. As usual.

This is where I struggle. Any incite will be greatly greatly appreciated.

  double speed_now = ( Encoder_2.getCurrentSpeed() - Encoder_1.getCurrentSpeed() ) /2;
  double Speed;                                          //  New
  Speed = -0.5*(double)(nchuk.joyY()-127);               //  New
  Speed_filter   = (1-0.2)*Speed_filter + 0.2*Speed;     //  New
  if(abs(Speed_filter) > 1){ 
    move_flag = true;}
  if( (move_flag==true) && (Speed_filter<5) ){ 
    move_flag = false;
    Speed_filter = 0;                            
    PID_speed.Integral = 0;} 
  double error = speed_now - Speed_filter; 
  PID_speed.Integral += error;
  if(move_flag == true) { 
    PID_speed.Integral = constrain(PID_speed.Integral , -2000, 2000);   
    PID_speed.Output   = PID_speed.P*error + PID_speed.I*PID_speed.Integral;
    PID_speed.Output   = constrain(PID_speed.Output , -8.0, 8.0);}
  else{  
    PID_speed.Integral = constrain(PID_speed.Integral , -2000, 2000);
    PID_speed.Output   = PID_speed.P*speed_now + PID_speed.I*PID_speed.Integral;
    PID_speed.Output   = constrain(PID_speed.Output , -10.0, 10.0);
    speed_Integral_average = 0.8*speed_Integral_average + 0.2*PID_speed.Integral;}
  PID_angle.Setpoint =  RELAX_ANGLE + PID_speed.Output;
  CompAngleX = -gyro_ext.getAngleX();
  double error;
  error = CompAngleX - PID_angle.Setpoint;
  PID_angle.Integral += error;
  PID_angle.Integral = constrain(PID_angle.Integral,-100,100); 
  PID_angle.differential = angle_speed;
  PID_angle.Output = PID_angle.P*error + PID_angle.I*PID_angle.Integral + PID_angle.D*PID_angle.differential;
  if(PID_angle.Output > 0){
    PID_angle.Output = PID_angle.Output + PWM_MIN_OFFSET;}
  else{
    PID_angle.Output = PID_angle.Output - PWM_MIN_OFFSET;}
  Turn_Setpoint = 0.2 * (nchuk.joyX()-133);              //  New
  Turn_filter   = (1-0.2)*Turn_filter + 0.2*Turn_Setpoint;
  double pwm_left  =  PID_angle.Output - Turn_filter;
  double pwm_right = -PID_angle.Output - Turn_filter;
  pwm_left  = constrain( pwm_left , -255, 255 );
  pwm_right = constrain( pwm_right, -255, 255 );