Yes, the output is:
Thanks for providing the avarice.exe
Yes, the output is:
Thanks for providing the avarice.exe
I’ve seen that a lot of functions in regards to the serial port are actually stubbed / non-functional, so I don’t think that avarice version can do much… Better use
that one.
Or rather, can any of the programs connect to the chip at all
avarice --edbg --debug --read-lockbits --jtag COM10 --ignore-intr :2331
or
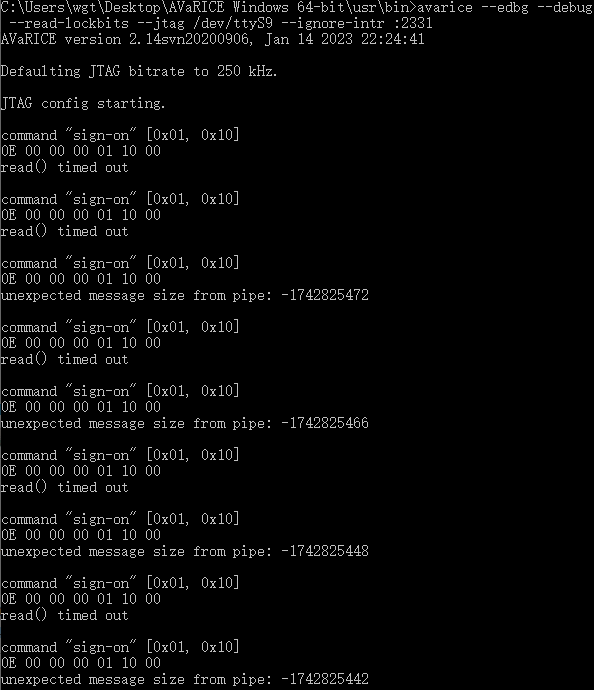
avarice --edbg --debug --read-lockbits --jtag /dev/ttyS9 --ignore-intr :2331
Use
https://github.com/maxgerhardt/avarice/suites/10374016246/artifacts/511730736
The output of
avarice --edbg --debug --read-lockbits --jtag COM10 --ignore-intr :2331
is:
The output of
avarice --edbg --debug --read-lockbits --jtag /dev/ttyS9 --ignore-intr :2331
is:

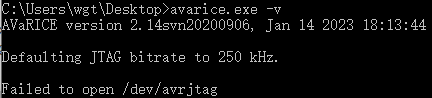
Doesn’t look like it’s doing anything useful. Maybe avarice is not even capable of the mEDBG + DebugWire combination. But it seems to not even be able to talk to the programmer. I’ll have to wait on my hardware for further things with avarice.
Can you try some things with GitHub - microchip-pic-avr-tools/pyedbglib: Low-level protocol library for communicating with Microchip CMSIS-DAP based debuggers? Specifically
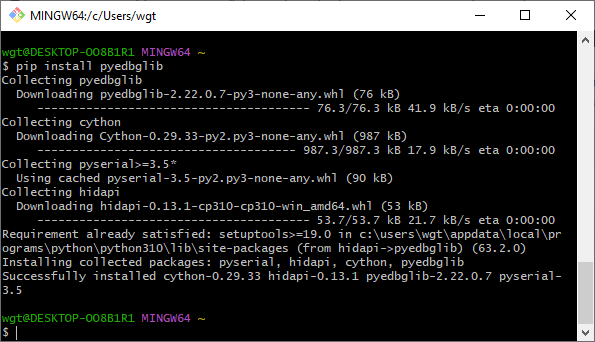
pip install git+https://github.com/microchip-pic-avr-tools/pyedbglib.git
with a test script like
from pyedbglib.hidtransport.hidtransportfactory import hid_transport
transport = hid_transport()

status = transport.connect(serial_number="", product="medbg")
print("Connect status to mEDBG: " + str(status))

# Example of application using housekeeping protocol to read out the target voltage:
from pyedbglib.protocols.housekeepingprotocol import Jtagice3HousekeepingProtocol
housekeeper = Jtagice3HousekeepingProtocol(transport)
housekeeper.start_session()
voltage = housekeeper.get_le16(Jtagice3HousekeepingProtocol.HOUSEKEEPING_CONTEXT_ANALOG,
                               Jtagice3HousekeepingProtocol.HOUSEKEEPING_ANALOG_VTREF)
voltage = voltage / 1000.0
housekeeper.end_session()
print ("Target is running at {0:.02f}V".format(voltage))
This needs Python3 with PIP installed.
Does the following correctly installed pyedbglib?
If it does, can you tell me how to run the script:
from pyedbglib.hidtransport.hidtransportfactory import hid_transport
transport = hid_transport()

status = transport.connect(serial_number="", product="medbg")
print("Connect status to mEDBG: " + str(status))

# Example of application using housekeeping protocol to read out the target voltage:
from pyedbglib.protocols.housekeepingprotocol import Jtagice3HousekeepingProtocol
housekeeper = Jtagice3HousekeepingProtocol(transport)
housekeeper.start_session()
voltage = housekeeper.get_le16(Jtagice3HousekeepingProtocol.HOUSEKEEPING_CONTEXT_ANALOG,
                               Jtagice3HousekeepingProtocol.HOUSEKEEPING_ANALOG_VTREF)
voltage = voltage / 1000.0
housekeeper.end_session()
print ("Target is running at {0:.02f}V".format(voltage))
Best regards.
Hm I thought about doing this directly in Windows, not inside MINGW64.
And yes that’s also a correct way to install it.
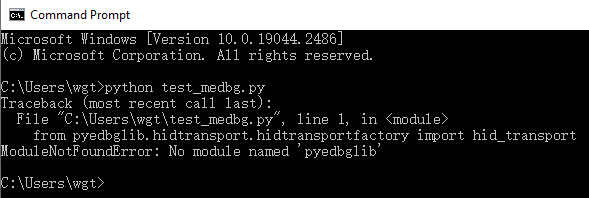
You just have to save that into a file (e.g. test_medgb.py) and run it with python.
python test_medgb.py
The output is:
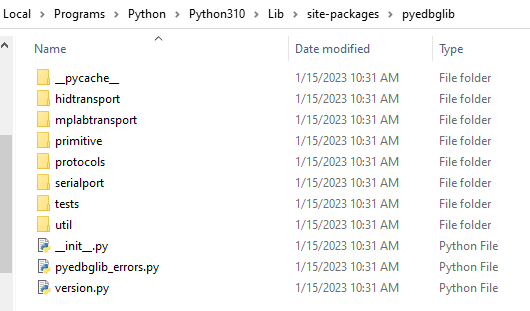
But the pyedbglib has been installed:
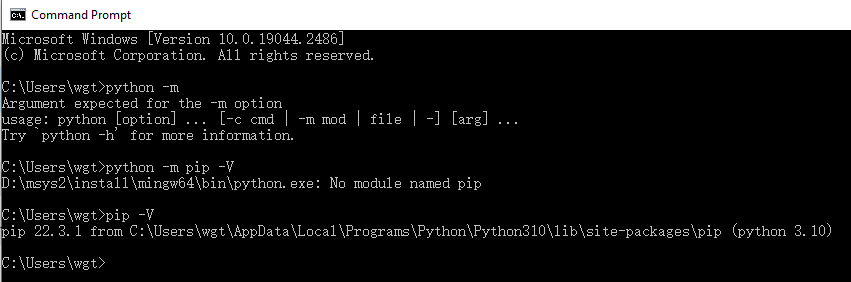
What’s the result of python -m pip -V? Does it point to those site-packages?
You seem to have python from the MinGW installation in your path conflicting with the python version installed natively on Windows.
Thank you for your great effort, @maxgerhardt
I installed a lot of software for compiling avarice…they conflict as unexpectedly, and I think I have to reinstall the OS again…
When your board is in hand, hoping to hear your good news, wishing the Platformio support the board completely, both uploading and debugging (not avr-stub) smoothly.
Best regards.
There is at least some progress in avarice, I’ve been accepted as CI maintainer for AVaRICE and in contact with the project maintainer (Jörg Wunsch). Microchip sadly has denied to give us a GDB server based on their Python libraries (here).
Thanks for replying.
By the way, is there some material about how to compile the source code? Something like the source code of avarice. How to begin?
My mother tongue is not English, and my major is not embedded arena, sometimes the word and sentence is hard to understanding, I have to use the translation software and bing/google. Even so, I still know a little. But I’m very interesting in mcu (or avr/arduino).
Best regards.
For Windows you downloads msys2 open a “MSYS2/MSYS” terminal (not MSYS2/MinGW64!), then install the needed packages (pacman -S <packages>) and follow the compilation commands the same way the CI does here.
Compilation instructions on Linux are a bit shorter.
Thanks a lot, very appreciate @maxgerhardt
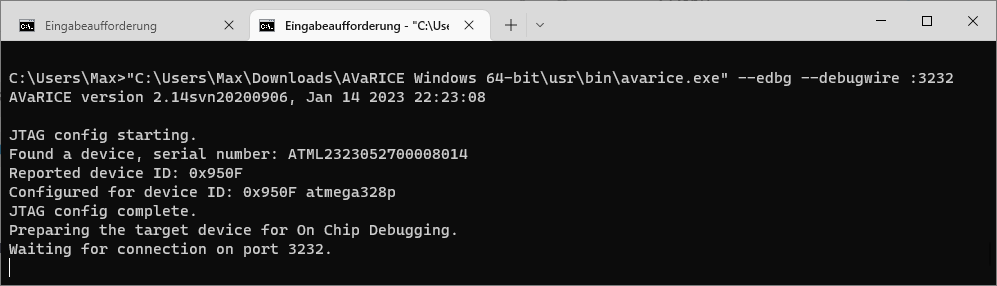
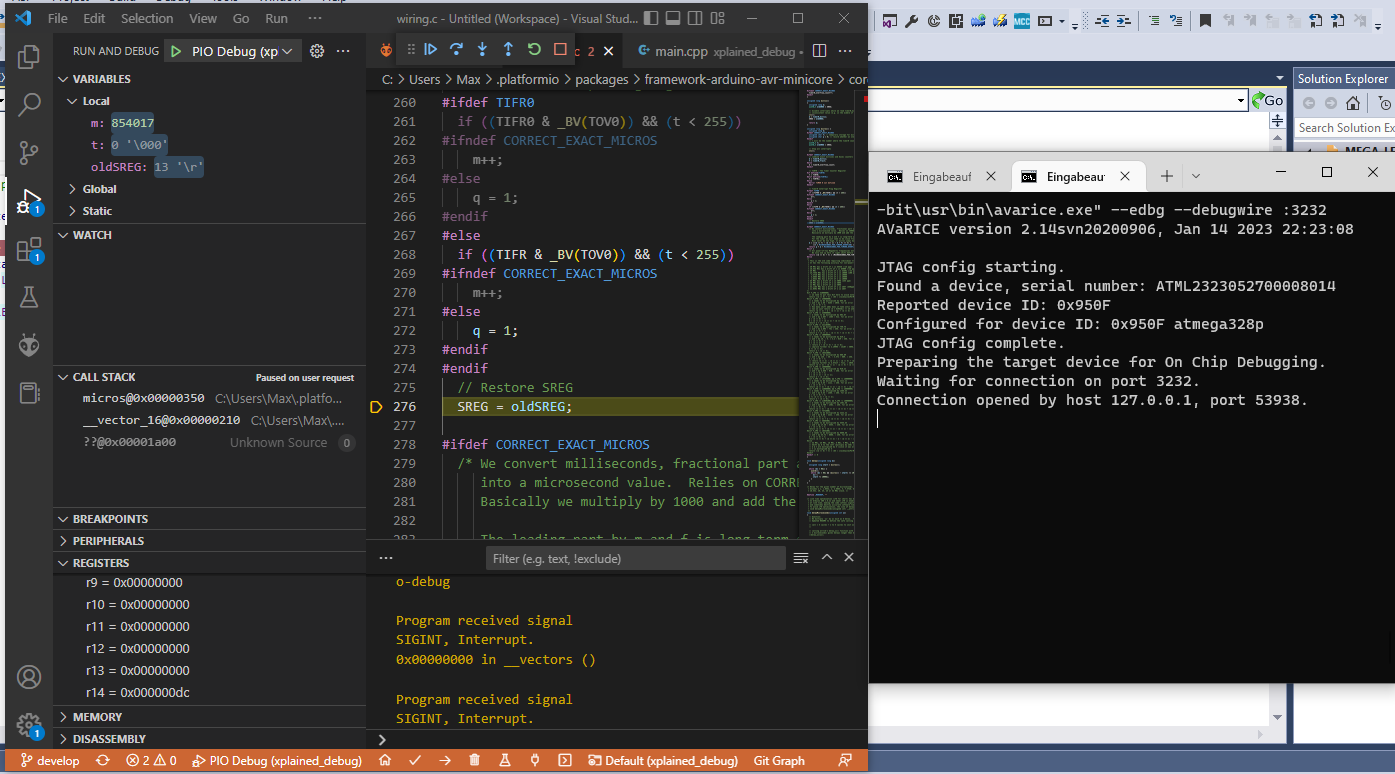
The AVaRICE version I linked to can connect perfectly fine to my real ATMega328P XPlained Mini board
I just once had to enable the DWEN fuse by installing Microchip Studio and starting a debugging session once per https://ww1.microchip.com/downloads/en/DeviceDoc/ATmega328P-Xplained-Mini-UG-DS50002659B.pdf 2.3.2. Once the fuse is set, no special driver is needed since it actually goes via the USB interface (so -P <serial port> is wrong, it doesn’t need -P, or if it all, it should be -P usb).
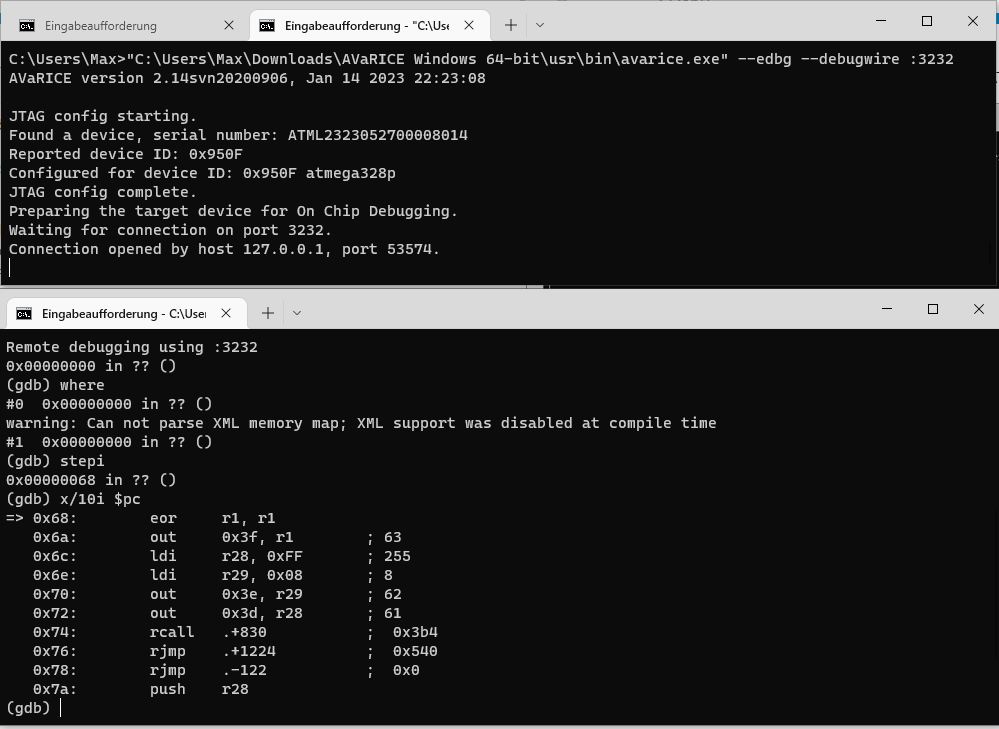
I can also attach avr-gdb no problems
C:\Users\Max\.platformio\packages\toolchain-atmelavr@1.70300.191015\bin\avr-gdb.exe -ex "target remote :3232"
Connection between PlatformIO and avr-gdb and AVaRICE also works fine
Just havng some issues regarding programming the .hex file when debugWire is enabled now, avrdude 7.1 fails at writing it… (xplainedmini_dw upload not working · Issue #1292 · avrdudes/avrdude · GitHub)
Currently using https://pastebin.com/72virvZ8.
Thank you.
After enabling the DWEN fuse, I using the .ini file you provided:
[env:ATmega328P]
platform = atmelavr
board = ATmega328P
framework = arduino
board_build.f_cpu = 16000000L

; always build in debug mode so that firmware can be compiled and uploaded using xplainedmini (ISP), then
; DWEN fuse is enabled (Microchip studio), then avarice is started
build_type = debug

;for upload
upload_protocol = custom
upload_flags =
    -C
    $PROJECT_PACKAGES_DIR/tool-avrdude/avrdude.conf
    -p
    atmega328p
    -Pusb
    -c
    xplainedmini
    -e
upload_command = avrdude $UPLOAD_FLAGS -U flash:w:$SOURCE:i

; expect FW to be preloaded
debug_load_mode = manual
; don't open debugging server yourself, we will start it
debug_tool = custom
; on port localhost port 3232
debug_port = :3232
; disable all optimization so that debugged code can be properly debugged
debug_build_flags = -O0 -ggdb3
debug_init_cmds =
  target extended-remote $DEBUG_PORT
  $INIT_BREAK
I can upload the code successfully using the upload button of Platformio:
I find that the avarice which Platformio included is version 2.9:
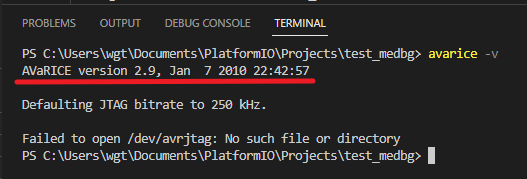
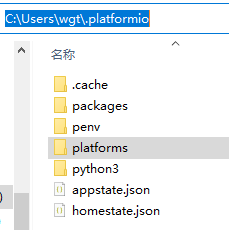
So…before debugging, I have to let the Platformio using the avarice version 2.14. I searched avarice.exe in the path:
No avarice.exe found.
I have downloaded avarice.exe version 2.14 which you provided, is there anyway to replace avarice.exe version 2.9 with avarice.exe version 2.14?
Best regards.
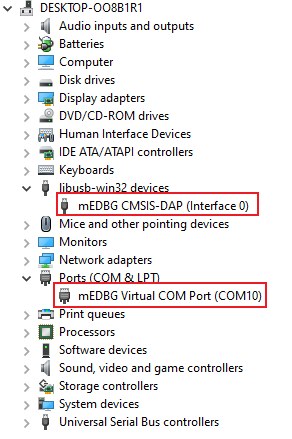
P.S.1 Since I changed the driver to libusb-win32, the microchip studio can’t recognize my board anymore, so I use a high voltage programmer (stk500) to enable the DWEN fuse. I think I will use Platformio from now on more frequently, untill I reinstall my OS.
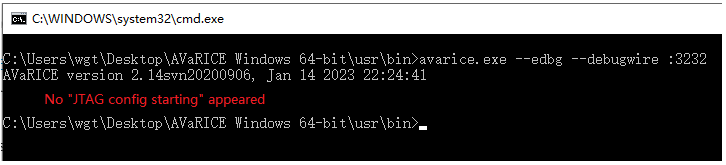
P.S.2 I try to use the command line to connect the board, but nothing getted:
PlatformIO doesn’t have avarice at all in its pacakges, so this older avarice version must come from your Windows’ PATH environment variable somewhere. It may be better to use the full path of the avarice version downloaded from my CI build