Good evening, I’m a programming neophyte and arduino, and I need help from people more experienced than me (it doesn’t take long).
I am carrying out a small project with arduino, and I started writing it through the Arduino IDE, but then I felt the need to better organize the code of a program with a few more functions while browsing the internet I discovered Visual studio code with the extension Platformio, I lasted a hard time dog to correct the many errors that marked me, but despite this it is not enough, because I came to transfer the code on my Arduino (not original) tells me that the process has been successful, but the my microcontroller does not show any sign of life even by pressing the reset button.
Can you help me?
Which element do you need more?
thanks a lot
Moses
So the project works with Arduino IDE, but doesn’t work with PlatformIO? Can you show the source code?
help me, what do you mean by source code
Your code. The files in the src/ folder of your project, and the platformio.ini please.
Thanks a lot for your interest, the following is my code, at the moment it only gives me an error on the last brace on the last line and I would be grateful if you tell me why.
below I put the platformio.ini that I have seen mentioned in many tutorials and I have not been able to understand what it is, can you help me?
    #include <Arduino.h>

    #include <Wire.h>  // Libreria di sistema - E' richiesta da I2CIO.cpp

    #include <LiquidCrystal_I2C.h> // Libreria LCD I2C

    #include <AccelStepper.h>

    LiquidCrystal_I2C lcd(0x27,20,4);

    //Definizione dei PIN bottoni

    #define bottonesu 11

    #define ok 12

    #define bottonegiu 13

    void fase1LamaSu();

    void fase2TavolaSu();

    void fase3DentiSu();

    void DammiLoZero();

    void FaseLamaGiu();

    void FaseTavolaGiu();

    void FaseDentiGiu();

    void FaseMotoreGiu();

    void DaFase1AFase2();

    void dafase2afase3();

    void riepilogo();

    void suono();

    //Definizione dei PIN motore

    const int pinDir = 10;

    const int pinStep = 9;

    int pinBuzzer = 8;        // pin al quale è collegato il buzzer

    const int numStepMotore = 2000; //E' il numero di step per rotazione del motore (potrebbe differire in base al modello)

    const long velocita = 700; //Si tratta di microsecondi tra un impulso e l'altro sul pin STEP

    int lama = 3;

    int tavola = 200;

    float denti = 20;

    int dentif;//denti femmina

    int fasi = 1;//le fasi delle lavorazioni

    int fasi2 = 1; //dichiaro la fase2 che vale 0

    float mdente;//misura denti

    float tagli; // dichiaro la variabile tagli, che indica con numeri decimali quante passate di lama c'è da fare per fare il dente femmina

    int tagliint;//arrotondamento tagli

    float passate;//misure delle passate

    int passi;//passi da fare per le passate

    //pin motore passo passo

    const int stepPin = 9; // definisco il pin del passo

    const int dirPin = 10; // definisco il pin della direzione

    const int numpassi = 200; //E' il numero di step per rotazione del motore (potrebbe differire in base al modello)

    const long velocita = 700; //Si tratta di microsecondi tra un impulso e l'altro sul pin STEP

    float mmpasso = 0.04; // i millimetri che si sposta il dado ogni passo

    String prova;

    String prova2;

    String prova3;

    String prova4;

    String mm = ("mm ");

    String num = ("N ");

    int yoyo = 0;

    void setup() {

      // pin buzzer

      pinMode(pinBuzzer, OUTPUT);

      //pin bottoni

      pinMode(bottonesu, INPUT);

      pinMode(ok, INPUT);

      pinMode(bottonegiu, INPUT);

      //pin motore

      pinMode(stepPin, OUTPUT);

      pinMode(dirPin, OUTPUT);

      //definiamo la direzione del motore

      digitalWrite(pinDir, HIGH);

      //inizializzo i PIN come OUTPUT del motore

      pinMode(pinStep, OUTPUT);

      pinMode(pinDir, OUTPUT);

      //display

      lcd.begin(20, 4); // Inizializzo LCD 20 caratteri per 4 linee

      lcd.clear();

      delay(200);

      tone(pinBuzzer, 988,100);    // Nota B5

      delay(100);

      tone(pinBuzzer,1319,850);    // Nota E6

    }

    void loop() {

      Serial.begin (9600);

      int pinsu = digitalRead(bottonesu);

      int pinok = digitalRead(ok);

      int pingiu = digitalRead(bottonegiu);

      for ( int i = 0 ; i < 10 ; i++) {

        //se premo il tasto su

        if (pinsu == HIGH ) {

          // 1 fase su lama

          if (fasi == 1 && lama <= 8) {

            fase1LamaSu();

            break;

          }

          //2 fase su tavola

          if (fasi == 2 && denti > 0) {

            fase2TavolaSu();

            break;

          }

          //3 fase su denti

          if (fasi == 3 && denti > 0) {

            fase3DentiSu ();

            break;

          }

          //5 fase SU (motore)

          if (fasi == 4) {

            DammiLoZero();

            break;

          }

        }

        if (pingiu == HIGH ) {//se premo il tasto giu

          //1 fase giu lama giu

          if (fasi == 1 && lama >= 1) {

            FaseLamaGiu();

            break;

          }

          // 2 fase giu tavola giu

          if (fasi == 2 && tavola >= 1) {

            FaseTavolaGiu();

            break;

          }

          //fase 3 denti giu

          if (fasi == 3 && denti >= 1) {

            FaseDentiGiu();

            break;

          }

          //4 fase giu (motore)

          if (fasi == 4) {

            FaseMotoreGiu();

          }

        }

        if (pinok == HIGH ) {// se premo il tasto ok

          // 1° fase OK da spessore lama a misur tavola

          if (fasi == 1) {

            DaFase1AFase2();

            break;

          }

          // 2 OK da spessore tavola a numero denti

          if (fasi == 2) {

            dafase2afase3();

            break;

          }

          // 3  ok riepilogo

          if (fasi == 3) {

            riepilogo();

            break;

          }

        } // if pin ok*/

      } //ciclo i

    }//void loop

    //-------------------------------------------------------

    void fase1LamaSu() {

      suono();

      lama ++; //aumenta lo spessore di lama di uno

      String prova = mm + lama;

      lcd.setCursor(0, 2);

      lcd.print(prova);

      delay (300);

    }

    //-------------------------------------------------------

    void fase2TavolaSu(){

      suono();

      tavola ++;

      lcd.clear();

      lcd.setCursor(0, 0);

      lcd.print("INSERISCI");

      lcd.setCursor(0, 1);

      lcd.print("LUNGHEZZA TAVOLA");

      String prova = mm + tavola;

      lcd.setCursor(0, 2);

      lcd.print(prova);

      delay (300);

    }

    //--------------------------------------------------

    void fase3DentiSu(){

      suono();

      denti ++;

      lcd.clear();

      lcd.setCursor(0, 0);

      lcd.print("INSERISCI");

      lcd.setCursor(0, 1);

      lcd.print("NUMERO TOTALE DENTI");

      lcd.setCursor(0, 2);

      lcd.print("TRA MASCHI E FEMMINE");

      String prova = num + denti;

      lcd.setCursor(0, 3);

      lcd.print(prova);

      delay (300);

    }

    //---------------------------------------------------

    void DammiLoZero(){

      digitalWrite(dirPin, HIGH);

      digitalWrite(stepPin, HIGH);

      delayMicroseconds(velocita);

      digitalWrite(stepPin, LOW);

      delayMicroseconds(velocita);

    }

    //---------------------------------------------------

    void FaseLamaGiu(){

      suono();

      lama --;

      String prova = mm + lama;

      lcd.setCursor(0, 2);

      lcd.print(prova);

      delay (300);

    }

    //---------------------------------------------------

    void FaseTavolaGiu(){

      suono();

      tavola --;

      lcd.clear();

      lcd.setCursor(0, 0);

      lcd.print("INSERISCI");

      lcd.setCursor(0, 1);

      lcd.print("LUNGHEZZA TAVOLA");

      String prova = mm + tavola;

      lcd.setCursor(0, 2);

      lcd.print(prova);

      delay (300);

    }

    //---------------------------------------------------

    void FaseDentiGiu(){

      suono();

      denti --;

      lcd.clear();

      lcd.setCursor(0, 0);

      lcd.print("INSERISCI");

      lcd.setCursor(0, 1);

      lcd.print("NUMERO TOTALE DENTI");

      lcd.setCursor(0, 2);

      lcd.print("TRA MASCHI E FEMMINE");

      String prova = num + denti;

      lcd.setCursor(0, 3);

      lcd.print(prova);

      delay (300);

    }

    //---------------------------------------------------

    void FaseMotoreGiu(){

      digitalWrite(pinDir, LOW);

      digitalWrite(pinStep, HIGH);

      delayMicroseconds(velocita);

      digitalWrite(pinStep, LOW);

      delayMicroseconds(velocita);

    }

    //---------------------------------------------------

    void DaFase1AFase2(){

      suono();

      fasi ++;

      lcd.clear();

      lcd.setCursor(0, 0);

      lcd.print("INSERISCI");

      lcd.setCursor(0, 1);

      lcd.print("LUNGHEZZA TAVOLA");

      String prova = mm + tavola;

      lcd.setCursor(0, 2);

      lcd.print(prova);

      delay (300);

    }

    //---------------------------------------------------

    void dafase2afase3(){

      suono();

      fasi ++;

      lcd.clear();

      lcd.setCursor(0, 0);

      lcd.print("INSERISCI");

      lcd.setCursor(0, 1);

      lcd.print("NUMERO TOTALE DENTI");

      lcd.setCursor(0, 2);

      lcd.print("TRA MASCHI E FEMMINE");

      String prova = num + denti;

      lcd.setCursor(0, 3);

      lcd.print(prova);

      delay (300);

    }

    //---------------------------------------------------

    void riepilogo(){

      suono();

      fasi ++;

      // faccio il primo riepilogo

      dentif = denti / 2; // calcolo quanti denti sono femmina

      lcd.clear();

      lcd.setCursor(0, 0);

      lcd.print("RIEPILOGO 1 DI 2");

      String prova2 = ("TAVOLA ") + mm + tavola;

      lcd.setCursor(0, 1);

      lcd.print(prova2);

      lcd.setCursor(0, 2);

      lcd.print("TOTALE DENTI ");

      lcd.setCursor(13, 2);

      lcd.print( denti );

      mdente = (tavola / denti);

      String prova4 = ("LARGHI ") + mm + mdente;

      lcd.setCursor(0, 3);

      lcd.print(prova4);

      delay (1000);


      //faccio il secondo riepilogo

      lcd.clear();

      tagli = (mdente / lama);

        // se la larghezza del dente è inferiore alla larghezza della lama

        if (mdente < lama) { //se la larghezza del dente è minore dello spessore della lama

          lcd.clear();//svuoto il display

          lcd.setCursor(0, 0);

          lcd.print ("QUESTA LAVORO");

          lcd.setCursor(0, 1); //imposta il cursore sulla prima colonna e sulla prima riga

          lcd.print("NON E' POSSIBILE");//stampa che non è possibile

          lcd.setCursor(0, 2);

          lcd.print ("SPESSORE LAMA > DENTE");

          delay (1000);//aspetta 5 secondi

          fasi = 1;//riporta fasi a 1

          lcd.clear();//svuoto il display

          lcd.begin(16, 2);

          lcd.setCursor(0, 0);

          lcd.print("Spessore lama");

          lcd.setCursor(0, 1);

          lcd.print("mm ");

          lcd.setCursor(3, 1);

          lcd.print (lama);

          //break;

        }

        else {

          tagliint = ceil(tagli); //trasforma la variabile tagli che è un numero decimale in un numero intero

          passate = ( mdente / tagliint ); //trovo il valore di passate dividendo il numero intero dei tagli per mdente

          lcd.print("RIEPILOGO 2 DI 2");

          lcd.setCursor(0, 1);

          lcd.print ("NUMERO PASSATE ");

          lcd.setCursor(15, 1);

          lcd.print (tagliint);

          lcd.setCursor(0, 2);

          lcd.print("OGNI PASSATA mm ");

          lcd.setCursor(16, 2);

          lcd.print ( passate );

          lcd.setCursor(0, 3);

          delay (1000);

          suono();

          lcd.setCursor(0, 0);

          lcd.print("SPOSTA IL PRIMO");

          lcd.setCursor(0, 1);

          lcd.print("PEZZO A TOCCARE");

          lcd.setCursor(0, 2);

          lcd.print("LA LAMA E PREMI OK");

          lcd.setCursor(0, 3);

          lcd.print("<<<              >>>");

          delay(300);

        }

    }

    void suono() {

      tone(pinBuzzer, 988, 100);// Nota B5;

    }
platformio.ini
; PlatformIO Project Configuration File

;

;   Build options: build flags, source filter

;   Upload options: custom upload port, speed and extra flags

;   Library options: dependencies, extra library storages

;   Advanced options: extra scripting

;

; Please visit documentation for the other options and examples

; https://docs.platformio.org/page/projectconf.html

[env:uno]

platform = atmelavr

board = uno

framework = arduinoAs you can see from the error message
src/main.cpp:85:16: error: redefinition of 'const long int velocita'
     const long velocita = 700; //Si tratta di microsecondi tra un impulso e l'altro sul pin STEP
                ^
src/main.cpp:53:16: note: 'const long int velocita' previously defined here
     const long velocita = 700; //Si tratta di microsecondi tra un impulso e l'altro sul pin STEP
                ^
Compiling .pio/build/uno/libad7/LiquidCrystal_I2C_ID576/LiquidCrystal_I2C.cpp.o
*** [.pio/build/uno/src/main.cpp.o] Error 1
The compiler is telling you that you have defined the variable velocita twice.
You wrote in your code.
    const long velocita = 700; //Si tratta di microsecondi tra un impulso e l'altro sul pin STEP

    int lama = 3;

    int tavola = 200;

    float denti = 20;

    int dentif;//denti femmina

    int fasi = 1;//le fasi delle lavorazioni

    int fasi2 = 1; //dichiaro la fase2 che vale 0

    float mdente;//misura denti

    float tagli; // dichiaro la variabile tagli, che indica con numeri decimali quante passate di lama c'è da fare per fare il dente femmina

    int tagliint;//arrotondamento tagli

    float passate;//misure delle passate

    int passi;//passi da fare per le passate

    //pin motore passo passo

    const int stepPin = 9; // definisco il pin del passo

    const int dirPin = 10; // definisco il pin della direzione

    const int numpassi = 200; //E' il numero di step per rotazione del motore (potrebbe differire in base al modello)

    const long velocita = 700; //Si tratta di microsecondi tra un impulso e l'altro sul pin STEP
So you need to remove the double-definition of this variable.
Good evening
sorry if I answer you only now, but I have been busy with the job.
I tried to make the correction you suggested me to do, but I didn’t get anything, Arduino still doesn’t answer. I also tried to insert the usual code through the Arduino IDE, and it worked regularly.
Through VScode I tried to put a simple blink on arduino, always changing the delays, and he always transferred it to me.
Then I tried to load this little code
#include <Arduino.h>
int pinBuzzer = 8;

void setup () {
pinMode (pinBuzzer, OUTPUT);
}

void loop () {
tone (pinBuzzer, 988,200); // Note B5
delay (100);
tone (pinBuzzer, 1319.850); // Note E6
delay (1500);
}
and report three problems to me
and after a long string of yellow letters of this type:
x16d4 = ATxmega16D4
x16e5 = ATxmega16E5
x192a1 = ATxmega192A1
x192a3 = ATxmega192A3
x192a3u = ATxmega192A3U
x192c3 = ATxmega192C3
x192d3 = ATxmega192D3
x256a1 = ATxmega256A1
x256a3 = ATxmega256A3
x256a3b = ATxmega256A3B
x256a3bu = ATxmega256A3BU
x256a3u = ATxmega256A3U
x256c3 = ATxmega256C3
x256d3 = ATxmega256D3
x32a4 = ATxmega32A4
x32a4u = ATxmega32A4U
x32c4 = ATxmega32C4
x32d4 = ATxmega32D4
x32e5 = ATxmega32E5
x384c3 = ATxmega384C3
x384d3 = ATxmega384D3
x64a1 = ATxmega64A1
x64a1u = ATxmega64A1U
x64a3 = ATxmega64A3
x64a3u = ATxmega64A3U
x64a4 = ATxmega64A4
x64a4u = ATxmega64A4U
x64b1 = ATxmega64B1
x64b3 = ATxmega64B3
x64c3 = ATxmega64C3
x64d3 = ATxmega64D3
x64d4 = ATxmega64D4
x8e5 = ATxmega8E5
ucr2 = deprecated, use ‘uc3a0512’
and after a long time he returned this message to me
Environment Status Duration
-------------- -------- ------------
one SUCCESS 00: 00: 32.333
lightblue-bean FAILED 00: 01: 53.223
attiny13 FAILED 00: 00: 06.328
digispark-pro FAILED 00: 00: 06.023
digispark-tiny FAILED 00: 00: 04.128
dwenguino FAILED 00: 02: 22.131
ATmega16 FAILED 00: 00: 06.209
ATmega48 FAILED 00: 00: 04.531
AT90CAN64 FAILED 00: 00: 06.851
ATmega324PB FAILED 00: 00: 04.832
ATmega328PB FAILED 00: 00: 04.968
nibo2 FAILED 00: 15: 07.453
panStampAVR FAILED 00: 00: 15.893
attiny828 FAILED 00: 00: 11.159
attiny441 FAILED 00: 00: 03.879
===================================== 14 failed, 1 succeeded in 00: 21: 09.942 == ===================================
can you help me?
Thank you very much
It looks like you have defined 14 environments within your platformio.ini and you are compiling and uploading to all of them. Since these are all different chips I don’t think that’s what you’d like to do. Note that the one environment has succeeded
so I’m assuming that this is the environment which has your correct board selected. You can select the to-be-used default environment with the default_envs directive (docs). So if you only want to compile and upload to the uno environment, you should put
[platformio]
default_envs = one
at the top of the platformio.ini file. Or just remove all environments which you don’t want in the platformio.ini.
Thanks for the reply. I know that VS code and platformio are too complicated for me and reluctantly I know that I have to abandon it
Hi, I studied and I was able to solve the previous problems and insert my code on Arduino, but now new problems have arisen, and I can’t understand why and even less solve them.
I’ll put the screenshot if you need anything else to solve, just ask.
Thanks so much
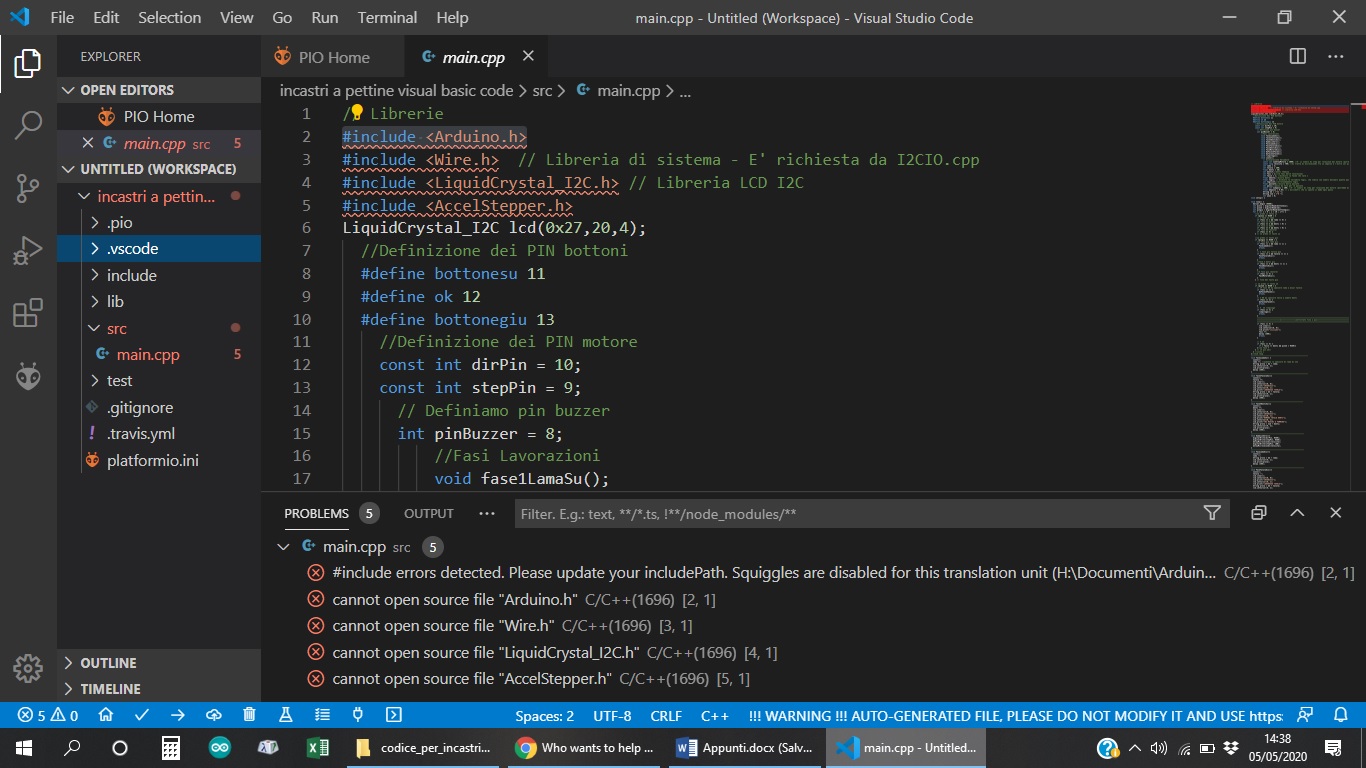
In the screen shot, error messages from Intellisense (and not the real build system) are visible.
Try to build it:
- If it fails, post the full log output.
- If it succeeds, we’ll provide you hints how to fix IntelliSense.
Hi, I tried to load the code on arduino and the result is this
> Executing task in folder comb joints visual basic code: C: \. Platformio \ penv \ Scripts \ platformio.exe run --target upload <

Processing uno (platform: atmelavr; board: uno; framework: arduino)
-------------------------------------------------- -------------------------------------------------- --------------

Verbose mode can be enabled via `-v, --verbose` option
CONFIGURATION: https://docs.platformio.org/page/boards/atmelavr/uno.html
PLATFORM: Atmel AVR 2.0.0> Arduino Uno
HARDWARE: ATMEGA328P 16MHz, 2KB RAM, 31.50KB Flash
PACKAGES:
 - framework-arduino-avr 5.0.0
 - tool-avrdude 1.60300.190424 (6.3.0)
 - toolchain-atmelavr 1.50400.190710 (5.4.0)
LDF: Library Dependency Finder -> http://bit.ly/configure-pio-ldf
LDF Modes: Finder ~ chain, Compatibility ~ soft
Found 8 compatible libraries
Scanning dependencies ...
Dependency Graph
| - <AccelStepper> 1.59
| - <LiquidCrystal_I2C>
| | - <Wire> 1.0
| - <Wire> 1.0
Building in release mode
Compiling .pio \ build \ uno \ src \ main.cpp.o
src \ main.cpp: In function 'void loop ()':
src \ main.cpp: 182: 38: error: lvalue required as left operand of assignment
         if (phases2 <= teeth && pinok = HIGH) {
                                      ^
*** [.pio \ build \ uno \ src \ main.cpp.o] Error 1
========================================== [FAILED] Took 18.12 seconds == ========================================
The terminal process terminated with exit code: 1

Terminal will be reused by tasks, press any key to close it.
Then if you allow me I would like to ask you a question that I am a little ashamed of … when we talk about IntelliSense what do we talk about?
Thanks so much
You probably want a comparison with == operator, not an assignment of the value HIGH to the pinok variable via the = sign here.
Is the technology / engine with which VSCode displays C/C++ errors in the IDE. VSCode’s Intellisense may sometimes still be wrong though and code might actually compile when given to GCC.
Good morning
I have another question to ask you
Is it possible to add a new platform library?
I would like to add this library, https://github.com/HobbyComponents/HCMotor but I can’t, can you help me?
Thanks
To your project?
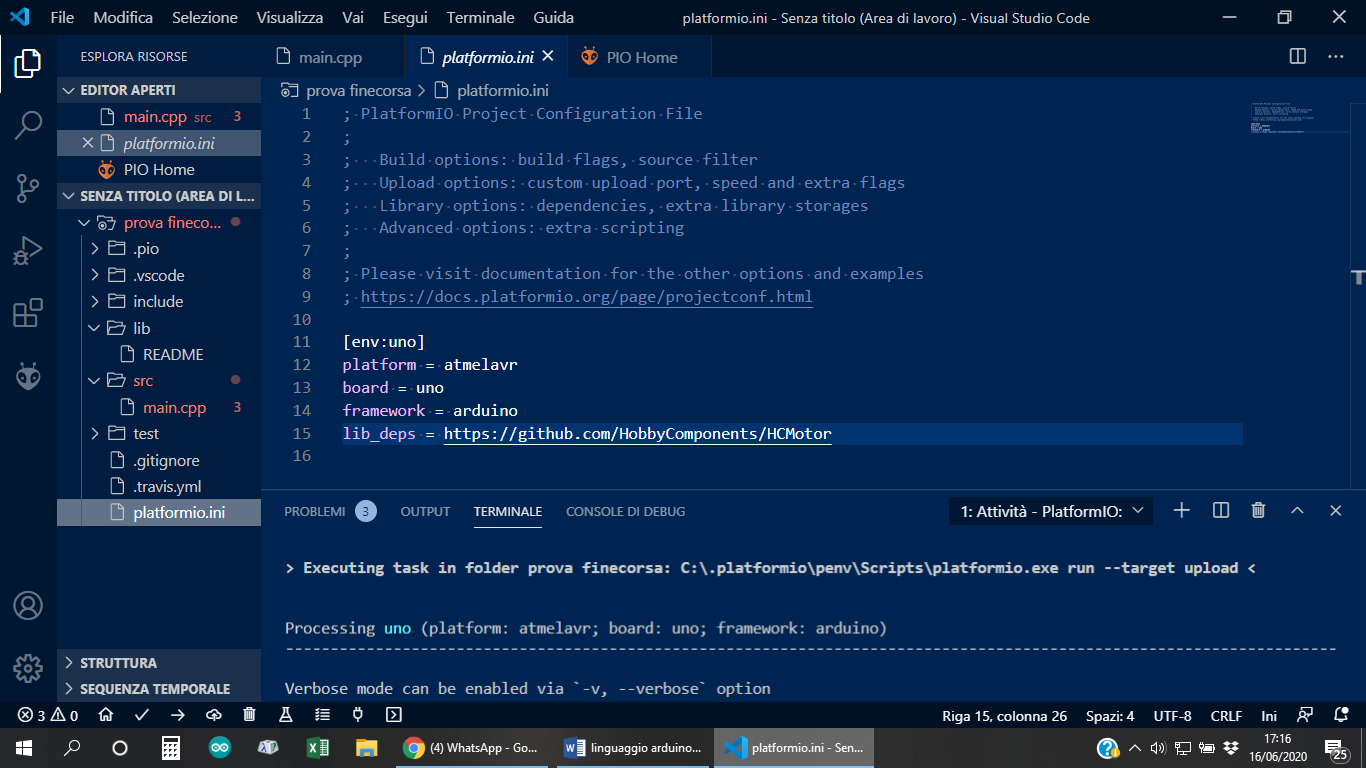
Edit the platformio.ini in the root of your project, and add lib_deps = https://github.com/HobbyComponents/HCMotor to it. Documentation for lib_deps is here. You can also use the Home button in the status bar (on the left side), and then click on ‘Projects’ and either ‘add existing’ or ‘configure’ your project to do this via the GUI.
Thanks for the reply
as you can see in the image that I have attached, I followed your instructions (if I understood them correctly), but it continues to give me errors, and it tells me this
> Executing task in folder prova finecorsa: C:\.platformio\penv\Scripts\platformio.exe run --target upload <


Processing uno (platform: atmelavr; board: uno; framework: arduino)
---------------------------------------------------------------------------------------------------------------------
Verbose mode can be enabled via `-v, --verbose` option
CONFIGURATION: https://docs.platformio.org/page/boards/atmelavr/uno.html
PLATFORM: Atmel AVR 2.2.0 > Arduino Uno
HARDWARE: ATMEGA328P 16MHz, 2KB RAM, 31.50KB Flash
DEBUG: Current (simavr) On-board (simavr)
PACKAGES:
 - framework-arduino-avr 5.0.0
 - tool-avrdude 1.60300.200527 (6.3.0)
 - toolchain-atmelavr 1.50400.190710 (5.4.0)
LDF: Library Dependency Finder -> http://bit.ly/configure-pio-ldf
LDF Modes: Finder ~ chain, Compatibility ~ soft
LibraryManager: Installing HCMotor
UserSideException: Please install Git client from https://git-scm.com/downloads:
  File "C:\.platformio\penv\lib\site-packages\platformio\builder\main.py", line 168:
    env.SConscript("$BUILD_SCRIPT")
  File "C:\.platformio\packages\tool-scons\script\..\engine\SCons\Script\SConscript.py", line 597:
    return _SConscript(self.fs, *files, **subst_kw)
  File "C:\.platformio\packages\tool-scons\script\..\engine\SCons\Script\SConscript.py", line 286:
    exec(compile(scriptdata, scriptname, 'exec'), call_stack[-1].globals)
  File "C:\.platformio\platforms\atmelavr\builder\main.py", line 161:
    target_elf = env.BuildProgram()
  File "C:\.platformio\packages\tool-scons\script\..\engine\SCons\Environment.py", line 219:
    return self.method(*nargs, **kwargs)
  File "C:\.platformio\penv\lib\site-packages\platformio\builder\tools\platformio.py", line 62:
    env.ProcessProjectDeps()
  File "C:\.platformio\packages\tool-scons\script\..\engine\SCons\Environment.py", line 219:
    return self.method(*nargs, **kwargs)
  File "C:\.platformio\penv\lib\site-packages\platformio\builder\tools\platformio.py", line 131:
    project_lib_builder = env.ConfigureProjectLibBuilder()
  File "C:\.platformio\packages\tool-scons\script\..\engine\SCons\Environment.py", line 219:
    return self.method(*nargs, **kwargs)
  File "C:\.platformio\penv\lib\site-packages\platformio\builder\tools\piolib.py", line 1036:
    project.install_dependencies()
  File "C:\.platformio\penv\lib\site-packages\platformio\builder\tools\piolib.py", line 868:
    lm.install(uri)
  File "c:\.platformio\penv\lib\site-packages\platformio\managers\lib.py", line 281:
    force=force,
  File "c:\.platformio\penv\lib\site-packages\platformio\managers\package.py", line 702:
    pkg_dir = self._install_from_url(name, url, requirements, track=True)
  File "c:\.platformio\penv\lib\site-packages\platformio\managers\package.py", line 485:
    vcs = VCSClientFactory.newClient(tmp_dir, url)
  File "c:\.platformio\penv\lib\site-packages\platformio\vcsclient.py", line 46:
    src_dir, remote_url, tag, silent
  File "c:\.platformio\penv\lib\site-packages\platformio\vcsclient.py", line 61:
    self.check_client()
  File "c:\.platformio\penv\lib\site-packages\platformio\vcsclient.py", line 127:
    "Please install Git client from https://git-scm.com/downloads"
============================================ [FAILED] Took 3.30 seconds ============================================
Il processo del terminale è stato terminato. Codice di uscita: 1

Terminale verrà riutilizzato dalle attività, premere un tasto qualsiasi per chiuderlo.
Yes, it looks like you did that correctly, since it is attempting to install the HCMotor library. However, as the next line of the compile output says, you need to now install the Git client, so that PlatformIO can work with git repositories. You have two options, you can do what the error message says, and install git:
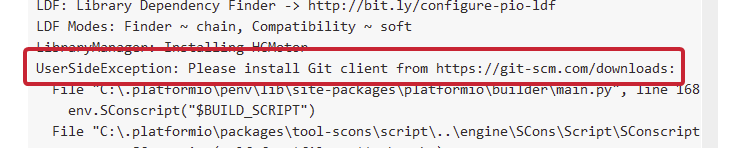
In other words, goto Git - Downloads and download the version of git for your operating system - i.e. Windows. Install it, and restart VSCode if you had it running still. PlatformIO should then find Git, and carry one.
Or, you can install the library via a zip file - the same way you would download a repo on GitHub if you dont’ have the git client. If you want to do that instead, change your lib_deps line to lib_deps = https://github.com/HobbyComponents/HCMotor/archive/master.zip, and building it try again! I would still however recommend installing and using Git, as that will allow for only changes to libraries and file to be downloaded, rather than having to re-download everything, whenever there are any updates.
Good evening, I’m working on a new project, and I need to install a new library, but by doing the above instructions I can’t get it to work.
The library is GravityTDS
the change I made on platformio.ini is: lib_deps = GravityTDS/GravityTDS.h at master · DFRobot/GravityTDS · GitHub
and report this error to me lib_deps = GravityTDS/GravityTDS.h at master · DFRobot/GravityTDS · GitHub
where am i wrong?
See documentation for lib_deps. It expects a path to the pure repository, not the header file. Just write
lib_deps =
   https://github.com/DFRobot/GravityTDS.git
(andpossible more libraries in an indented new line if necessary)
Hi everyone I am that with the ds1302 board and on my platformio I have installed the following library GitHub - msparks/arduino-ds1302 at f4794ec8f159c0a5b006085591dcea080415165e and since I’m not an arduino or github expert, I would like to ask you how I can do to understand all the functions of the librerya that I mentioned above.
I started from this code, but even if I change the date it doesn’t change my day
#include <Arduino.h>

#include <Ds1302.h>

Ds1302 rtc(31, 33, 32);

#include <LiquidCrystal_I2C.h>

LiquidCrystal_I2C lcd(0x27,20,4);

const static char* WeekDays[] ={

    "Lunedi",

    "Martedi",

    "Mercoledi",

    "Giovedi",

    "Venerdi",

    "Sabato",

    "Domenica"

};

const int su = 13;const int giu = 9;const int dx = 12;const int sx = 11;const int ok = 10;

void setup(){

    Serial.begin(9600);

    lcd.init();

    lcd.backlight();

    rtc.init();

    pinMode(su, INPUT);pinMode(giu, INPUT);pinMode(dx, INPUT);pinMode(sx, INPUT);pinMode(ok, INPUT);

        Ds1302::DateTime data_ora = {

            .year = 0,

            .month = 1,

            .day = 1,

            .hour = 0,

            .minute = 0,

            .second = 0,

            .dow = Ds1302::DOW_TUE

        };

    rtc.setDateTime(&data_ora);

    lcd.clear();

}

void loop(){

    // get the current time

    Ds1302::DateTime now;

    rtc.getDateTime(&now);

    static uint8_t last_second = 0;

    if (last_second != now.second){

        last_second = now.second;

        lcd.setCursor(0,2);

            lcd.print(WeekDays[now.dow - 1]),lcd.print(" ");

            if (now.day < 10)lcd.print('0');lcd.print(now.day); lcd.print('/');

            if (now.month < 10)lcd.print('0');lcd.print(now.month); lcd.print('/');

            if (now.year < 10)lcd.print('0');lcd.print(now.year);

        lcd.setCursor(0,3);

            if (now.hour < 10) lcd.print('0');lcd.print(now.hour);lcd.print(':');

            if (now.minute < 10) lcd.print('0');lcd.print(now.minute);lcd.print(':');

            if (now.second < 10) lcd.print('0');lcd.print(now.second);

    }

    delay(100);

}
Thanks everyone for the answers