Program uploaded but seems not running

Hello,
I have been programming on Arduino boards with Arduino IDE for years, but I would like to switch on the STM32. So I try by the very begining, as a newbie on PlatformIO.
I have created a basic new program as shown on this page, Getting Started with PlatformIO | STM32-base project,
and my board being a STM32 Bluepill, i have just changed the 1st line, so my code is as follow:

#include "stm32f1xx_hal.h"
// trouvé sur file:///U:/ELECTRONIQUE/STM32/EXEMPLES/Getting%20Started%20with%20PlatformIO_STM32.html 
// j'ai juste changé #include "stm32f4xx_hal.h" par #include "stm32f1xx_hal.h" car ma carte est une
// Bluepill STM32F103C8, déclarée à la création du projet

#define LED_PIN                                GPIO_PIN_5
#define LED_GPIO_PORT                          GPIOA
#define LED_GPIO_CLK_ENABLE()                  __HAL_RCC_GPIOA_CLK_ENABLE()

void LED_Init();

int main(void) {
  HAL_Init();
  LED_Init();

  while (1)
  {
    HAL_GPIO_TogglePin(LED_GPIO_PORT, LED_PIN);
    HAL_Delay(1000);
  }
}

void LED_Init() {
  LED_GPIO_CLK_ENABLE();
  GPIO_InitTypeDef GPIO_InitStruct;
  GPIO_InitStruct.Pin = LED_PIN;
  GPIO_InitStruct.Mode = GPIO_MODE_OUTPUT_PP;
  GPIO_InitStruct.Pull = GPIO_PULLUP;
  GPIO_InitStruct.Speed = GPIO_SPEED_HIGH;
  HAL_GPIO_Init(LED_GPIO_PORT, &GPIO_InitStruct);
}

void SysTick_Handler(void) {
  HAL_IncTick();
}

I use an (firmware updated) ST-Link to connect the Bluepill, and PlatformIO tells me that the upload is successful:

Processing bluepill_f103c8 (platform: ststm32; board: bluepill_f103c8; framework: stm32cube)
-----------------------------------------------------------------------------------------------------------------------------------------------------------------------------------------------------------------------Verbose mode can be enabled via `-v, --verbose` option
CONFIGURATION: https://docs.platformio.org/page/boards/ststm32/bluepill_f103c8.html
PLATFORM: ST STM32 (15.6.0) > BluePill F103C8
HARDWARE: STM32F103C8T6 72MHz, 20KB RAM, 64KB Flash
DEBUG: Current (stlink) External (blackmagic, cmsis-dap, jlink, stlink)
PACKAGES:
 - framework-stm32cubef1 @ 1.8.4
 - tool-dfuutil @ 1.11.0
 - tool-ldscripts-ststm32 @ 0.2.0
 - tool-openocd @ 2.1100.211028 (11.0)
 - tool-stm32duino @ 1.0.2
 - toolchain-gccarmnoneeabi @ 1.70201.0 (7.2.1)
LDF: Library Dependency Finder -> https://bit.ly/configure-pio-ldf
LDF Modes: Finder ~ chain, Compatibility ~ soft
Found 28 compatible libraries
Scanning dependencies...
No dependencies
Building in release mode
Checking size .pio\build\bluepill_f103c8\firmware.elf
Advanced Memory Usage is available via "PlatformIO Home > Project Inspect"
RAM:   [          ]   0.2% (used 44 bytes from 20480 bytes)
Flash: [          ]   1.8% (used 1156 bytes from 65536 bytes)
Configuring upload protocol...
AVAILABLE: blackmagic, cmsis-dap, dfu, jlink, mbed, stlink
CURRENT: upload_protocol = stlink
Uploading .pio\build\bluepill_f103c8\firmware.elf
xPack OpenOCD x86_64 Open On-Chip Debugger 0.11.0+dev (2021-10-16-21:19)
Licensed under GNU GPL v2
For bug reports, read
        http://openocd.org/doc/doxygen/bugs.html
debug_level: 1

hla_swd
none separate

target halted due to debug-request, current mode: Thread 
xPSR: 0x01000000 pc: 0x08000100 msp: 0x20001100
** Programming Started **
** Programming Finished **
** Verify Started **
** Verified OK **
** Resetting Target **
shutdown command invoked
============================================================================================= [SUCCESS] Took 2.61 seconds ============================================================================================= *  Terminal will be reused by tasks, press any key to close it. 

So I believe that the code has been uploaded into the Bluepill, but the problem is that nothing happens: the code is suppose to made a Green LED blinking, but there is just the Red LED permanently ON.

What is wrong ??

Thank you very much
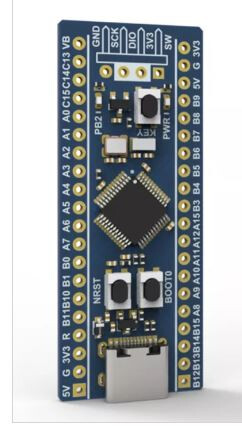
The Bluepill uses GPIOC and GPIO_PIN_13. The board used in the example is a NucleoF401xx which is wired differently.

Your Bluepill pinout is here STM32F103C8T6_Hello - Using low cost Bluepill (STM32F103C8T6) boards wi… | Mbed.

HTH

Cheers,
Norm.

Double check if you are writing code in a .c or in a .cpp file. If you are in a .cpp file, the interrupt handlers must use extern "C" to match their exepcted names, i.e,.

extern "C" void SysTick_Handler(void) {

Also not sure why you would need to have a pullup activated here on the LED’s pin, consider using GPIO_NOPULL instead.

Hi @maxgerhardt

The tutorial linked to is using *.c files, and uses the GPIO_PULLUP option, which is a little on the weird side for an output pin.

Cheers,
Norm.

I apologize for a so stupid topic ! it is my first lines on PlatformIO and also the first time I use a STM32 Bluepill, as I have been using Arduinos for decades…

I have to find basic codes examples using [ Platformio + Bluepill ] to avoid to ask so stupid questions…: by the way if you a site with such tutos, I am interested…

Thank you all

Well if you haven’t already, just change this to

#define LED_PIN                                GPIO_PIN_13
#define LED_GPIO_PORT                          GPIOC
#define LED_GPIO_CLK_ENABLE()                  __HAL_RCC_GPIOC_CLK_ENABLE()

does it work now?

No: I just get the Red led permanently ON (probably indicating that the board is powered).

Platformio says “SUCCESS” after upload, but nothing…

Executing task in folder essai01: C:\Users\Michel\.platformio\penv\Scripts\platformio.exe run --target upload 

Processing bluepill_f103c8 (platform: ststm32; board: bluepill_f103c8; framework: stm32cube)
-----------------------------------------------------------------------------------------------------------------------------------------------------------------------------------------------------------------------Verbose mode can be enabled via `-v, --verbose` option
CONFIGURATION: https://docs.platformio.org/page/boards/ststm32/bluepill_f103c8.html
PLATFORM: ST STM32 (15.6.0) > BluePill F103C8
HARDWARE: STM32F103C8T6 72MHz, 20KB RAM, 64KB Flash
DEBUG: Current (stlink) External (blackmagic, cmsis-dap, jlink, stlink)
PACKAGES:
 - framework-stm32cubef1 @ 1.8.4
 - tool-dfuutil @ 1.11.0
 - tool-ldscripts-ststm32 @ 0.2.0
 - tool-openocd @ 2.1100.211028 (11.0)
 - tool-stm32duino @ 1.0.2
 - toolchain-gccarmnoneeabi @ 1.70201.0 (7.2.1)
LDF: Library Dependency Finder -> https://bit.ly/configure-pio-ldf
LDF Modes: Finder ~ chain, Compatibility ~ soft
Found 28 compatible libraries
Scanning dependencies...
No dependencies
Building in release mode
Checking size .pio\build\bluepill_f103c8\firmware.elf
Advanced Memory Usage is available via "PlatformIO Home > Project Inspect"
RAM:   [          ]   0.2% (used 44 bytes from 20480 bytes)
Flash: [          ]   1.8% (used 1156 bytes from 65536 bytes)
Configuring upload protocol...
AVAILABLE: blackmagic, cmsis-dap, dfu, jlink, mbed, stlink
CURRENT: upload_protocol = stlink
Uploading .pio\build\bluepill_f103c8\firmware.elf
xPack OpenOCD x86_64 Open On-Chip Debugger 0.11.0+dev (2021-10-16-21:19)
Licensed under GNU GPL v2
For bug reports, read
        http://openocd.org/doc/doxygen/bugs.html
debug_level: 1

hla_swd
none separate

target halted due to debug-request, current mode: Thread 
xPSR: 0x01000000 pc: 0x080004d8 msp: 0x20005000
** Programming Started **
** Programming Finished **
** Verify Started **
** Verified OK **
** Resetting Target **
shutdown command invoked
============================================================================================= [SUCCESS] Took 2.76 seconds ============================================================================================= *  Terminal will be reused by tasks, press any key to close it. 

In VSCode’s menu bar, there should be Debugging → Start Debugging available.

Can you see where it’s stuck if you pause execution / try to step with it?

Meantime I have written a similar code using the Arduino Framework in VScode because I feel far more confortable with the Arduino syntax.
Compiled in VScore gives “SUCCESS”, but there is no blinking Led at all:

#include <Arduino.h>

// put function declarations here:
// int myFunction(int, int);
#define LED_BUILTIN  PC13 // STM32 built-in LED is connected with PC13 


// the setup function runs once when you press reset or power the board

void setup() {
  // put your setup code here, to run once:
  // int result = myFunction(2, 3);

  // initialize digital pin LED_BUILTIN as an output.
  pinMode(LED_BUILTIN, OUTPUT);
}

void loop() {
  // put your main code here, to run repeatedly:
    digitalWrite(LED_BUILTIN, HIGH);   // turn the LED on (HIGH is the voltage level)
    delay(1000);                       // wait for a second
    digitalWrite(LED_BUILTIN, LOW);    // turn the LED off by making the voltage LOW
    delay(1000);                       // wait for a second
}

// put function definitions here:
// int myFunction(int x, int y) {
//  return x + y;
//}

This let me think that the code is probably NOT uploaded into the Bluepill ???

Should I press the “Reset” button on the Bluepill or do anything ? My bluepill has 2 buttons “Boot” and “NRST” (reset) and is connected via a ST-Link USB adapter.

but strange that VScore tells “SUCCESS” when I upload, and I do not see any reaction of the Bluepill during uploading process, nor after ?..

This is interesting.

I followed the instructions at the link given for the tutorial, and then changed the LED_PIN and LED_GPIO_PORT as required to GPIO_PIN_13 and GPIOC, saved and compiled from within VSCode. Everything compiled but right at the end, I get an "undefined reference to `main’ from the startup code, by the look of things.

Linking .pio/build/bluepill_f103c8/firmware.elf
.pio/build/bluepill_f103c8/libFrameworkCMSISDevice.a(startup_stm32f103xb.o): In function `LoopFillZerobss':
(.text.Reset_Handler+0x2e): undefined reference to `main'
collect2: error: ld returned 1 exit status
*** [.pio/build/bluepill_f103c8/firmware.elf] Error 1

Which is a tad weird as main is definitely declared and present in main.c.

I only have the following in platformio.ini:

[env:bluepill_f103c8]
platform = ststm32
board = bluepill_f103c8
framework=STM32Cube

I have ST STM32 version 15.6.0 installed, which is the latest. More hunting required! :cry:

Cheers,
Norm.

Not a site, but an excellent book. Warren Gay’s Beginning STM32 Development with … is so good, I bought the paper and PDF versions. There’s a preview on Google Books at Beginning STM32: Developing with FreeRTOS, libopencm3 and GCC - Warren Gay - Google Books, plus, it is entirely based on the Bluepill.

On the other hand, it isn’t PlatformIO based though.

HTH

Cheers,
Norm.

Have you managed to get the green Led blinking ??

I have tried with the Arduino Framework instead of STM32Cube, and get the same “SUCCESS” at the end of the upload, but still nothing happened: only the red Led is permanently ON.

Then I have left VScore left and tried with the classic Arduino IDE v1.2.15, using the ST-Link.
I got the same succes after uploading:

STM32 ST-LINK CLI v3.3.0.0
STM32 ST-LINK Command Line Interface

ST-LINK SN: 45003A002833353739303541
ST-LINK Firmware version: V2J42S7 (Need Update)
Connected via SWD.
SWD Frequency = 4000K.
Target voltage = 3.2 V
Connection mode: Normal
Reset mode: Software reset
Device ID: 0x410 
Device flash Size: 64 Kbytes
Device family: STM32F10xx Medium-density

Loading file...
Flash Programming:
  File : C:\Users\Michel\AppData\Local\Temp\arduino_build_430535\essai03_arduino.ino.bin
  Address : 0x08000000
Memory programming...
 0%������������������������������ 60%�������������������� 100%
Memory programmed in 1s and 47ms.
Programming Complete.

MCU Reset.

Application started.

but same prblem: nothing happened, there is only the Red Led permanently on.

I am under the feeling that there is something particular to do with the “Boot” and “Reset” buttons to allow the code to be really uploaded : it looks like despite what VScore say, the code is not transfered (?).

Any suggestion ?

There’s 0 need to be poking around in the dark with regards to what’s happening, you can use debugging to see the code execute or see where it’s stuck, whether it’s putting the right values in the registers etc. Please use it.

I’m afraid I’m still looking into why it is refusing to link. It compiles ok, but then reports that it cannot see the main function at link time.

Cheers,
Norm.

Ok, the weirdness of my undefined reference to `main` error went away when I created an identical project. It seems that the compilation never compiled src/main.c. Anyway, I managed to get a clean compile and link.

To upload with my ST-Link V2 programmer device, the upload default, I didn’t have to amend my platformio.ini from the following:

[env:bluepill_f103c8]
platform = ststm32
board = bluepill_f103c8
framework = stm32cube

And after a successful upload, no blinking green LED!

I ran up the debugger and didn’t see anything untoward, everything stepped through fine, just no LED effects were noticed. Then I spotted a problem in the source.

Because the original code was blinking a GPIOA pin, only the GPIOA clock was enabled! We have changed over to GPIOC so we need to start the GPIOC clock instead.

In your code, change these lines:

#define LED_GPIO_CLK_ENABLE()   __HAL_RCC_GPIOA_CLK_ENABLE()
...
GPIO_InitStruct.Pull = GPIO_PULLUP;

to these instead:

#define LED_GPIO_CLK_ENABLE()   __HAL_RCC_GPIOC_CLK_ENABLE()
...
GPIO_InitStruct.Pull = GPIO_NOPULL;

That will start the GPIOC clock and turn off the pullup resistors, and we are in business with a flashing green LED! (Although, it works fine with GPIO_PULLUP or GPIO_PULLDOWN enabled!)

Cheers,
Norm.

I have solved the problem !
The cause was simpler than you suggested: the STM32 Bluepill has its bluit-in Led connected to PB2, and not to PC13 as usual !!
See the attached photo: PB2 is written just close to the Led !
image

So Platformio was right saying that the upload was OK !

I just had to change the code in the program from “#define LED_BUILTIN PC13” to “#define LED_BUILTIN PB2” and everything works perfectly !

Ha! Interesting, your Bluepill looks nothing like mine. Mine can be seen on this page: Blue Pill - STM32duino wiki where it states PC13 is the LED pin.

If yours is PB2, then You’ll have to start the GPIOB clock instead of the original GPIOA or my GPIOC clock.

However, I’m glad you got it sorted.

Cheers,
Norm.

I have not written any line of code related to GPIOB nor GPIOA, and the Led is perfectly blinking.

Here s my code:

#include <Arduino.h>

// put function declarations here:
// int myFunction(int, int);
#define LED_BUILTIN  PB2 // STM32 built-in LED is connected with PB2, parfois c'est PC13 au lieu de PB2 


// the setup function runs once when you press reset or power the board

void setup() {
  // put your setup code here, to run once:
  // int result = myFunction(2, 3);

  // initialize digital pin LED_BUILTIN as an output.
  pinMode(LED_BUILTIN, OUTPUT);
}

void loop() {
  // put your main code here, to run repeatedly:
    digitalWrite(LED_BUILTIN, HIGH);   // turn the LED on (HIGH is the voltage level)
    delay(1000);                       // wait for a second
    digitalWrite(LED_BUILTIN, LOW);    // turn the LED off by making the voltage LOW
    delay(1000);                       // wait for a second
}

// put function definitions here:
// int myFunction(int x, int y) {
//  return x + y;
//}

So why do you say that I have to start GPIOB ? what is the value added of this start ?

Thanks

My apologies, I thought you were still using the original code you posted. I forgot you had switched to using the Arduino framework. The framework will ensure that the correct clocks arevstarted.

Cheers,
Norm.