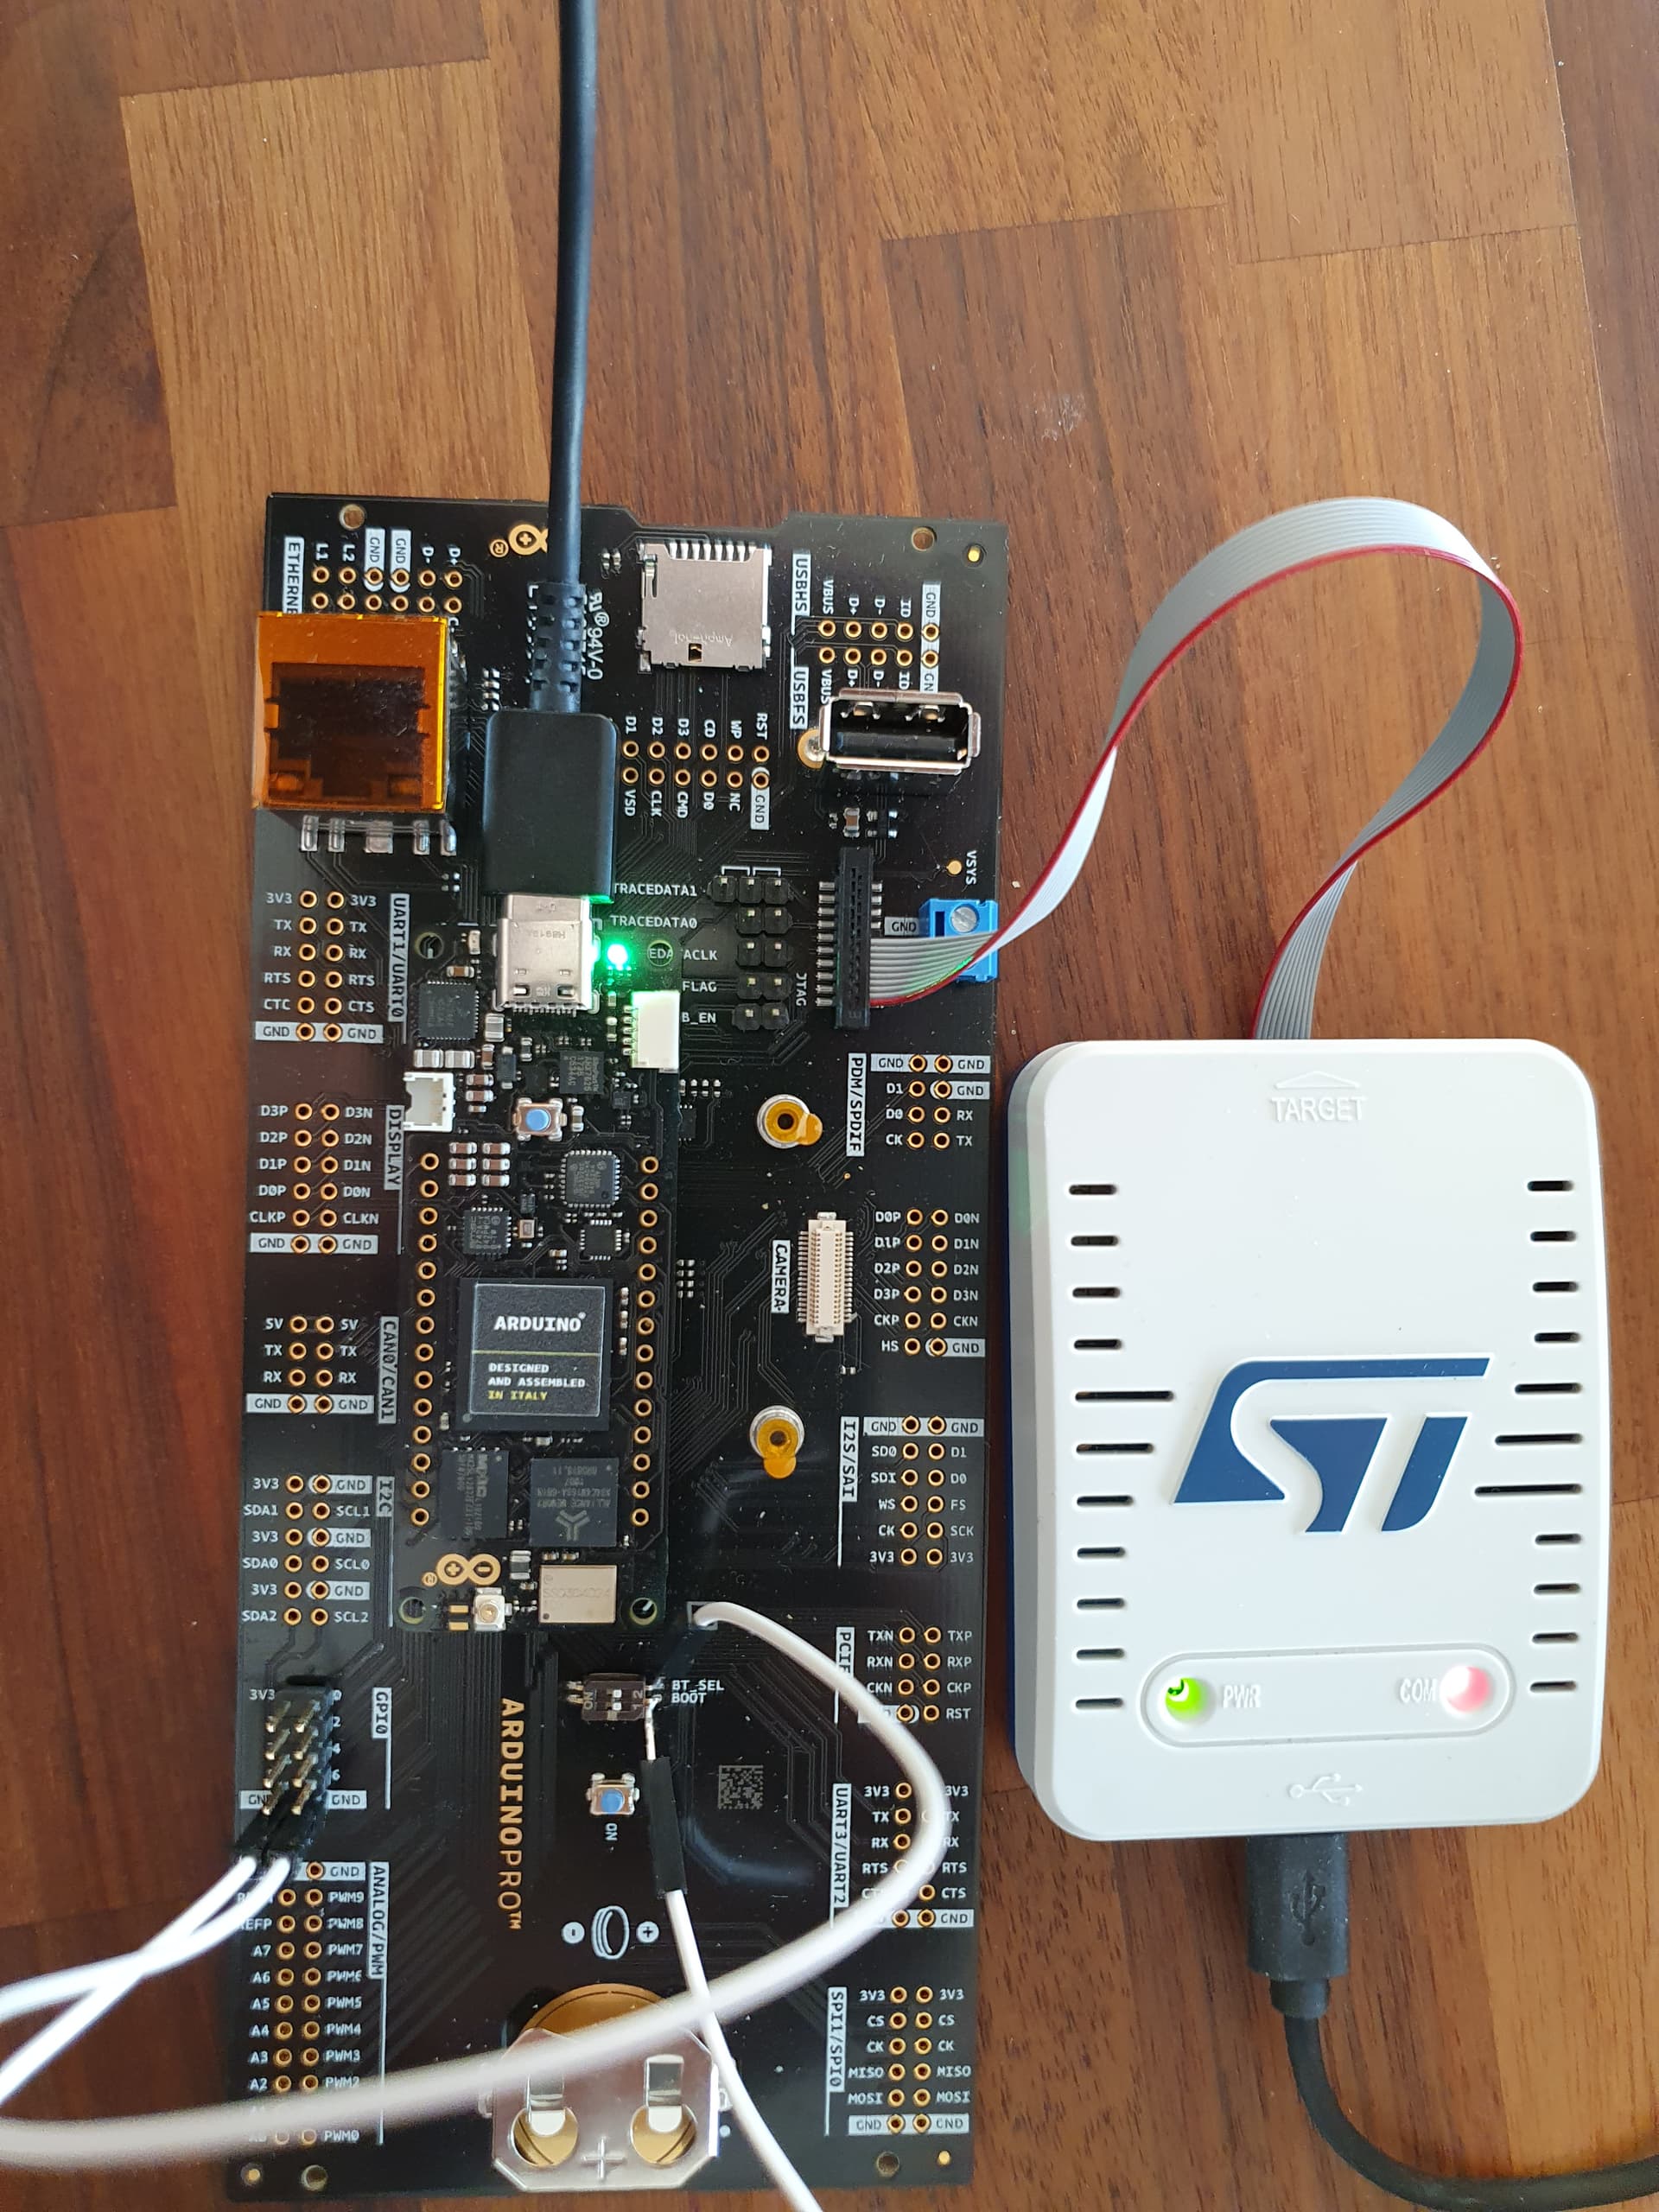
For my first try with PlatformIO I have the following Setup:
VisualStudioCode with PlatformIO
Board: Arduino Portenta H7 and Brackout Board
STLINK-V3SET Debug Adapter
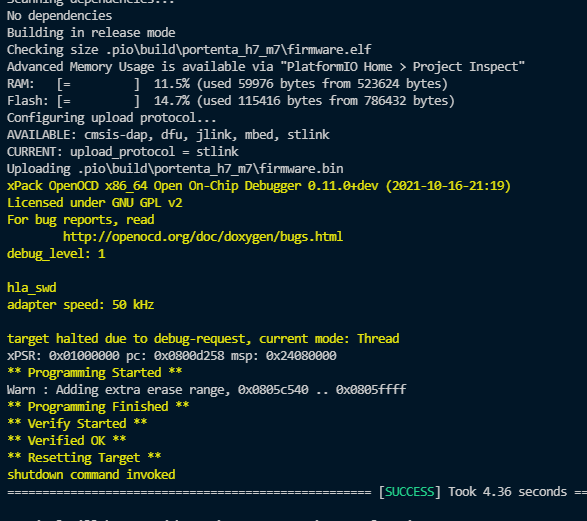
I try to bring the simple blink program to run. Build and Upload work successfully. And when I start debugging, the output in the debug console looks good:
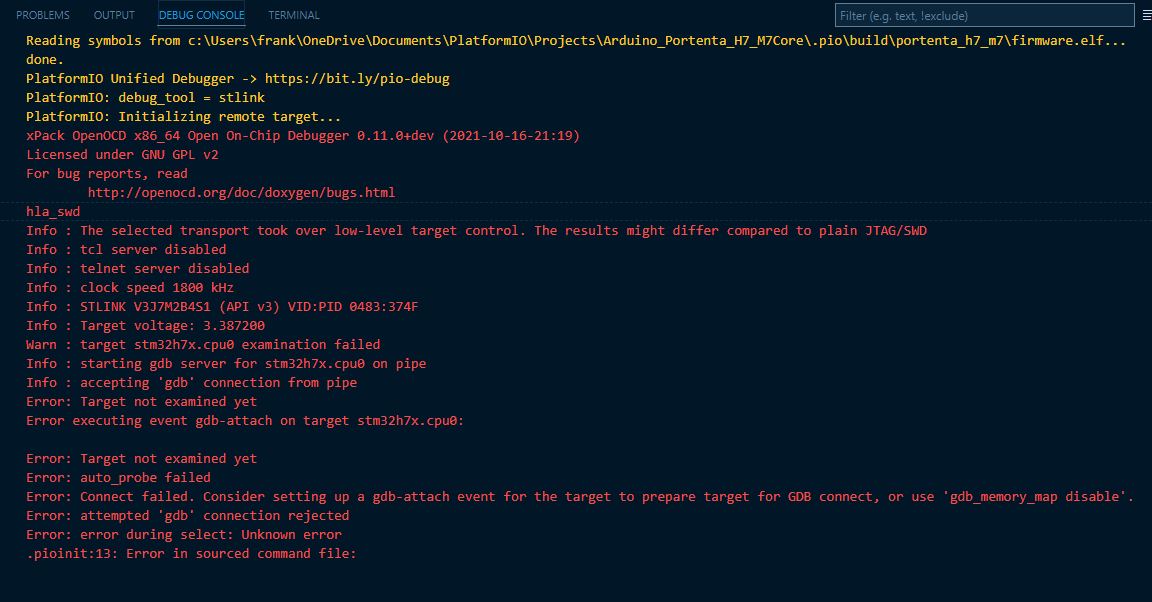
Reading symbols from c:\Users\frank\OneDrive\Documents\PlatformIO\Projects\Arduino_Portenta_H7_M7Core\.pio\build\portenta_h7_m7\firmware.elf...
done.
PlatformIO Unified Debugger
PlatformIO: debug_tool = stlink
PlatformIO: Initializing remote target...
xPack OpenOCD x86_64 Open On-Chip Debugger 0.11.0+dev (2021-10-16-21:19)
Licensed under GNU GPL v2
hla_swd
Info : The selected transport took over low-level target control. The results might differ compared to plain JTAG/SWD
Info : tcl server disabled
Info : telnet server disabled
Info : clock speed 1800 kHz
Info : STLINK V3J7M2B4S1 (API v3) VID:PID 0483:374F
Info : Target voltage: 3.374400
Info : stm32h7x.cpu0: Cortex-M7 r1p1 processor detected
Info : stm32h7x.cpu0: target has 8 breakpoints, 4 watchpoints
Info : starting gdb server for stm32h7x.cpu0 on pipe
Info : accepting 'gdb' connection from pipe
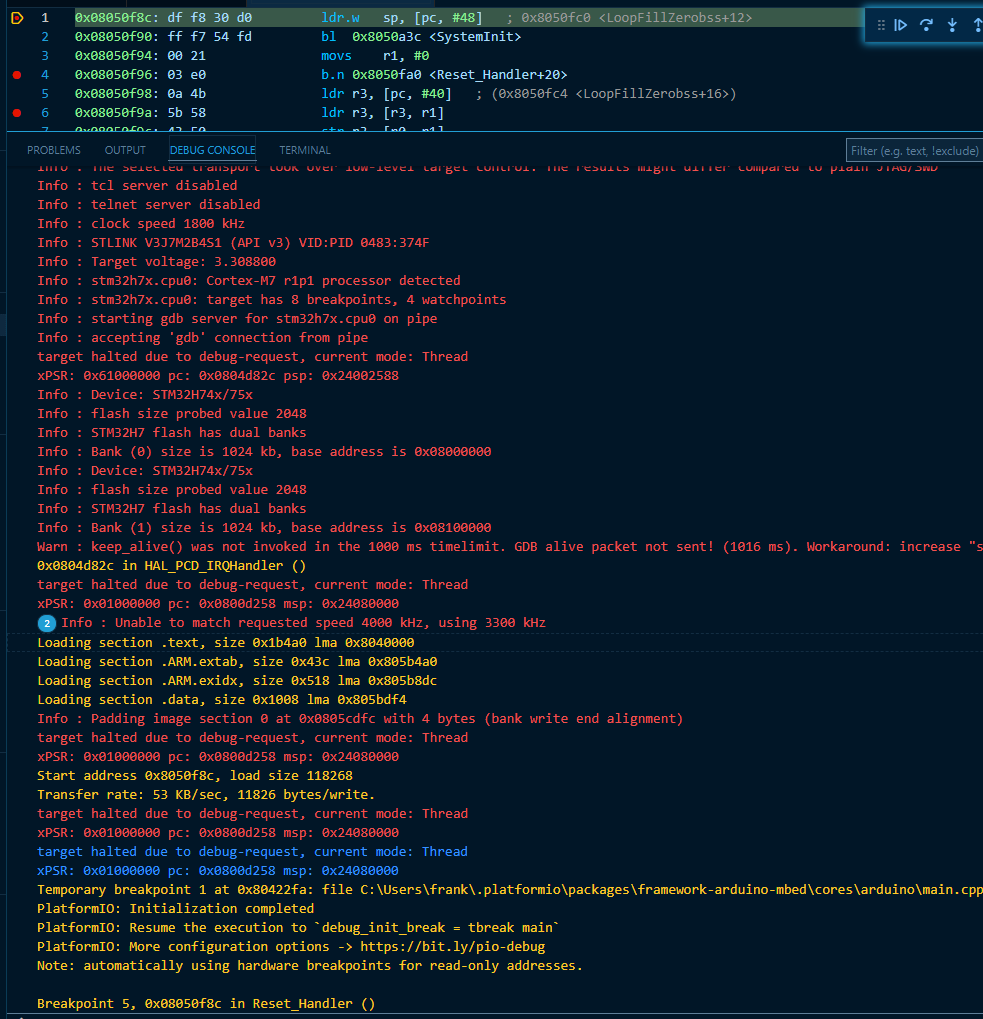
target halted due to debug-request, current mode: Thread
xPSR: 0x01000000 pc: 0x1ff0a6e2 msp: 0x24003ab8
Info : Device: STM32H74x/75x
Info : flash size probed value 2048
Info : STM32H7 flash has dual banks
Info : Bank (0) size is 1024 kb, base address is 0x08000000
Info : Device: STM32H74x/75x
Info : flash size probed value 2048
Info : STM32H7 flash has dual banks
Info : Bank (1) size is 1024 kb, base address is 0x08100000
Warn : keep_alive() was not invoked in the 1000 ms timelimit. GDB alive packet not sent! (1008 ms). Workaround: increase "set remotetimeout" in GDB
0x1ff0a6e2 in ?? ()
target halted due to debug-request, current mode: Thread
xPSR: 0x01000000 pc: 0x1ff09abc msp: 0x24003af8
Info : Unable to match requested speed 4000 kHz, using 3300 kHz
Info : Unable to match requested speed 4000 kHz, using 3300 kHz
Loading section .text, size 0x1b4a0 lma 0x8040000
Loading section .ARM.extab, size 0x43c lma 0x805b4a0
Loading section .ARM.exidx, size 0x518 lma 0x805b8dc
Loading section .data, size 0x1008 lma 0x805bdf4
Info : Padding image section 0 at 0x0805cdfc with 4 bytes (bank write end alignment)
target halted due to debug-request, current mode: Thread
xPSR: 0x01000000 pc: 0x1ff09abc msp: 0x24003af8
Start address 0x8050f8c, load size 118268
Transfer rate: 53 KB/sec, 11826 bytes/write.
target halted due to debug-request, current mode: Thread
xPSR: 0x01000000 pc: 0x1ff09abc msp: 0x24003af8
target halted due to debug-request, current mode: Thread
xPSR: 0x01000000 pc: 0x1ff09abc msp: 0x24003af8
Temporary breakpoint 1 at 0x80422fa: file C:\Users\frank\.platformio\packages\framework-arduino-mbed\cores\arduino\main.cpp, line 36.
PlatformIO: Initialization completed
PlatformIO: Resume the execution to `debug_init_break = tbreak main`
PlatformIO: More configuration options
Note: automatically using hardware breakpoints for read-only addresses.
Program
received signal SIGINT, Interrupt.
0x1ff0a6e2 in ?? ()
Info : halted: PC: 0x1ff0a6e4
halted: PC: 0x1ff0a6e4
Info : halted: PC: 0x1ff0a6e6
halted: PC: 0x1ff0a6e6
The big problem I have is that the program seams not to start at the correct address. No breakpoints are reached. Also a breakpoint on the first line in the Reset_Handler.dbgasm file (address 0x08050f8c) has never been reached. The program counter is always in the system memory (0x1ff00000-0x1ff1FFFF) area.
What can I do to bring this to work? Can somebody help me with this?
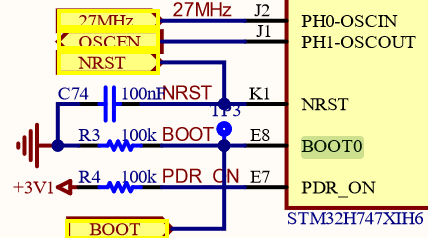
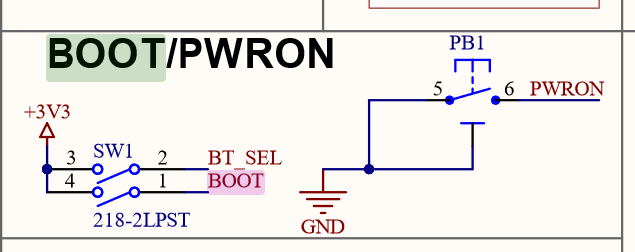
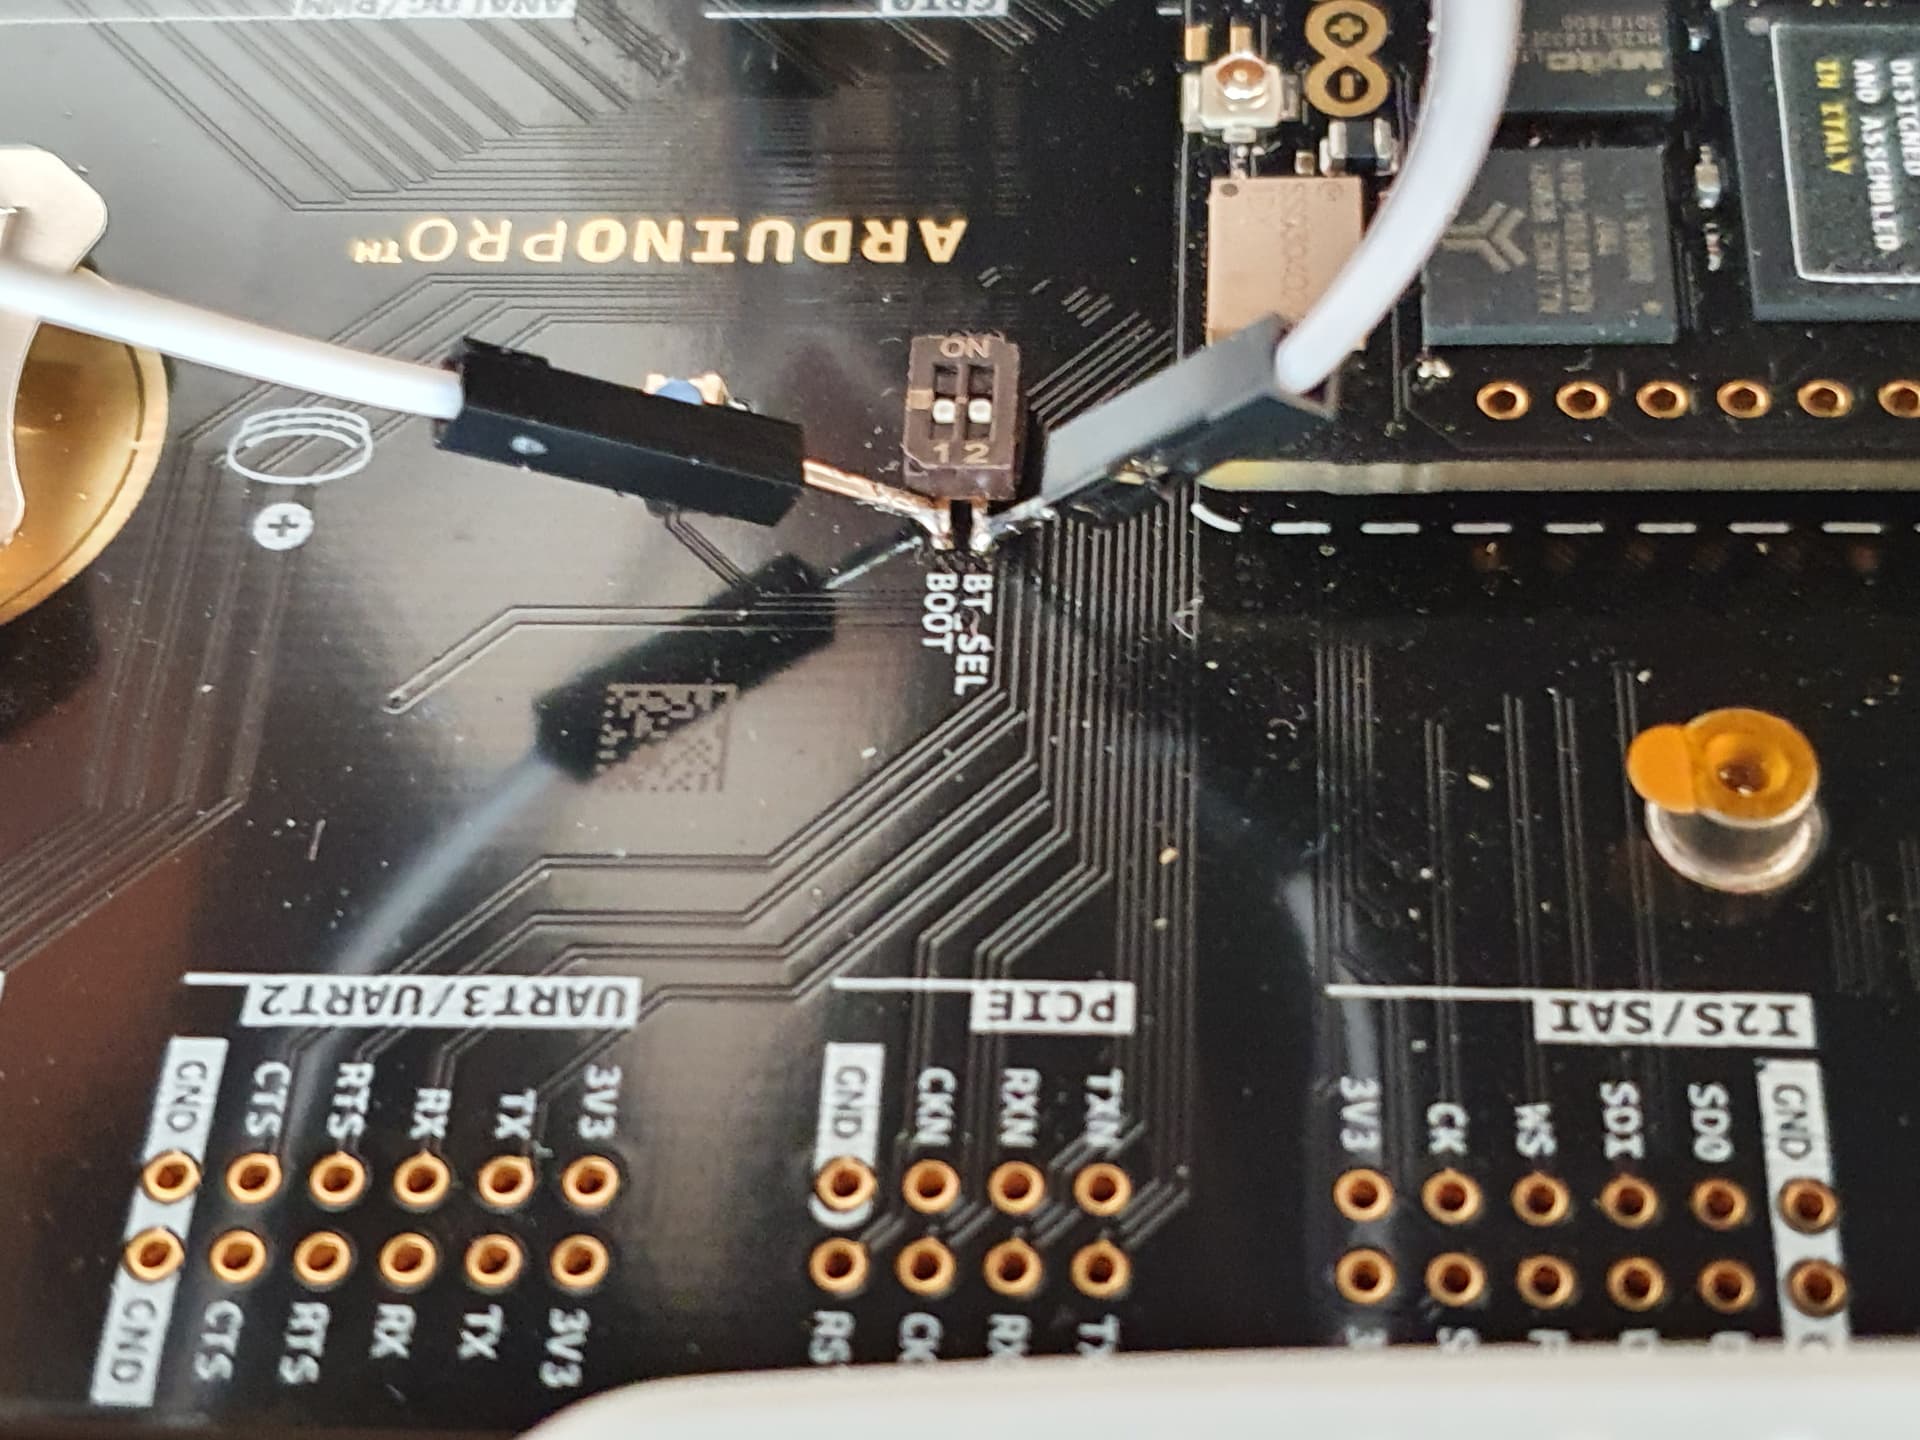
Hmm I see this is tricky. The breakout board gives you a slider switch labeled “BOOT” for it but it only connects to 3.3V, not directly to GND which is what you’d need.
The only instance in which I’ve seen that debugging starts in the system memory is if the BOOT0 pin has a weak pulldown (which it has on the Portenta H7 board with its 100K resistor) or if its left floating. Connecting the pin directly to GND solved the issue there.
You might want to get creative and temporarily solder a jumper cable to the “1” pin of the SW1 so that you can plug it directly into GND to test this.
There may also be a way with configuration fuses settable by the STM32CubeProgrammer tool to ignore the BOOT0 state and assume it as a constant, I’m not sure.
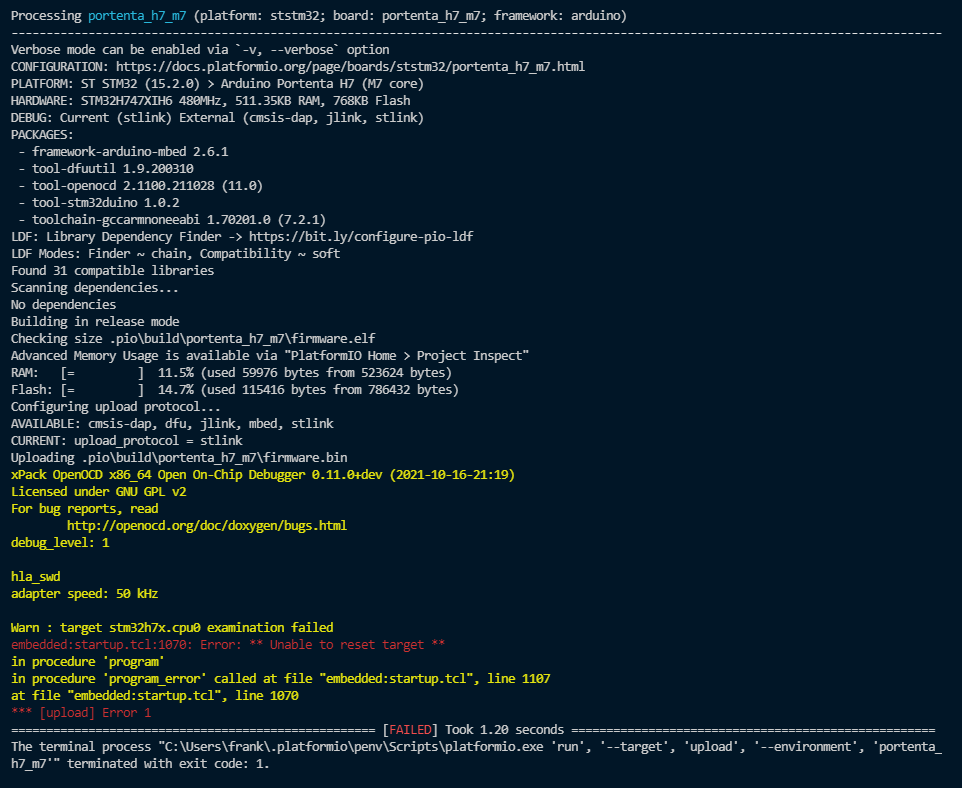
I had to remove first the foil from the switch to see that the switch for BOOT is in ON position (factory default). I moved it now to the OFF position. I guess 100k resistor for pull down should be enough. The situation has changed now. Uploading the program fails:
xPack OpenOCD x86_64 Open On-Chip Debugger 0.11.0+dev (2021-10-16-21:19)
Licensed under GNU GPL v2
For bug reports, read
http://openocd.org/doc/doxygen/bugs.html
debug_level: 1
hla_swd
Warn : target stm32h7x.cpu0 examination failed
embedded:startup.tcl:1070: Error: ** Unable to reset target **
in procedure ‘program’
in procedure ‘program_error’ called at file “embedded:startup.tcl”, line 1107
at file “embedded:startup.tcl”, line 1070
*** [upload] Error 1
… in the debugger console:
*Info : tcl server disabled *
*Info : telnet server disabled *
*Info : clock speed 1800 kHz *
*Info : STLINK V3J7M2B4S1 (API v3) VID:PID 0483:374F *
*Info : Target voltage: 3.331200 *
*Warn : target stm32h7x.cpu0 examination failed *
*Info : starting gdb server for stm32h7x.cpu0 on pipe *
*Info : accepting ‘gdb’ connection from pipe *
*Error: Target not examined yet *
*Error executing event gdb-attach on target stm32h7x.cpu0: *
*Error: Target not examined yet *
*Error: auto_probe failed *
*Error: Connect failed. Consider setting up a gdb-attach event for the target to prepare target for GDB connect, or use ‘gdb_memory_map disable’. *
*Error: attempted ‘gdb’ connection rejected *
*Error: error during select: Unknown error * .pioinit:13: Error in sourced command file:
It seams that the micro controller can not be detected. I guess something is running on the board (blinking LED).
Both switches must be in the upper position (closest to the text label BT_SEL and BOOT) so that they’re not directly connected to 3.3V but connected to GND via the weak pulldown resistor.
As I said, my only experience with debugging starting at the wrong address was when BOOT0 was not directly, without a resistor, connected to GND. Can you try per
I Also removed USB-c and connect a external power supply (+5V) to the breakout board (J8). The behavior is exactly the same. Also with BOOT switch in ON position it is the same (starting in bootloader mode)
If I do the same with BOOT in ON position it works without any errors.
But with BOOT in ON position I have to press first the reset button because the LED is blinking. (something seems to be running on the controller). With pressing the reset button blinking stops and upload is possible without a problem.
When I try to upload with BOOT on GND then pressing the reset button has not the same effect. The LED starts blinking again and again.
Is it possible that something is preconfigured on the controller. Is it possible to wipe out everything completely. Would this make sense?
I found a solution to bring it work:
Before I start in PlatformIO with upload / debug, I start the STM32CubeProgrammer and do a connect/disconnect . Then I can proceed with upload / debug in PlatformIO and it works. The program stops at the breakpoints and it’s possible to step trought the program in single step mode.
Removing STLink from USB and plugin it again does not change anything. Upload and debug in PlatformIO is still possible. But removing temporarily power from the Portenta Board brings back the problems again. Obviously the STM32CubeProgrammer do something in the MCU that PlatformIO/OpenOCD don’t do. But it seams to be persistent until MCU power off/on .
I think this puts the board in a special reset state that makes the board accepting of a debug connection…
Are you using a Software Reset or a Hardware Reset in STM32CubeProgrammer? The same method should be used in PlatformIO.
If opening an issue does not help immediately, you can try to edit your local portenta_h7_m7.json file in <home folder>/.platformio/platforms/ststm32/boards. It has a section
you can expand this section by OpenOCD extra arguments
where you can iterate the none reset configuration through the available methods listed in here
Possible values are none (the default), trst_only, srst_only and trst_and_srst
[… extendable by…] srst_pulls_trst, trst_pulls_srst , srst_nogate, srst_gates_jtag, …
I’m in a similar situation as you.
I have a custom board with BOOT0 and BT_SEL floating. BOOT0 is only connected to the weak pulldown on the Portenta H7.
I can connect via ST-LinkV2 and STMCubeProgrammer to the Portenta, like you.
However the connect/disconnect trick doesn’t in my case. How was the BOOT0 pin connection that worked for you ultimately?
Also did you have to specify the 0x8004000 adress somewhere in order that the debug upload works correctly without overwriting the arduino bootloader?