There is a few topics already on this subject but there still doesn’t seem to be any clear instructions on how to have multiple files in platformIO talking to the main.cpp code. I am trying to get converted over to platformIO from the Arduino IDE, and one of my first hurdles seems to be how i can split up my functions into different files like i have done with tabs in the Arduino IDE.
i have tried to follow the links and tips from the previous topics and created header files in the library folder and then in the main source folder but it still won’t pick up my other files. Also the import functionality from existing Arduino IDE files only allows single file imports.
if anyone can offer more support it would be greatly appreciated! I would like to move over to platformIO but i need to be able to split up my functions in different files to make my codes more simplistic.
thanks for getting back to me. I’m not sure of the best way to show you as the code that I’m transferring across isn’t that tidy at the moment and might not make much sense. If it doesn’t i can make up some another sample code to simplify what’s going on but basically i have split up my sketch into 3 different functions which talk to each other passing information between.
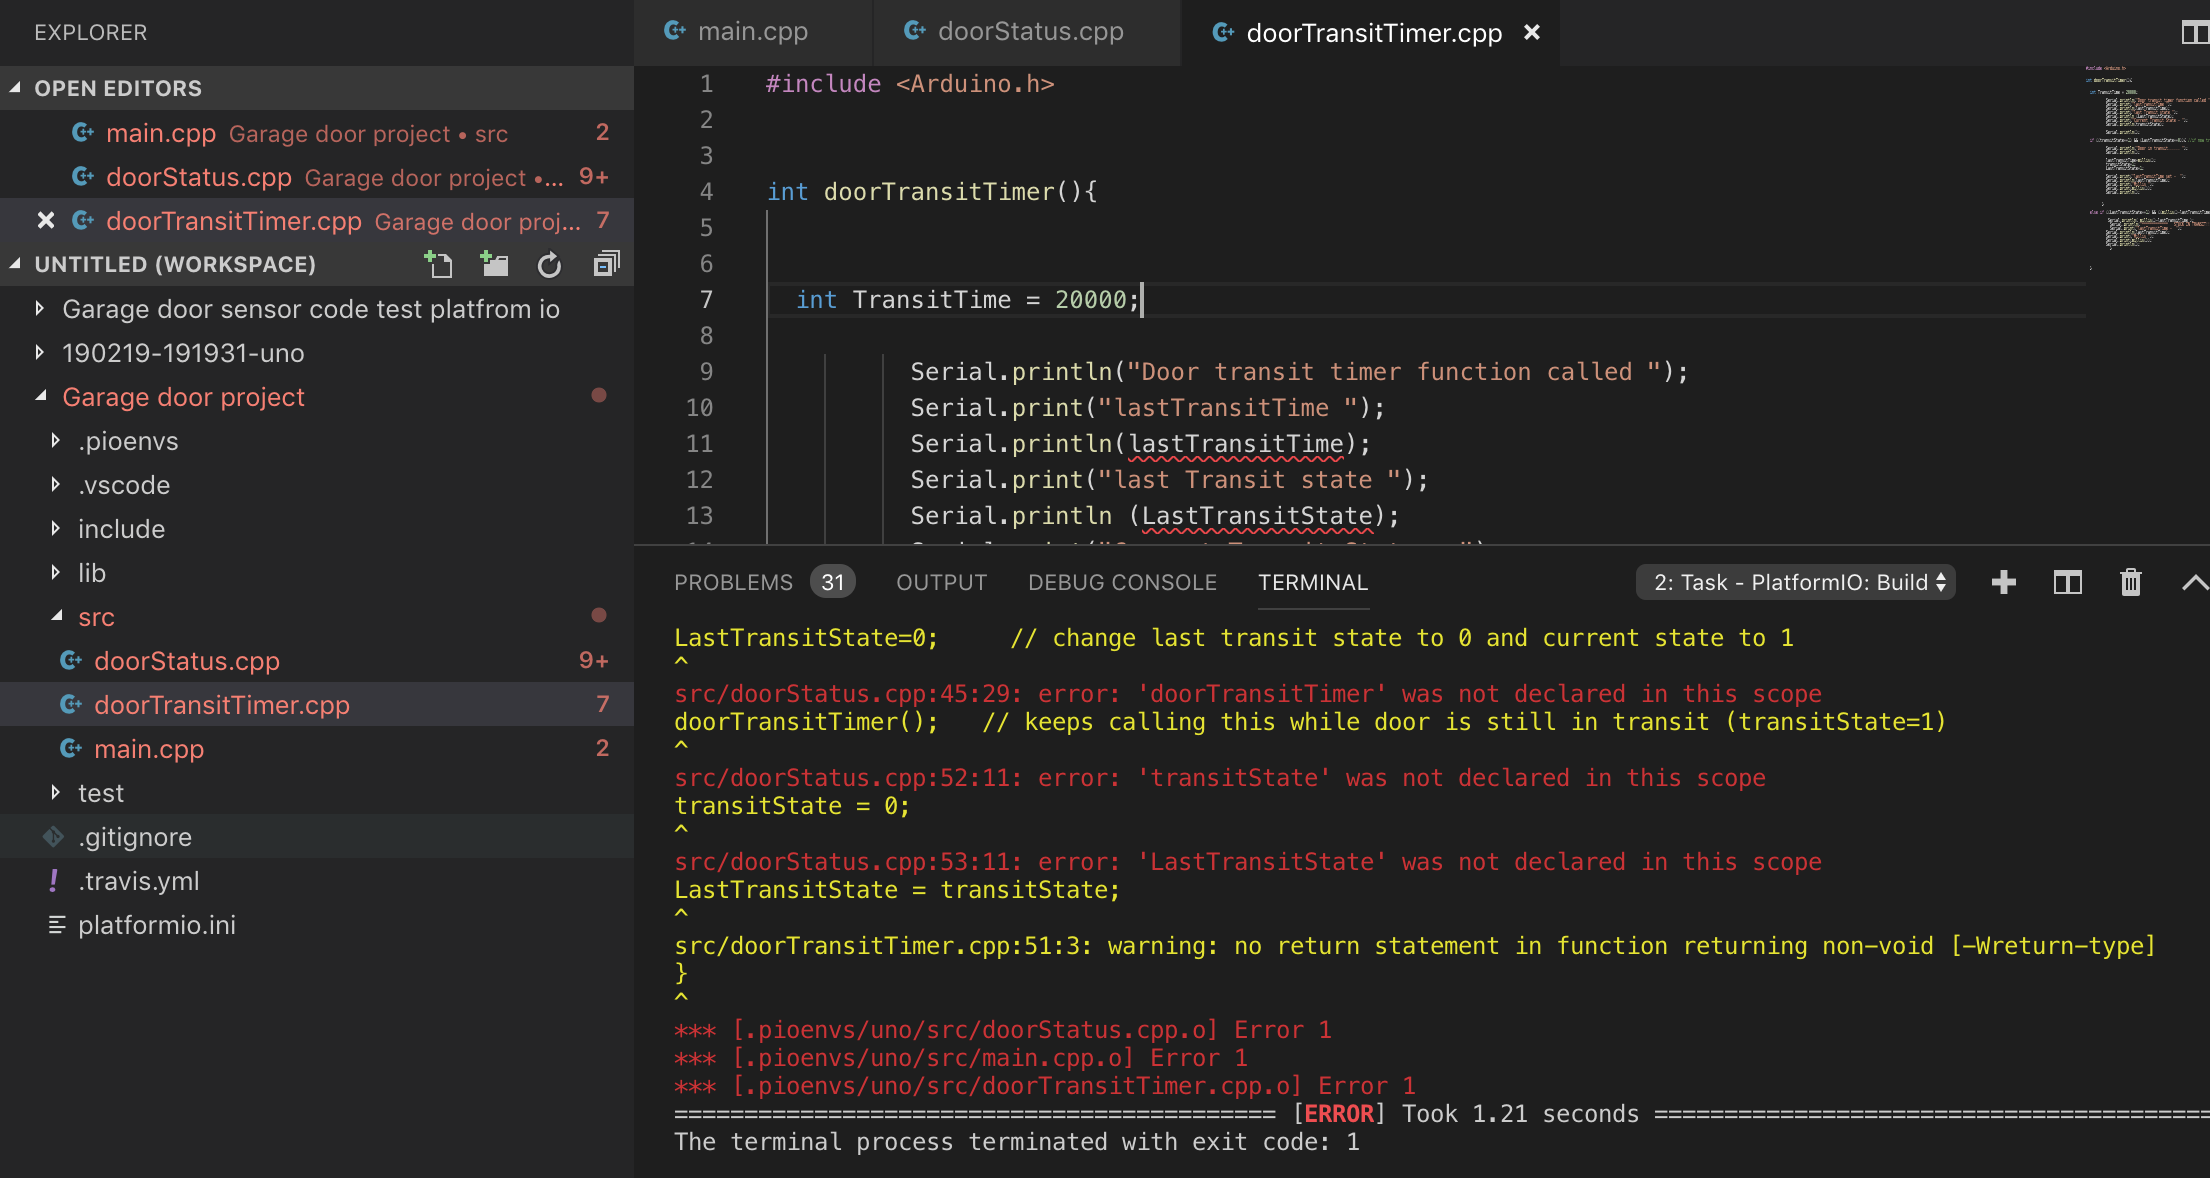
In this example shot i have shown the 3 functions in the src folder as .cpp files. I have also tried to put them in the library folder and tried to make them .h files also. In any configuration i get the same messages stating it doesn’t recognise the other functions. As you can probably see i have no idea what I’m doing here but i really can’t find any documentation that is clear in what to do.
// Garage door sensor code main section

int closedSwLPin =4;
int closedSwRPin =5;
int openSwPin =6;
int opnClsRelayLed =7;

int sensorOutput;

int transitState=0;
int LastTransitState=0;
unsigned long lastTransitTime;

void setup() {
  Serial.begin(9600);
  pinMode(closedSwLPin, INPUT);
  pinMode(closedSwRPin, INPUT);
  pinMode(openSwPin, INPUT);
  transitState = 0;   ////  transit state reset set for testing ***********

}

void loop() {
    delay(2000);

    switch (doorStatus()){
      case 1:
      Serial.println("************");
      Serial.println("Door is Closed");
      Serial.println("************");

      break;

      case 2:
      Serial.println("************");
      Serial.println("Door is Open");
      Serial.println("************");
      break;

      case 3:

      Serial.println("************");
      Serial.println("Door is in transit");
      Serial.println("************");
      break;

      default:
      break;
    }
}
********************************* ********************************* *********************************
*********************************  Second tab/Function   *********************************
********************************* ********************************* *********************************
// Door Status function

int doorStatus(){

int  closedSwLPinOutput = digitalRead(closedSwLPin);
int  closedSwRPinOutput = digitalRead(closedSwRPin);
int  openSwPinOutput = digitalRead(openSwPin);
int doorStatus;


        Serial.print("R Closed Switch - ");
        Serial.println(closedSwRPinOutput);
        Serial.print("L Closed Switch - ");
        Serial.println(closedSwLPinOutput);
        Serial.print("Open Switch - ");
        Serial.println(openSwPinOutput);
        delay(2000);

  if ((closedSwLPinOutput ==1) && (closedSwRPinOutput ==1) && (openSwPinOutput ==0)){

      doorStatus = 1;             // Send a 1 (closed) to main loop
      Serial.print("Door status - ");
      Serial.println(doorStatus);
      transitState = 0;
      LastTransitState = transitState;
      }

   else if ((closedSwLPinOutput==0) && (closedSwRPinOutput ==0) && (openSwPinOutput ==0)){
            doorStatus = 3;
            Serial.print("Door status - ");
            Serial.println(doorStatus);   // Send a 3 (transit) to main loop

            if (transitState == 0){     // if first time in transit since last (transitState=0) then
                LastTransitState=0;     // change last transit state to 0 and current state to 1
                transitState = 1;
                Serial.print("Last Transit State - ");
                Serial.println(LastTransitState);
                Serial.print("Current Transit State - ");
                Serial.println(transitState);
                }

           doorTransitTimer();   // keeps calling this while door is still in transit (transitState=1)

          }
   else if ((closedSwLPinOutput ==0) && (closedSwRPinOutput ==0) && (openSwPinOutput ==1)){ // Send a 0 (open) to main loop
          doorStatus = 2;
          transitState = 0;
          LastTransitState = transitState;
         }
        return doorStatus;
}
********************************* ********************************* *********************************
*********************************  Third tab/Function    *********************************
********************************* ********************************* *********************************

// Door Transit Timer

int doorTransitTimer(){

  int TransitTime = 20000;

          Serial.println("Door transit timer function called ");
          Serial.print("lastTransitTime ");
          Serial.println(lastTransitTime);
          Serial.print("last Transit state ");
          Serial.println (LastTransitState);
          Serial.print("Current Transit State - ");
          Serial.println(transitState);

          Serial.println();

  if ((transitState==1) && (LastTransitState==0)){ //if now transiting when we werent before

          Serial.println("Door in transit...... ");
          Serial.println();

          lastTransitTime=millis();
          transitState=1;
          LastTransitState=1;

          Serial.print("lastTransitTime set -  ");
          Serial.println(lastTransitTime);
          Serial.print("Millis ");
          Serial.print(millis());
          Serial.println();

        }

  else if ((LastTransitState==1) && ((millis()-lastTransitTime) >=(TransitTime))){

           Serial.println( millis()-lastTransitTime );
            Serial.println("*************   STUCK IN TRANSIT!!!   ************");
            Serial.print("lastTransitTime -  ");
          Serial.println(lastTransitTime);
          Serial.print("Millis ");
          Serial.print(millis());
          Serial.println();
            }
  }
So i have done some more research and created some mock up test code which works and want to share it to help anyone in the same boat as me. As you will probably tell i am a novice so if you have anything to add please be my guest. I still agree with some of the other members in the community, and think a short video will be useful.
I used this guide and this guide because it was more straightforward than the one suggested. A generic C++ search for multiple files reveals what you need.
// ***************  Third .cpp *************

#include <Arduino.h>
#include "tempNotification.h"
#include "readTempHumidity.h"
int overTemp;

void tempNotification(){
   if (overTemp ==1){
         Serial.print("Temp at 29 deg!!");
   }
 else{
      Serial.print("Temp back to normal !!");
      }
}
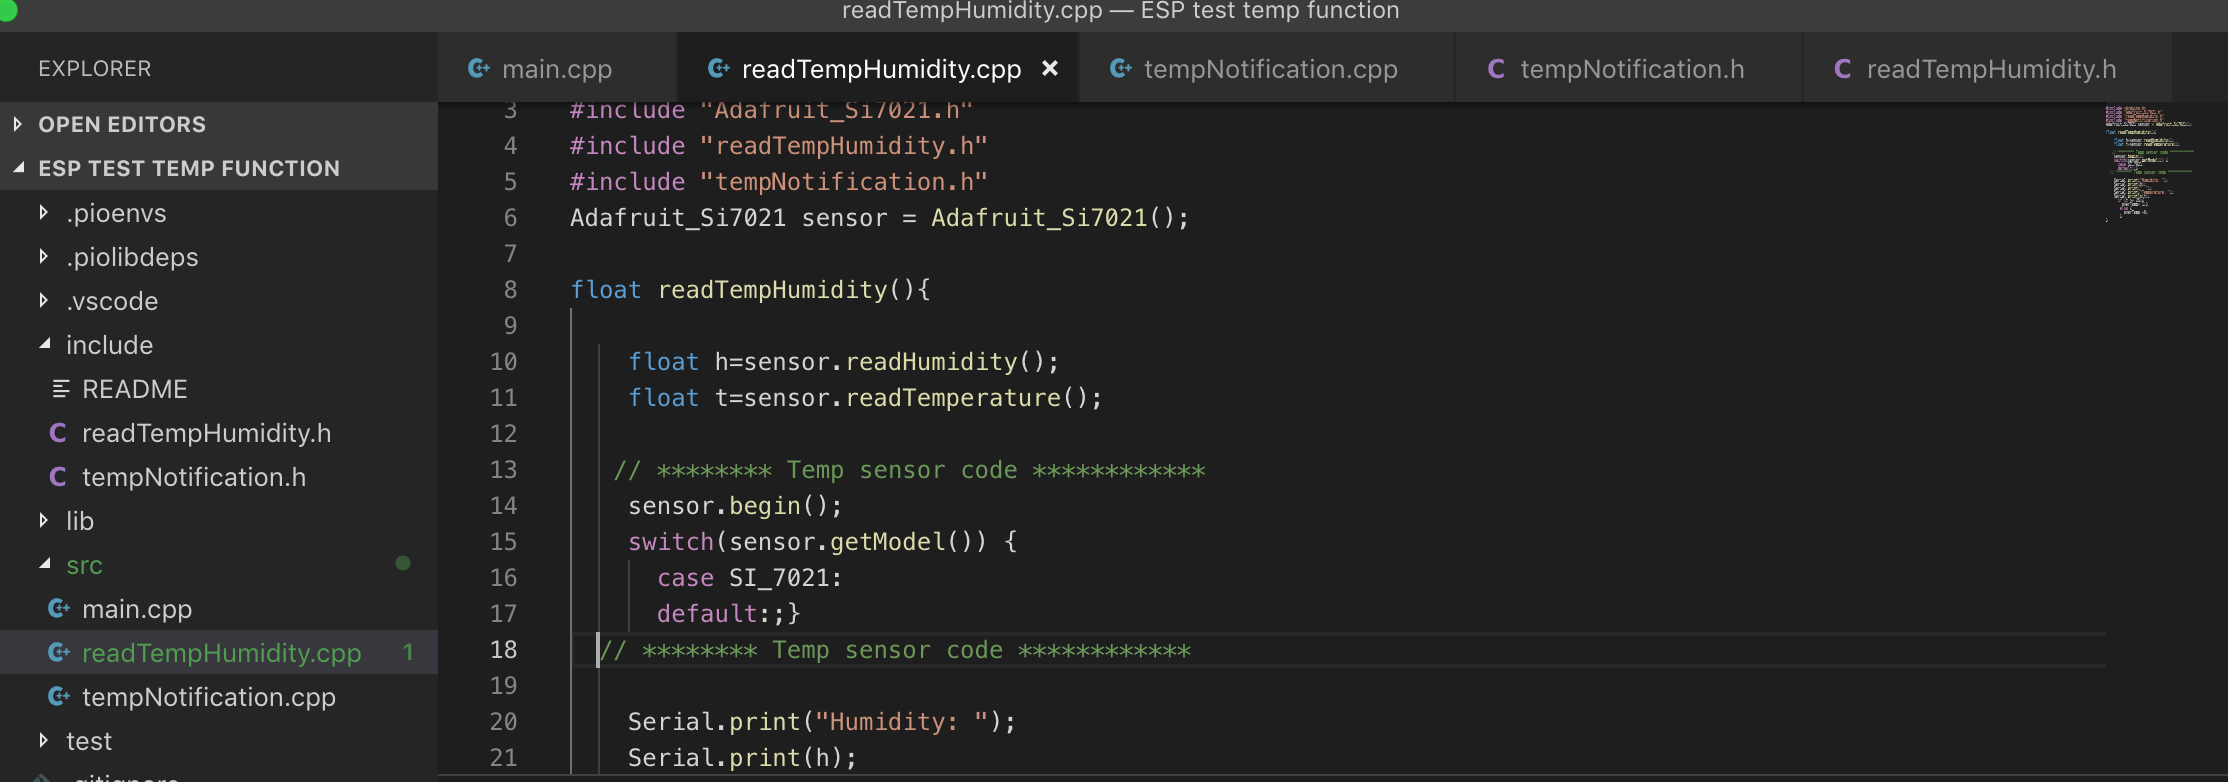
So… there was a topic like this before discussing a possible tutorial about this and I still don’t exactly get why. There are tons of ressources out there explaining this as it’s standard C/C++ stuff. Nonetheless assuming second header and source file are called readTempHumidity.* and the third header and source file are called tempNotification.*:
Be careful on when you include what and if you actually need it to prevent include-loops although you try to catch such errors with #ifndet… e.g. why include readTempHumidity.h in tempNotification.h?
What is
switch(sensor.getModel()) { case SI_7021: default:;}
supposed to do over just sensor.getModel()?
Have you thought about using an object-oriented style? I think your example would work well using classes and to someone new to C++ it would make much more sense why there are header and source files. There won’t be the need for the extern-keyword while class members and methods show how header files help to cleanup and document (!) your code.
Hi @Thomseeen thanks for looking at this for me. Just so you know - this was just a very simple example I made to teach myself about the functionality working between multiple files, which also require sharing global variables.
So through my research to this question, I did find that PIO behaves just like standard C++. I think my point is PlatformIO is supposed to be the next alternate to the IDE and in which case a large portion of its market will be Arduino coders. And, as Arduino behaves quite differently, it would have value in providing some short videos with some fundamental explanations to help people come across…
Second is ‘readHumidity’ and third is ‘tempNotification’
I did this (and happy to be corrected) because i have the variable ‘overTemp’ which is passed between the two.
This is part of the sensor code (adafruit SI 7021 temp sensor) that i pasted in. I couldn’t work out how to get rid of this switch case, so I just left it in the code.
As you can probably tell I’m a novice so I’m a little lost in what this means… Am i right in saying if I used standard library fundamentals i wouldn’t have to use the ‘extern’? Can you point me to any examples which you have come across which may explain better?
I have no clue whether this is the actual target audience of PIO; it might be in the future… I mean, if someone really just wants another editor for Arduino only, why not go with VSCode+Arduino extension?
Typo corrected it…
overTemp is defined in the tempNotification.h so to use it in tempNotification.cpp and readTempHumidity.cpp you will have to include it there, what you did. What you don’t need is anything defined in the readTempHumidity.h in the tempNotification.cpp, so no need to include it there.
This part could be stripped down to just the method call sensor.getModel(). Doing a switch based on the return value (i.e. whether the detected model is a SI_7021) doesn’t make much sense as the actual cases don’t do anything. Then again, why even check the model of the sensor if you do nothing with the result? Looking at that function closely there are a few things strange but that would be off topic and you said it was just a quick test so you maybe know… if you don’t and you are curious feel free to just pm me
If you are a novice in programming overall it might not be the right thing to jump into OOP (Object Oriented Programming) just yet. It’s a whole topic by itself (first google result for “OOP in C++”). Let’s say there are other ways to do the same thing without the extern-keyword even without using OOP. But as you said, this should just have been an example so never mind
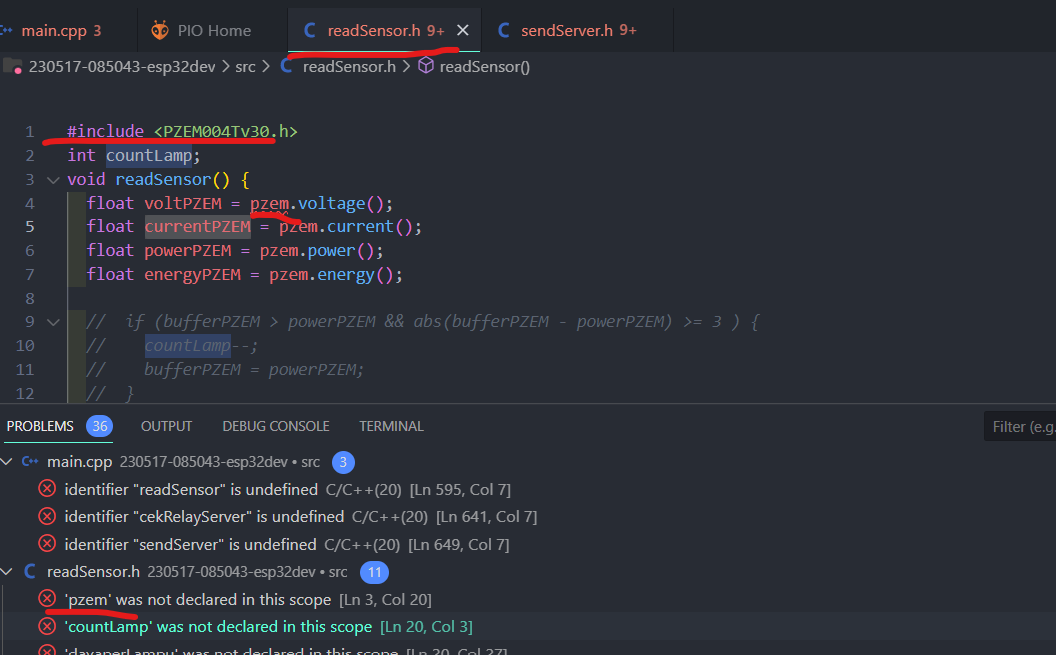
All of this is already discussed in this topic. You’re doing multile things wrong:
If you create the pzem object in another file, like main.cpp, and you want another .cpp file to be able to use it, you should declare the object as extern in a .h file
extern PZEM004Tv30 pzem;
You are creating an int countLamp; global variable in a header file (readSensor.h). This is wrong. It will create multiple instances of that global variable for each .cpp file that includes this header.
You should only declare function prototypes and global variables as extern in header files. In the .cpp file, you then define them (no extern, the function code, etc.)
The Arduino IDE, while excellent for new people getting started with the Arduino, takes “hand holding” to the extreme, and completely confuses these same people when they move off of the Arduino IDE onto something else – such as PlatformIO, which works as a proper C++ IDE should!
For example, these are things that the IDE does behind the scenes that PlatformIO and other “proper” development systems don’t:
Creates a temporary folder and copies the top level *.ino file into it.
Appends all the remaining *.ino files in your sketch, onto the end of the above, in alphabetical order.
Runs a temporary compile to get the missing headers, *.h, for any functions you have used, but not pre-declared.
Copies any *.h and *.C sources that yoiu have used, into the temporary folder.
Compiles these into *.O files.
Compiles any used libraries into *.a in the lib folder beneath said temporary folder.
Compiles the top level sketch, with all the *.ino files included, into a *.o file.
Links all the *.o files and *.a libraries into a *.elf file.
Converts the *.elf to *.hex for uploading and *.eep (EEPROM data) which the IDE is completely unable to upload!
PlatformIO, on the other hand, like all good C++ development systems, expects you to know about these things, and to get things correctly done as per C++ rules and regulations.
Other confusions that stem from the Arduino IDE’s hand holding include “adding a library”, which in the IDE simply means “adding a header file to the sketch”. The actual library is added at link time. But the number of people who now think that a library, in C++, is simply a header file …
So, the IDE is fine for novices and others who will never develop C++ in any other environment, but for those who learn C++ in the Arduino IDE, who then go on to other development environments, it is, sadly, a major cause of confusion.
Cheers,
Norm.
PS. The list of things that the Arduino IDE does for you in the background is explained in full, in my book, which I will not mention the title of here, or where to get it! wink: