HI!
Help me please.
My device is a Chinese clone NODEMCU.
Free pin only GPIO0. A DS18B20 sensor is connected to it.
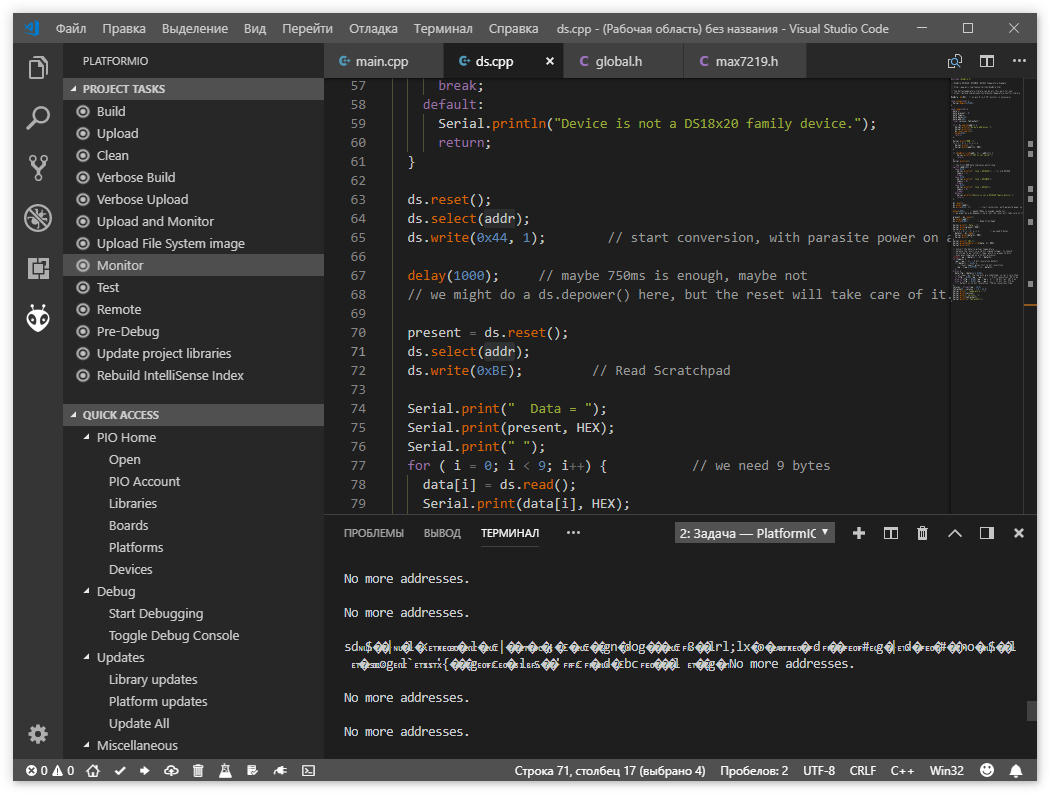
If the port monitor is active, the DS18B20 sensor shows 0.
IDE VS Code. OS Win 10 x64.
Content platformio.ini:
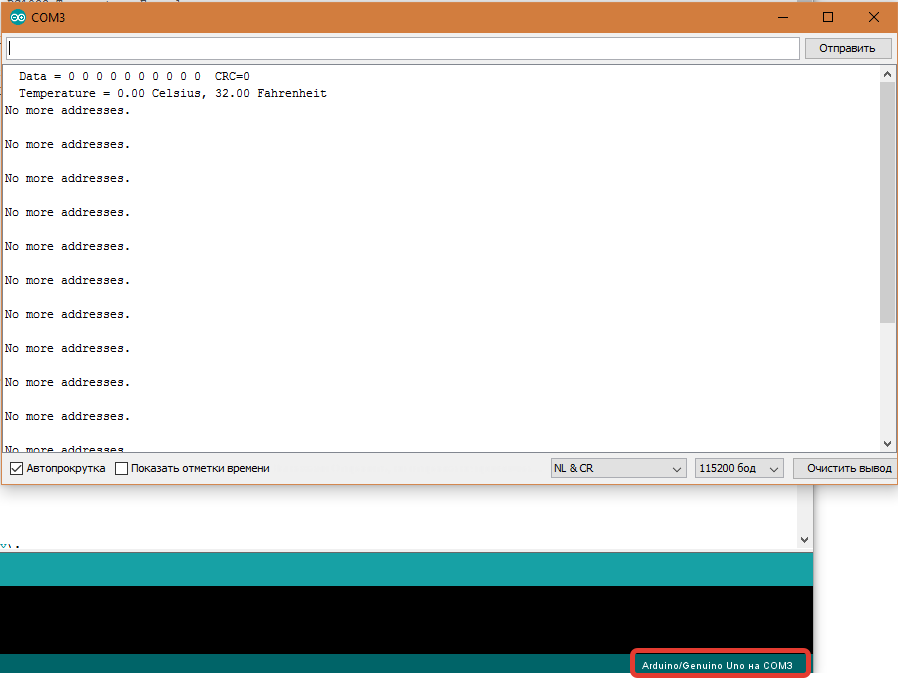
А вот что показывает монитор порта в Arduino IDE с той же прошивкой:
ROM = 28 FF 8E 16 C2 16 4 2B
  Chip = DS18B20
  Data = 1 30 1 4B 46 1F FF 1F 10 20  CRC=20
  Temperature = 19.00 Celsius, 66.20 Fahrenheit
No more addresses.

ROM = 28 FF 8E 16 C2 16 4 2B
  Chip = DS18B20
  Data = 1 30 1 4B 46 1F FF 1F 10 20  CRC=20
  Temperature = 19.00 Celsius, 66.20 Fahrenheit
No more addresses.

ROM = 28 FF 8E 16 C2 16 4 2B
  Chip = DS18B20
  Data = 1 30 1 4B 46 1F FF 1F 10 20  CRC=20
  Temperature = 19.00 Celsius, 66.20 Fahrenheit
No more addresses.
Здесь всё чётко.
Я даже 1 датчик (герметичный) распилил. Думал китайцы “забыли” положить. Оказался на месте.
Мысли, что с монитором platformIO такая беда не появлялось до тех пор, пока я не глянул показания датчика на странице браузера…
P.S. Кстати, проверял подключение датчика на других цифровых пинах. GPIO4, GPIO5, etc…
Та же самая петрушка.
So, we have a flashed device. This device prints correct data into Arduino Serial Monitor and does not print with PlatformIO? Could you try to manually reset a board when connected to PIO monitor?
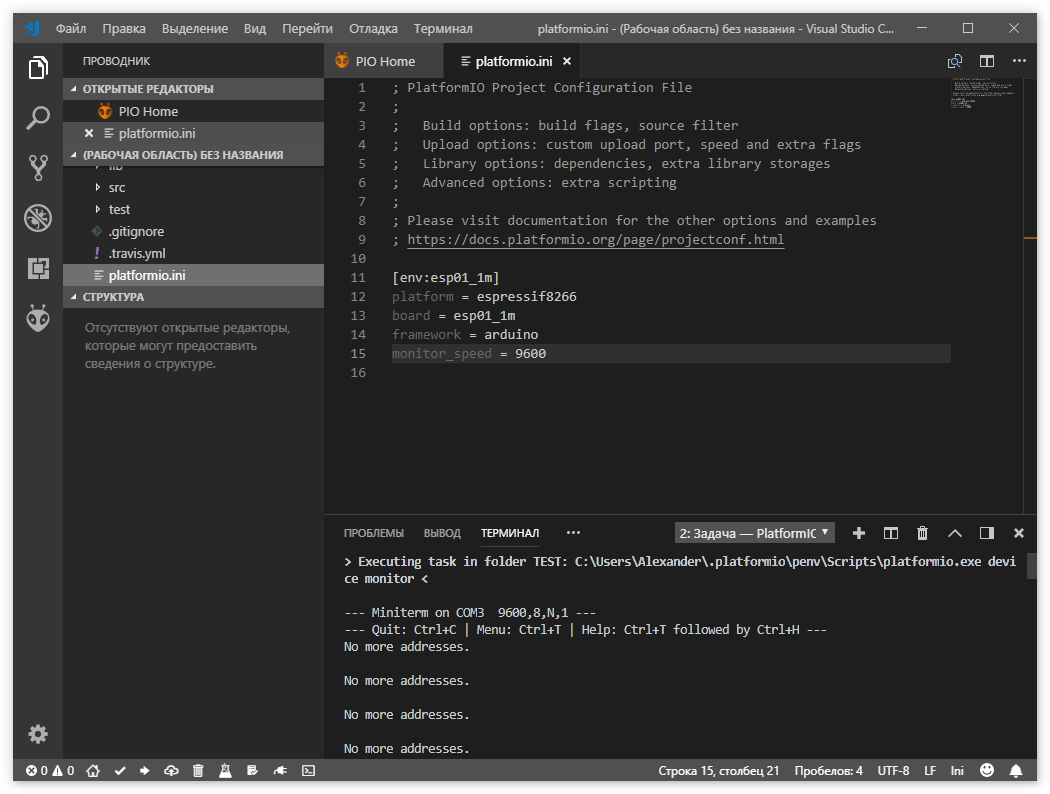
Если выбрать плату, например, NODEMCU-1.0, вывод в монитор порта правильный
Sketch: #include <OneWire.h>
// OneWire DS18S20, DS18B20, DS1822 Temperature Example
//
// http://www.pjrc.com/teensy/td_libs_OneWire.html
//
// The DallasTemperature library can do all this work for you!
// https://github.com/milesburton/Arduino-Temperature-Control-Library

OneWire  ds(D3);  // on pin 0 (a 4.7K resistor is necessary)

void setup(void) {
  Serial.begin(115200);
}

void loop(void) {
  byte i;
  byte present = 0;
  byte type_s;
  byte data[12];
  byte addr[8];
  float celsius, fahrenheit;

  if ( !ds.search(addr)) {
Serial.println("No more addresses.");
Serial.println();
ds.reset_search();
delay(250);
return;
  }

  Serial.print("ROM =");
  for( i = 0; i < 8; i++) {
Serial.write(' ');
Serial.print(addr[i], HEX);
  }

  if (OneWire::crc8(addr, 7) != addr[7]) {
  Serial.println("CRC is not valid!");
  return;
  }
  Serial.println();

  // the first ROM byte indicates which chip
  switch (addr[0]) {
case 0x10:
  Serial.println("  Chip = DS18S20");  // or old DS1820
  type_s = 1;
  break;
case 0x28:
  Serial.println("  Chip = DS18B20");
  type_s = 0;
  break;
case 0x22:
  Serial.println("  Chip = DS1822");
  type_s = 0;
  break;
default:
  Serial.println("Device is not a DS18x20 family device.");
  return;
  }

  ds.reset();
  ds.select(addr);
  ds.write(0x44, 1);        // start conversion, with parasite power on at the end

  delay(1000);     // maybe 750ms is enough, maybe not
  // we might do a ds.depower() here, but the reset will take care of it.

  present = ds.reset();
  ds.select(addr);
  ds.write(0xBE);         // Read Scratchpad

  Serial.print("  Data = ");
  Serial.print(present, HEX);
  Serial.print(" ");
  for ( i = 0; i < 9; i++) {           // we need 9 bytes
data[i] = ds.read();
Serial.print(data[i], HEX);
Serial.print(" ");
  }
  Serial.print(" CRC=");
  Serial.print(OneWire::crc8(data, 8), HEX);
  Serial.println();

  // Convert the data to actual temperature
  // because the result is a 16 bit signed integer, it should
  // be stored to an "int16_t" type, which is always 16 bits
  // even when compiled on a 32 bit processor.
  int16_t raw = (data[1] << 8) | data[0];
  if (type_s) {
raw = raw << 3; // 9 bit resolution default
if (data[7] == 0x10) {
  // "count remain" gives full 12 bit resolution
  raw = (raw & 0xFFF0) + 12 - data[6];
}
  } else {
byte cfg = (data[4] & 0x60);
// at lower res, the low bits are undefined, so let's zero them
if (cfg == 0x00) raw = raw & ~7;  // 9 bit resolution, 93.75 ms
else if (cfg == 0x20) raw = raw & ~3; // 10 bit res, 187.5 ms
else if (cfg == 0x40) raw = raw & ~1; // 11 bit res, 375 ms
//// default is 12 bit resolution, 750 ms conversion time
  }
  celsius = (float)raw / 16.0;
  fahrenheit = celsius * 1.8 + 32.0;
  Serial.print("  Temperature = ");
  Serial.print(celsius);
  Serial.print(" Celsius, ");
  Serial.print(fahrenheit);
  Serial.println(" Fahrenheit");
}
У меня ESP-12 c обвязкой от NodeMCU (Не надо нажимать кнопку при прошивке если board = nodemcu). USB VID:PID=1A86:7523 SER=5 LOCATION=1-2
Да я все типы esp (кроме esp-32 конечно) подставлял в platformio.ini, перебирал все скорости (естественно, что в скетче скорость тоже менял). Вот очередная картинко:
В Linux в серийный порт идёт то же самое. Правильное вывод данных с температурного датчика ТОЛЬКО в мониторе порта ARDUINO!!! Я же показывал в картинках выше, блин…
На ESP32 такой проблемы не наблюдается.
На ESP8266 навряд ли вернусь, так что для меня проблема потеряла актуальность.
Спасибо за участие в нерешении данного бага.
Тему можете закрывать.
Нажаль это не проблема платы
Столкнулся с похожей проблемой:
Датчик ds18b20, плата nodemcu v3.
Вывод в монитор порта на pio не идет, при включении монитора порта плата “зависает” - светодиод встроенный перестает моргать. При закрытии монитора порта, светодиод опять моргает. На arduino ide все работает хорошо.
При подключении к телефону (андроид), если использую монитор порта встроенный в программу Arduinodroid - все ок. Если использую программу serial usb terminal то плата при подключении опять “зависает”. К телефону подключаю через otg.
Возможно за столько лет нашлось решение данной проблемы?
above they wrote in Russian, I thought it was not a problem.
Unfortunately, it is not a problem with the board
I encountered a similar problem:
DS18b20 sensor, nodemcu v3 board.
The output to the port monitor on the pio does not go, when the port monitor is turned on, the board “freezes” - the built-in LED stops blinking. When the port monitor is closed, the LED blinks again. On the arduino ide, everything works fine.
When connecting to a phone (android), if I use the port monitor built into the Arduinodroid program - everything is ok. If I use the serial usb terminal program, the board “freezes” again when connected. I connect to the phone via otg.
Perhaps a solution to this problem has been found after so many years?