ESP8266 + STM32F4 - Advice is needed before I waste more time!

Hello Everyone,

I’m not sure if I got to the right place where I can find answers on many of the questions I have since I started with ESP8266 development few weeks ago. I did really spent a tremendous time in researching and reading materials from Espressif, but the more I read, the more I get confused on what to do or where to go next.

In a nutshell, I’m merely an embedded developer and things like MQTT, REST, JSON, and web programming in general are totally new to me. I have finished the development of a product I designed around STM32F407 uC and I thought the ESP8266 is the best way to add IOT/connectivity to my project since it is the most popular IOT SOC out there. However, most of the implementations I have found are intended for Arduino platform. I even couldn’t find a single example project that is not targeted to the Arduino community.

As far as the development of a custom firmware is concerned, the materials published by Espressif are really confusing and I couldn’t get my head around it yet. What they call an “SDK” is no more than a package of source code. No idea what to modify, or where and how to edit or write programs for ESP8266. From what I can understand, PlatformIO is the IDE that I can use to write, debug, and test programs for the ESP8266, and probably the whole project including the code for the STM32? The answer to this question is probably the most important for me, as I really don’t have much time to waste searching for more examples and resources to get started with the the ESP8266 ecosystem.

I’m aware of many initiatives that look great and maybe much more from what I want to do, ESP-Link and ESPurna are examples to mention some. But what I want to do is just simply be able to update the firmware for a deployed STM32F4 product over the internet. A simple web interface to configure the AP credentials initially by customer, and when connected, getting a firmware image off a remote server over internet.

Things I need to know for now are:

1- Do you suggest PlatformIO as the IDE to start with to write/modify custom firmware for the ESP8266?

2- Do I need any other tools, libraries, SDKs, in order to write a custom firmware for ESP8266 with the STM32F4 as the main processor? Again, no Arduino or NudeMCU is involved here!

3- For custom web interface used to manage the AP credentials initially by end-customers, what I need to develop it and do you suggest any templates/projects as a start point to get my product up and running quickly without much involvement in web programming, HTML, REST, etc…

Any feedback is highly appreciated. Thank you very much!

For STM32 type microcontrollers mbed-os has the https://github.com/ARMmbed/mbed-os/tree/master/components/wifi/esp8266-driver with which WiFi connectivity can be enabled, if you are working with mbed-os of course. For the STM32 HAL there is the AT Parser at http://stm32f4-discovery.net/download/esp8266-at-commands-parser-v1-1/ which should be easily integratable for F1 types of µCs. Note that this lets you only interact with Espressif’s AT firmware, a general firmware which allows TCP and UDP connections via a UART command stream.

Espressif’s SDK (e.g. GitHub - espressif/ESP8266_RTOS_SDK: Latest ESP8266 SDK based on FreeRTOS, esp-idf style. or GitHub - espressif/ESP8266_NONOS_SDK: ESP8266 nonOS SDK or GitHub - wujiangang/ESP8266_IOT_PLATFORM: A demo that should be run with ESP8266 RTOS SDK) is… well a software development kit. The compiler tools (xtensa-lx106-elf-gcc and friends) bundled with a bunch of framework code and libraries to make your job easier. See e.g. https://www.espressif.com/sites/default/files/documentation/2a-esp8266-sdk_getting_started_guide_en.pdf.

Yes, PlatformIO is perfectly capable helping you develop ESP8266 firmwares in the frameworks Arduino, Espressif Non-OS, Espressif RTOS and Simba (docs). In fact, it can also compile firmwares for the STM32 Micros (docs).

PlatformIO automatically installs the needed compilers and frameworks, you do not need to do that manually. See quick-start here.

Lots of the premade, readily-available stuff is made for Arduino. For example, the WiFi manager (opens a hotspot, shows a page where user can enter the real credentials, reconnects) here. Or the HTML server which serves files from the SPIFFs (flash) filesystem (here, here). Or ArduinoJson. Or MQTT.

Of course there are also libraries written for Espressif RTOS SDK, e.g. an MQTT client.

FOTA is not a trivial thing. I haven’t yet seen a firmware where the ESP8266 flashs an STM32 micro with a firmware image acquired over the internet. But it’s readily available for the ESP8266 itself (to update its own firmware), here. ESP-link itselfs says that it’s not a ST-Link / SWD programmer (mbed-compatible board · Issue #92 · jeelabs/esp-link · GitHub). If you want to flash your STM32 you’d need to write a firmware which interacts with some of bootloader you put on there or teach it SWD programming.

Oh and there is also the esp-open-rtos alternative framework which might be interesting to you. PIO doesn’t yet support this framework.

1 Like

You will probably have to develop your solution “in house” without making compromises.

PlatformIO is made for developing on different platforms. I personally use Arduino, ESP/Arduino, MBED, Arduino/STM32 and (ick) bare-metal stm32 CubeMX. That is what makes it truly useful.

The 8266 has OTA updating and you can look at the code implementing it. An experienced programmer could take that and leverage it over the internet. Probably a bad idea as if you can do it, some hacker will be able to do it too.

Thank you very much for the prompt, yet very helpful and detailed reply.

Well, starting from where you left off, I totally agree with you. FOTA is not a trivial thing, but I guess it’s not very different from what ESP-LINK does, except that the flashing is done by bridging the programming software on PC with the target MCU. First step I’m concerned about is the web interface that allows end-user to configure the AP for wifi access. After that, checking/downloading a new firmware image has to be done from the web interface or a mobile app. From what I can understand, all I have to do to manage the flashing is to configure the BOOT pins, reset the MCU to force it into bootloader mode, send the firmware image serially over USART. It might be done without the need to store the entire FW image on the flash file system used by ESP8266. Also, since the FW image is less than 512 KB in size, I guess it’s not a big problem saving the entire image on file system before issuing a transfer to the uC over USART.

Since PlatformIO is enough to do the job like you said, I guess I’m good to go without the need to bother about the Xtensa toolchain and dependencies.

Unfortunately, MBED-OS is not used on my project. I’m using FreeRTOS. Also, I’m not sure if I can get where I want using the AT firmware.

Anyways, VSCode is already installed and extended with PlatformIO on a Windows box. I will also do the same on my Ubuntu 18.04 box. It would be great if you can provide me with some template projects or any resources that I can use to begin development for ESP8266 + STM32. I would rather start with a more generic project, smart switch, sensor, etc, then when I feel well founded with the framework, I will try to move to more sophisticated projects.

Thank you again!

Yep, as maxgerhardt said, there’s no firmware out there that can do that out of the box. Looks like I will have to come up with a solution myself. The problem is, I’m not sure how long it’s gonna take me to learn before I can do it. Really don’t want to reinvent the wheel here, and I hope I will not have to. With these dozens of different implementations out there, there must be something similar to the task I want to achieve.

I remember I came across an application note describing the OTA for the ESP8266 itself. DO you mean it could help modifying that to do the update for the MCU instead of the ESP?

It’s part of the SDK (ESP8266_NONOS_SDK/bin at master · espressif/ESP8266_NONOS_SDK · GitHub / ESP-AT | Espressif Systems)

You probably want to look into the STM32 UART bootloader and a Raspberry Pi program flashing an STM32 via that serial connection (here) for porting it.

Yes the ESP8266 OTA code might also give you an idea how to transfer the firmware image to the STM32, stream-based.

Sure I can come up with something. An STM32 using the STM32HAL framework reads out an DHT11 temperature sensor, sends the value via UART to the ESP8266, which then transfers it to the Thingspeak via a HTTP REST client. Would be the easiest the example I could think of. Out of convencience I’d program the ESP8266 with Arduino though… You’d just have to write more and different code for other framework types.

1 Like

Do you mean even when using the SDK, the AT command set is still used?

Yes, that’s exactly what I’m doing now using external tools and managing the signals manually. I guess it’s not difficult to toggle GPIOs on the ESP8266 board to manage those signals on the STM32 board.

Well, I’m not super fan of the Arduino and I program purely in C. IDEs used are uVision and Atollic TrueStudio. That example sounds interesting. Could you please elaborate more?

The AT firmware is just a ESP-NONRTOS firmware which implements the TCP/UDP client functionality over UART AT commands and is supplied as a binary blob or source (ESP8266_NONOS_SDK/examples/at at master · espressif/ESP8266_NONOS_SDK · GitHub).

Yeah I can get this example working in code quite quickly and then share it.

Awesome! I’m looking forward for the example!

Thank you again for your help!

Hello again,

I’m now trying to apply what I’ve learned from the “Quick Start” here

Since I’m developing the firmware with the ESP8266 being the main target uC (no Arduino or NudeMCU), I believe the following configurations apply to my situation:
https://docs.platformio.org/en/latest/boards/espressif8266/esp12e.html

Please correct me if I’m wrong.

I really don’t know how I missed such a great tool for quite a bit now. Anyways, thanks to the ESP8266 complexity that got me here!

P.S. The module I’m using has a 4 MB flash on board!

NodeMCU is a convenient development board with the ESP12F or ESP12E on it, so it’d definitely recommend it to give it a try for development phase. It’s like using a Nucleo board instead of the raw STM32 chip. For deployment you can still solder a ESP8266 with the appropiate flash chip and power supply to your product.

And also I’ll probably have the demo (bluepill stm32f103c8 + ESP12E on a NodeMCU) finished by today :).

1 Like

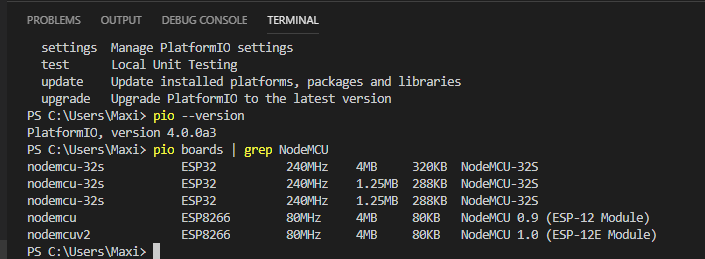
I believe I have missed the point here for quite a bit. The “MCU” in its name “NodeMCU” has made me thing that another MCU is involved, in addition to the ESP8266, so I kept avoiding anything related to NodeMCU. Now, what I’ve got here is exactly what the NodeMCU does/offers in a single compact PCB. The ESP8266, power supply, and USB-TTL. Well, I did all of that myself, but of course, NodeMCU is much easier and neat to work with.

So, I’m good to go with NodeMCU (sorry about the “nude” in earlier post :slight_smile: ) as the platform/board of choice to start the development.
1 Like

Here you can have a look at an example project: GitHub - maxgerhardt/pio-stm32-with-esp8266-dht11: A simple demo in which a STM32 reads a DHT11 temperature sensor and the ESP8266 transmits it to the ThingSpeak.

Thank you very much. I made an initial test using the Blinky example for ESP8266 and everything works out perfectly. Code compiles and I have been able to flash the ESP8266 without any additional configuration. That’s simply astonishing!

Now, regarding the STM32 + ESP8266 example you provided, could you please elaborate more on the IDE Setup section?

Where and how to go/write that command?

In a normal shell / commandline that has access to the PIO tools. E.g., in your VisualStudioCode you have a “Terminal” tab somewhere. Use the cd (change-directory) command to navigate the filesystem, then execute that PIO command. PIO can also be used from the CLI very nicely.

That’s what I expected initially, but PIO wasn’t recognized by the terminal in the VSCode.

Hm but it should be. Check Redirecting... that it’s using the correct shell environment. I installed it directly from the commandline and added the path to the pio.exe binary to my PATH environment variable. Maybe you can locate your pio.exe and also add it to the PATH.

For goodness sake, from where one would get to “settings”? I guess it’s not the same from File > Preferences > Settings.

Update: It seems there’s no other settings tap in the program. However, I don’t see “Use built-in PIO Core” option anywhere. Where it has to be?

Update: Sorry, just found it. It’s in “Extensions” at the bottom of list. I will try it now!

Update: “Use Built-in PIO Core” is already enabled.

Do I have to install Python? I guess it’s not required anymore for the recent version of PIO that I have just downloaded yesterday.

Installing the VSCode plugin should cause the installation of Python (3 now I think), but not in a system-wide version, it’s just called within the extension itself. When installing PIO from the CLI, you need python.