Hi, I have just soldered up my microupdi board and a pro micro as per MCUdude instructions here:
excerpt from the microUPDI site:
After the Pro Micro is flashed with mEDBG firmware it will present itself to the computer as an mEDBG CMSIS-DAP device. In Atmel Studio it will show up as a generic mEDBG device, while in Arduino IDE it will show up as an *Arduino UNO WiFi Rev2.
So my question is can I use this with Platformio to debug, and if so how do I configure it in PIO.ini?
any help much appreciated.
Paul
Uh, neat. Per Applicability for Arduino Nano Every board · Issue #8 · stemnic/pyAVRdbg · GitHub the code in the repo might support it. I see you’ve already opened an issue at Debug the avr 4809 chip · Issue #9 · stemnic/pyAVRdbg · GitHub for help.
Are you able to download and use the script contained in that repo? (It might need a modified requirements.txt). Once you’re able to run the script and if the script is capable of opening a GDB server on some port, making it usable in PlatformIO is just a matter of setting debug_tool = custom and debug_port to the IP and port (localhost:3333 normaly) where the GDB server is opened.
I’ve download the pyAVRDBG files, but I am not familiar with Python. Here’s the list of files:
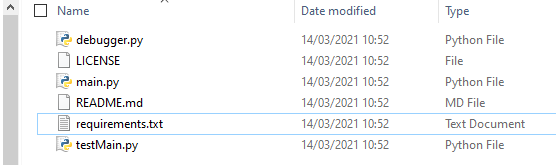
Which one is the script and how do I run it - from within PIO or somewhere else?
Thanks for your time and help,
Paul
I was able to install and run it this way:
- Open the
requirements.txt file and replace the contents with that
- Open a commandline (Windows + R → cmd.exe)
- Make sure python is accessible from the commandline by executing
python -V. It should return some Python 3.x version, for me Python 3.8.6 – I don’t think Python 2 is supported. (if it shows ‘no such command’ although Python 3 is installed, you need to add it to the path or install Python3 if it’s not installed)
-
cd into the directory where you’ve downloaded pyAVRdbg (e.g., cd C:\Users\Max\Downloads\pyAVRdbg)
- Install the python dependencies by running
python -r requirements.txt. It should run without errors – otherwise report error
- Connect the mEDG debug probe to the computer
- Execute
python main.py
For me, without a debugger connected, it shows
>python main.py
ERROR:pyedbglib.hidtransport.hidtransportbase:No CMSIS-DAP devices found.
INFO:pymcuprog.deviceinfo.deviceinfo:Looking for device atmega4809
Traceback ...
so it just quickly errors out.
What does it output for you?
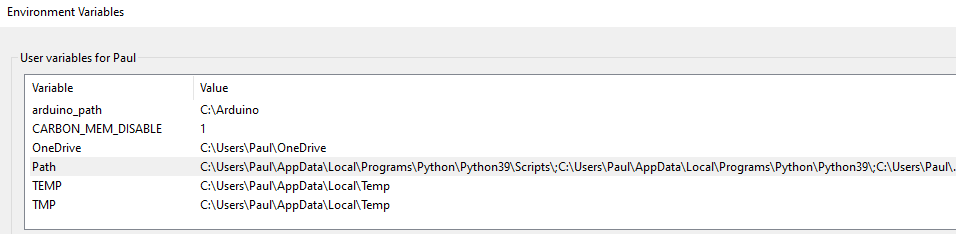
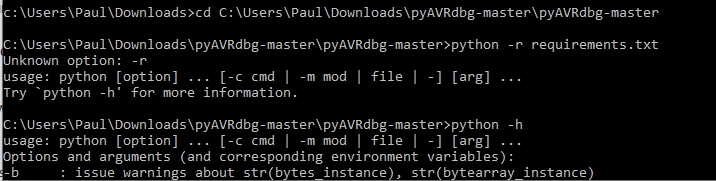
thanks, I ran the command prompt as admin and checked the win 10 path included python - shown below.
I then tried the python dependencies install but got this error. Also when I ran python -h there doesn’t seem to be an -r option.
Just to add I have python 2.7.18 running too (needed for something which can’t use latest python). Interestingly when I checked in win control panel only python 2.7.18 shows as installed, but that may be because Python 3 doesn’t show in control panel?
here’s the output:
Running python -V
shows

Thanks again for help with this,
Paul
My bad – the command should be python -m pip install -r requirements.txt.
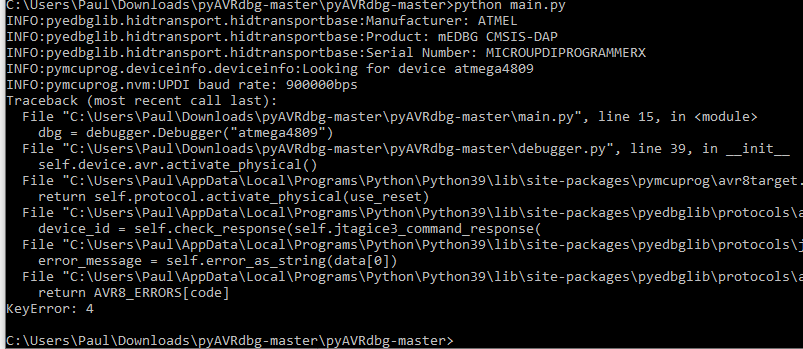
O.K. that all went ok, so I’ve connected MCUdude’s mEDBG device (not attached yet to my 4809 as I have to sort cables) and I get this which in my limited knowledge looks hopeful:
I’ll try to attach a 4809 to it tonight / tomorrow and report back.
Thanks for your help Max
Paul
So, having connected a 4809 to the microUPDI, I now have this, which again to me looks very hopeful…
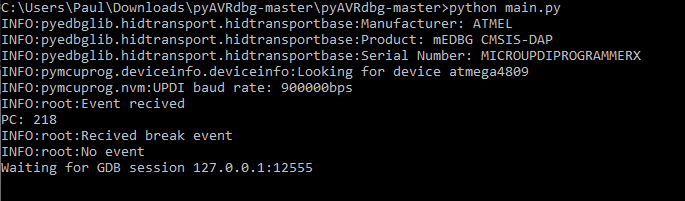
So do you think I am now in a position to configure PIO / VSCode? If so, I’ll go ahead with the info you provided:
but I’ll use port localhost: 12555
If all this works, I’ll document it for other users if that helps.
thanks,
Paul
1 Like
That output looks indeed good. You should add
debug_tool = custom
; empty debug server invocation
debug_server =
debug_port = localhsot:12555
to the platformio.ini, go to the Debugger sidebar in VSCode, select the right project configuration and press the play button.
sorry what does that bit mean?
I’m not sure if the microUPDI device will also act as a USART1 pass through, I’ll have to check. The code currently on the 4809 accepts chars from an ftdi (which was on USART1) and prints them back to the PC terminal, so I may have to use a different USART in order to have anything to debug.
I was referring to the dropdown menu in the debugger – if you have multiple workspaces loaded, it will show all of them, so care must be taken to select the right project.
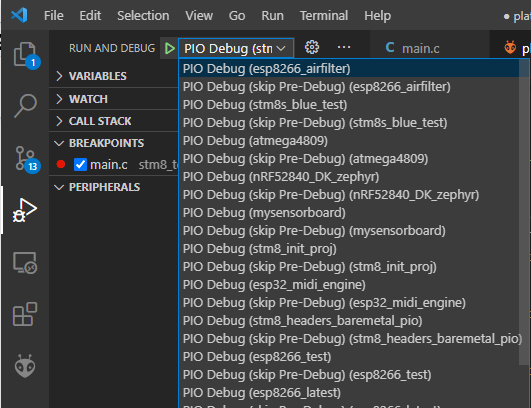
ah thanks, I only have the one workspace.
in the microUPDI page it states
Features

    A 6-pin UPDI programming connector
        UPDI interface for programming and debugging
        Serial interface for communicating with the target over UART
so I’m missing something as my serial port isn’t surrently working. I’ll have to check that out.
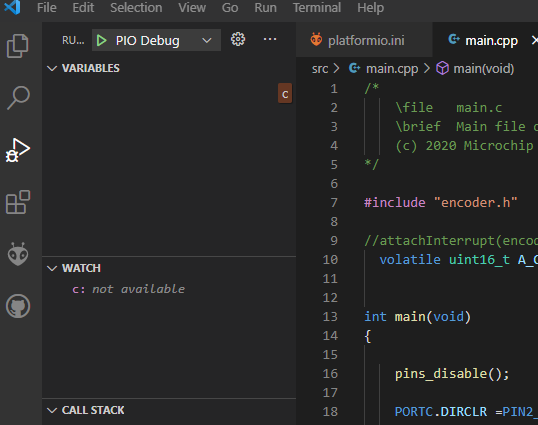
What’s the best way to see some basic debug output? In the variables window I’ve put in the name of a variable ‘c’ from the executing code, would I expect it show how the variable changes in that window?
I guess I’m going to have to read up now on how the VSCode debug features work.
I’ll see if I can get the serial port working and go from there.
thanks a lot for all the help,
Paul
Hm the way I see it, purely flashing and debugging the target is covered by just the UPDI pin, the serial connection is just for convenience – with debugging you’ll be able to see the state of all variables when the chip is halted (but no UART output). That should be good for now.
What happens when you place a breakpoint in line 16 (by clicking on the linenumber) and pressing the play button? Does the pyAVRdbg script see an incoming connection and crashes or does it work?
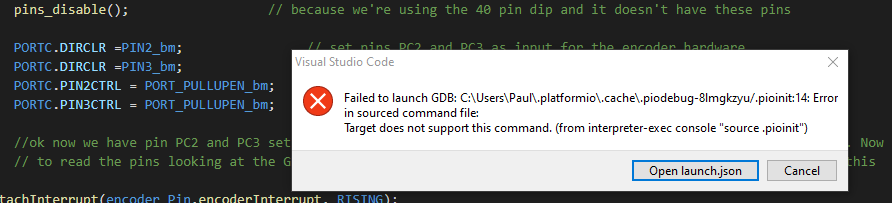
perhaps not so good now, I get this in the pio UI:
and this in the win cmd window :
C:\Users\Paul\Downloads\pyAVRdbg-master\pyAVRdbg-master>python main.py
INFO:pyedbglib.hidtransport.hidtransportbase:Manufacturer: ATMEL
INFO:pyedbglib.hidtransport.hidtransportbase:Product: mEDBG CMSIS-DAP
INFO:pyedbglib.hidtransport.hidtransportbase:Serial Number: MICROUPDIPROGRAMMERX
INFO:pymcuprog.deviceinfo.deviceinfo:Looking for device atmega4809
INFO:pymcuprog.nvm:UPDI baud rate: 900000bps
INFO:root:Event recived
PC: 218
INFO:root:Recived break event
INFO:root:No event
Waiting for GDB session 127.0.0.1:12555
Connected by ('127.0.0.1', 64822)
-> $qSupported#37
<- +
INFO:root:AVR running state False
Supported
<- $PacketSize=1000#f1
INFO:root:No event
-> ++$?#3f
<- +
INFO:root:AVR running state False
<- $S00#b3
INFO:root:No event
-> +$Hc-1#09
<- +
INFO:root:AVR running state False
<- $#00
INFO:root:No event
-> +$qC#b4
<- +
INFO:root:AVR running state False
C
<- $#00
INFO:root:No event
-> +$qOffsets#4b
<- +
INFO:root:AVR running state False
Offsets
<- $Text=000;Data=000;Bss=000#24
INFO:root:No event
-> +$Hg0#df
<- +
INFO:root:AVR running state False
<- $#00
INFO:root:No event
-> +$g#67
<- +
INFO:root:AVR running state False
['0x0', '0x0', '0x0', '0x0', '0x0', '0x0', '0x0', '0x0', '0x0', '0x0', '0x0', '0x0', '0x0', '0x0', '0xfa', '0x4b', '0xce', '0x3f', '0x20', '0x0', '0x0', '0x0', '0x0', '0x0', '0x0', '0x60', '0xc8', '0x4b', '0xcd', '0x3f', '0x20', '0x0']
['0x21']
['0xcd', '0x3f']
<- $0000000000000000000000000000fa4bce3f2000000000000060c84bcd3f200021cd3f#1c
INFO:root:No event
-> +$p22#d4
<- +
INFO:root:AVR running state False
218
0xda
0x1b4
000001b4
b4010000
<- $b4010000#b7
INFO:root:No event
-> +$!#21
<- +
INFO:root:AVR running state False
<- $#00
INFO:root:No event
-> +$qSymbol::#5b
<- +
INFO:root:AVR running state False
Symbol::
<- $OK#9a
INFO:root:No event
-> +$qRcmd,696e6974#07
<- +
INFO:root:AVR running state False
Rcmd,696e6974
<- $#00
INFO:root:No event
-> +
INFO:root:No event
-> $k#6b
<- +
INFO:root:AVR running state False

C:\Users\Paul\Downloads\pyAVRdbg-master\pyAVRdbg-master>
Hmm maybe it doesn’t support flashing the target.
I also see the script has exited.
Can you upload the firmware via the UPDI adapter via pyupdi as you’ve done per Error using pyupdi, just to check if you can flash normally?
If that works you can also add per docs the directive
build_mode = debug
debug_load_mode = manual
to not trigger the firmware upload via the GDB server and build the firwmare in debug mode. Try uploading the firmware first, start the script again and then try debugging again.
I forgot, I was previously using pyupdi to upload code but this is no longer physically connected with the microupdi device in its place, so do I need to make further changes to pio.ini so that code uploads happen via the microupdi device?
pio.ini
[platformio]
; Default build target
default_envs = ATmega4809_pyupdi_upload

; Parameters used for all environments
[env]
platform = atmelmegaavr
framework = arduino
; Chip in use
board = ATmega4809
; Clock frequency in [Hz]
board_build.f_cpu = 16000000L
; Oscillator type (internal or external)
board_hardware.oscillator = internal
; Arduino pinout variant
board_build.variant = 40pin-standard

; Unflag build flags
;build_unflags =

; Extra build flags PK - see https://github.com/MCUdude/MegaCoreX/blob/master/PlatformIO.md for options
;build_flags =

; Monitor port is auto detected. Override here
;monitor_port =
; Serial monitor baud rate
monitor_speed = 9600

; MIGHT WANT TO REFERENCE THE HELP PAGE AGAIN and put in some more options(flags) https://docs.platformio.org/en/latest/core/userguide/device/cmd_monitor.html
monitor_flags =
  --echo

[env:ATmega4809_pyupdi_upload]
; Upload protocol for UPDI upload - from PIO help pages ; see bottom of this page https://github.com/MCUdude/MegaCoreX/blob/master/PlatformIO.md for install

platform = atmelmegaavr

board = ATmega4809
upload_protocol = custom
upload_speed = 115200
upload_port = COM9
upload_flags =
    -d
    atmega4809
    -c
    $UPLOAD_PORT
    -b
    $UPLOAD_SPEED
upload_command = pyupdi $UPLOAD_FLAGS -f $SOURCE


; run the following command to set fuses
; pio run -e fuses_bootloader -t fuses
; run the following command to set fuses + burn bootloader
; pio run -e fuses_bootloader -t bootloader
;[env:fuses_bootloader]
; Upload protocol for used to set fuses/bootloader
;upload_protocol = ${env:Upload_UPDI.upload_protocol}
;upload_flags =

; Hardware settings
board_hardware.bod = 2.7v
board_hardware.eesave = yes
board_hardware.uart = no_bootloader
board_hardware.rstpin = reset

debug_tool = custom
debug_server =
debug_port = 127.0.0.1:12555
sorry crossed replies, I’ll try what you’ve suggested.
thanks.
Can you replace this section with
upload_protocol = custom
upload_flags =
    -C
    $PROJECT_PACKAGES_DIR/tool-avrdude-megaavr/avrdude.conf
    -p
    $BOARD_MCU
    -c
    xplainedmini_updi
    -Pusb
    -b115200
upload_command = avrdude $UPLOAD_FLAGS -U flash:w:$SOURCE:i
and try a normal upload? (pyAVRdbg script must be stopped in the background if running)
Per GitHub - MCUdude/microUPDI: DIY UPDI programmer with open source hardware! this should be AVRdude invocation needed to transport the firmware. A good sanity check if the upload is generally working before debugging.
ok tried the above replacing sections of PIO.ini. Kept the microUPDI connected and uploading via that produces this success output:
Executing task: C:\Users\Paul\.platformio\penv\Scripts\platformio.exe run --target upload <

Processing ATmega4809_pyupdi_upload (platform: atmelmegaavr; board: ATmega4809; framework: arduino)
---------------------------------------------------------------------------------------------------------------------------------------------------------------------------------------------------------------------------------Verbose mode can be enabled via `-v, --verbose` option
CONFIGURATION: https://docs.platformio.org/page/boards/atmelmegaavr/ATmega4809.html
PLATFORM: Atmel megaAVR (1.4.0) > ATmega4809
HARDWARE: ATMEGA4809 16MHz, 6KB RAM, 48KB Flash
PACKAGES:
 - framework-arduino-megaavr-megacorex 1.0.7
 - tool-avrdude-megaavr 2.60300.210128 (6.3.0)
 - toolchain-atmelavr 2.70300.201015 (7.3.0)
LDF: Library Dependency Finder -> http://bit.ly/configure-pio-ldf
LDF Modes: Finder ~ chain, Compatibility ~ soft
Found 10 compatible libraries
Scanning dependencies...
Dependency Graph
|-- <src>
Building in release mode
Checking size .pio\build\ATmega4809_pyupdi_upload\firmware.elf
Advanced Memory Usage is available via "PlatformIO Home > Project Inspect"
RAM:   [          ]   1.6% (used 98 bytes from 6144 bytes)
Flash: [=         ]   7.8% (used 3841 bytes from 49152 bytes)
Configuring upload protocol...
AVAILABLE: custom
CURRENT: upload_protocol = custom
Uploading .pio\build\ATmega4809_pyupdi_upload\firmware.hex

avrdude: AVR device initialized and ready to accept instructions

Reading | ################################################## | 100% 0.10s

avrdude: Device signature = 0x1e9651 (probably m4809)
avrdude: NOTE: "flash" memory has been specified, an erase cycle will be performed
         To disable this feature, specify the -D option.
avrdude: erasing chip
avrdude: reading input file ".pio\build\ATmega4809_pyupdi_upload\firmware.hex"
avrdude: writing flash (3842 bytes):

Writing | ################################################## | 100% 1.27s

avrdude: 3842 bytes of flash written
avrdude: verifying flash memory against .pio\build\ATmega4809_pyupdi_upload\firmware.hex:
avrdude: load data flash data from input file .pio\build\ATmega4809_pyupdi_upload\firmware.hex:
avrdude: input file .pio\build\ATmega4809_pyupdi_upload\firmware.hex contains 3842 bytes
avrdude: reading on-chip flash data:

Reading | ################################################## | 100% 1.02s

avrdude: verifying ...
avrdude: 3842 bytes of flash verified

avrdude: safemode: Fuses OK (E:FF, H:FF, L:FF)

avrdude done.  Thank you.

================================================================================================== [SUCCESS] Took 3.78 seconds ==================
Also my USART1 working again, accepting and returning char strings to PC terminal.