Atmel AVR dev/platform v2.1.0: new boards, AVR simulator, updated Arduino cores

We are pleased to announce the next release v2.1.0 of Atmel AVR development platform.

What’s New

See Release Notes for details.

Documentation

See Atmel AVR — PlatformIO latest documentation

Examples

See project examples platform-atmelavr/examples at develop · platformio/platform-atmelavr · GitHub

Update

  • PlatformIO IDE – please navigate to PIO Home > Platforms > Updates
  • PlatformIO Core – please run a next CLI command $ pio update

Demo of AVR Simulator


Regards,
Your friends at PlatformIO.

3 Likes

Great news! :slight_smile:

Shouldn’t debug_tool = simavr be in the platformio.ini on in the right tab of that screenshot? :stuck_out_tongue_winking_eye: And please don’t make the screenshot a link… I clicked on it to view it properly and was taken to the PlatformIO website instead!

simavr is set by default as debug tool :slight_smile:

1 Like

Prints to Serial are not showing like in above picture?

Is there any special setup to capture regular prints?

I’ve just tested with the following files, works fine for me.

platformio.ini

[env:nanoatmega328new]
platform = atmelavr
board = nanoatmega328new
framework = arduino

main.cpp

#include <Arduino.h>

void setup() {
  Serial.begin(115200);
}

uint16_t count;
void loop() {
  Serial.println(count++);
  delay(200);
}
1 Like

I can reproduce this with the same main.cpp and mostly same platformio.ini ( I added @2.1.0 to the patform call to ensure that version was used) and the green print in the demo screenshot doesn’t appear in the debug console. Using Windows 10.

I initially had the breakpoint at the delay, then tried against the println statement just in case it behaved differently - no change.

Could somebody test if this also happens on OSX?
I’m still not familiar with the mechanism simavr uses to send those prints to the gdb terminal, I will look at it tomorrow, but certainly, more testing is required.
Also, does platformio-cli give the same result?

pio debug --interface=gdb -x .pioinit
1 Like

Note also the watch window is empty! I’m also running under Win10:

Microsoft Windows [Version 10.0.18362.836]
(c) 2019 Microsoft Corporation. All rights reserved.

D:\- Downloads\Nano>pio debug --interface=gdb -x .pioinit
Preparing firmware for debugging...
Processing nanoatmega328new (platform: atmelavr; board: nanoatmega328new; framework: arduino)
---------------------------------------------------------------------------------------------------------------------------------------------------------------------------------------------------------------------------
Verbose mode can be enabled via `-v, --verbose` option
CONFIGURATION: https://docs.platformio.org/page/boards/atmelavr/nanoatmega328new.html
PLATFORM: Atmel AVR 2.1.0 > Arduino Nano ATmega328 (New Bootloader)
HARDWARE: ATMEGA328P 16MHz, 2KB RAM, 30KB Flash
DEBUG: Current (simavr) On-board (simavr)
PACKAGES: 
 - framework-arduino-avr 5.0.0 
 - toolchain-atmelavr 1.50400.190710 (5.4.0)
LDF: Library Dependency Finder -> http://bit.ly/configure-pio-ldf
LDF Modes: Finder ~ chain, Compatibility ~ soft
Found 5 compatible libraries
Scanning dependencies...
No dependencies
Building in debug mode
Compiling .pio\build\nanoatmega328new\src\main.cpp.o
Archiving .pio\build\nanoatmega328new\libFrameworkArduinoVariant.a
Compiling .pio\build\nanoatmega328new\FrameworkArduino\CDC.cpp.o
Compiling .pio\build\nanoatmega328new\FrameworkArduino\HardwareSerial.cpp.o
Compiling .pio\build\nanoatmega328new\FrameworkArduino\HardwareSerial0.cpp.o
Compiling .pio\build\nanoatmega328new\FrameworkArduino\HardwareSerial1.cpp.o
Compiling .pio\build\nanoatmega328new\FrameworkArduino\HardwareSerial2.cpp.o
Compiling .pio\build\nanoatmega328new\FrameworkArduino\HardwareSerial3.cpp.o
Compiling .pio\build\nanoatmega328new\FrameworkArduino\IPAddress.cpp.o
Compiling .pio\build\nanoatmega328new\FrameworkArduino\PluggableUSB.cpp.o
Compiling .pio\build\nanoatmega328new\FrameworkArduino\Print.cpp.o
Compiling .pio\build\nanoatmega328new\FrameworkArduino\Stream.cpp.o
Compiling .pio\build\nanoatmega328new\FrameworkArduino\Tone.cpp.o
Compiling .pio\build\nanoatmega328new\FrameworkArduino\USBCore.cpp.o
Compiling .pio\build\nanoatmega328new\FrameworkArduino\WInterrupts.c.o
Compiling .pio\build\nanoatmega328new\FrameworkArduino\WMath.cpp.o
Compiling .pio\build\nanoatmega328new\FrameworkArduino\WString.cpp.o
Compiling .pio\build\nanoatmega328new\FrameworkArduino\abi.cpp.o
Compiling .pio\build\nanoatmega328new\FrameworkArduino\hooks.c.o
Compiling .pio\build\nanoatmega328new\FrameworkArduino\main.cpp.o
Compiling .pio\build\nanoatmega328new\FrameworkArduino\new.cpp.o
Compiling .pio\build\nanoatmega328new\FrameworkArduino\wiring.c.o
Compiling .pio\build\nanoatmega328new\FrameworkArduino\wiring_analog.c.o
Compiling .pio\build\nanoatmega328new\FrameworkArduino\wiring_digital.c.o
Compiling .pio\build\nanoatmega328new\FrameworkArduino\wiring_pulse.S.o
Compiling .pio\build\nanoatmega328new\FrameworkArduino\wiring_pulse.c.o
Compiling .pio\build\nanoatmega328new\FrameworkArduino\wiring_shift.c.o
Archiving .pio\build\nanoatmega328new\libFrameworkArduino.a
Linking .pio\build\nanoatmega328new\firmware.elf
Building .pio\build\nanoatmega328new\firmware.hex
Checking size .pio\build\nanoatmega328new\firmware.elf
Advanced Memory Usage is available via "PlatformIO Home > Project Inspect"
RAM:   [=         ]  10.7% (used 220 bytes from 2048 bytes)
Flash: [=         ]   7.8% (used 2394 bytes from 30720 bytes)
=============================================================================================== [SUCCESS] Took 3.06 seconds ===============================================================================================

D:\- Downloads\Nano>  

I ran the debugger with the ‘skip Pre-Debug’ option after the above command ’ pio debug --interface=gdb -x .pioinit’ and still don’t get printouts!

1 Like

Hi,
I think I found the calls related to the UART function in simavr.
First is the following piece of code, which fills a buffer of 256 bytes, and sends a log message once said buffer got filled up or the \n character arrives.

	if (p->flags & AVR_UART_FLAG_STDIO) {
		const int maxsize = 256;
		if (!p->stdio_out)
			p->stdio_out = malloc(maxsize);
		p->stdio_out[p->stdio_len++] = v < ' ' ? '.' : v;
		p->stdio_out[p->stdio_len] = 0;
		if (v == '\n' || p->stdio_len == maxsize) {
			p->stdio_len = 0;
			AVR_LOG(avr, LOG_OUTPUT,
					FONT_GREEN "%s\n" FONT_DEFAULT, p->stdio_out);
		}
	}

I tested its behaviour with the following code:
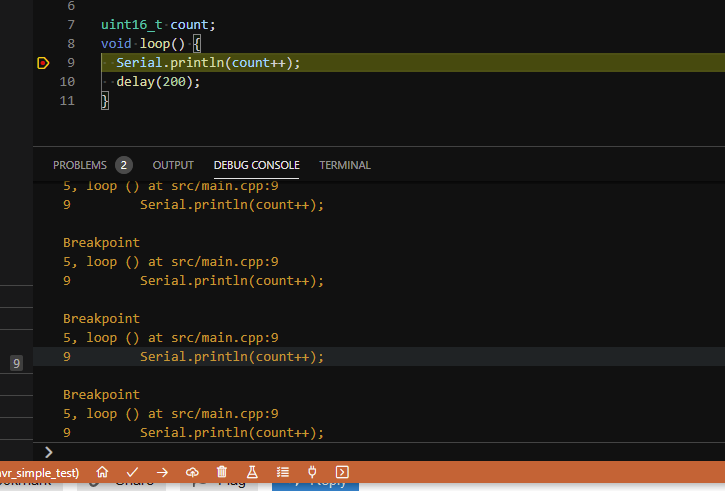
uint16_t count;
void loop() {
  Serial.print(count++);
  //Serial.write('\n');
  delay(10);
}

At first no character gets printed to the console, even in Linux, nonetheless, after some time they come all in one print like this:

0123456789101112131415161718192021222324252627282930313233343536373839404142434445464748495051525354555657585960616263646566676869707172737475767778798081828384858687888990919293949596979899100101102103104105106107108109110111112113114115116117118119120121

If I were to uncomment that line with the Serial.write('\n'), then once again it works just as before.

Now, what is the AVR_LOG() function?

After following the references, which wasn’t easy, I got the following:

#define AVR_LOG(avr, level, ...) \
	do { \
		avr_global_logger(avr, level, __VA_ARGS__); \
	} while(0)

So AVR_LOG is a macro for avr_global_logger

void
avr_global_logger(
		struct avr_t* avr,
		const int level,
		const char * format,
		... )
{
	va_list args;
	va_start(args, format);
	if (_avr_global_logger)
		_avr_global_logger(avr, level, format, args);
	va_end(args);
}

Then avr_global_logger is a call for _avr_global_logger

static avr_logger_p _avr_global_logger = std_logger;

_avr_global_logger is an pointer that by default points to std_logger

std_logger(
		avr_t * avr,
		const int level,
		const char * format,
		va_list ap)
{
	if (!avr || avr->log >= level) {
		vfprintf((level > LOG_ERROR) ?  stdout : stderr , format, ap);
	}
}

std_logger calls vfprintf conditionally, finally!!
It looks like the message gets printed to stdout or stderr depending on the log level.
I don’t know how avr-gdb deals with the stdout output from a program or if there are any conditions tho make it work.

What do we know is that the console output only works under the condition that a \n character arrives, so it is usable for text messages but isn’t suitable for arbitrary binary data.

Still, this doesn’t explain why the windows version doesn’t work, yet I also found this comment about the gdb print management,

Not sure if it applies to us, however, it wouldn’t surprise me if it did by seeing how the disassemble bug is still there after all the years :wink:

2 Likes

It would be nice to have a separate Monitor window attached to the serial port just like the real hardware to be able to send inputs as well.

Certainly would be great, but I think there are some heavy technical limitations to achieve what you suggest, at least in a portable way.

I found there is another implementation of the sim_avr libs called simduino, and said variant already has support for terminal simulation. However to achieve that it uses a pseudo terminal or PTY, something that isn’t supported by the windows os as far as I know.

1 Like

Is there anything else I should do besides installing the Atmel AVR platform to use the AVR simulator? I tried to debug the native-blink example for Atmel AVR, with this platformio.ini:

[env:uno]
platform = atmelavr
board_build.mcu = atmega328p
board_build.f_cpu = 16000000L

upload_protocol = arduino
upload_speed = 115200

Building and uploading to my Arduino Uno works, but when I set a breakpoint in the code and click on the PIO Debug button, I get the following error message:

> Executing task: platformio debug <

Error: Please setup environments in `platformio.ini` file
The terminal process "platformio 'debug'" terminated with exit code: 1.

There’s no board = line in the platformio.ini yet it builds? Is this the full file?

1 Like

Oh right, good catch! The original example file doesn’t have this line and I just copied it without adding the board. I didn’t notice because building and uploading just worked.

I added board = uno and now the simulator works too!