Using BigSur. Never used BOOTSEL.
I meant prior to uploading, plug in the Pico while holding down the BOOTSEL button.
If you have a RESET button connected, hold down the BOOTSEL button & press/release the RESET button and then release the BOOTSEL button. In both cases, RPI-RP2 UF2 volume should get mounted onto the desktop before the upload.
I have U8g2 working now. Problem was related to using I2C_SDA and I2C_SCL definitions (as alternative for SDA and SCL which are not defined which by itself is strange).
These definitions could not be resolved. I got errors like:
Linking .pio\build\pico\firmware.elf
c:/users/<me>/.platformio/packages/toolchain-gccarmnoneeabi@1.90201.191206/bin/../lib/gcc/arm-none-eabi/9.2.1/../../../../arm-none-eabi/bin/ld.exe: .pio\build\pico\src\main.cpp.o: in function `_GLOBAL__sub_I_period':
main.cpp:(.text.startup._GLOBAL__sub_I_period+0x4): undefined reference to `digitalPinToPinName(unsigned char)'
I still get other serious compilation errors (that I can’t yet explain/fix) however, which makes that Arduino on Pico (arduino-embed) is currently a nogo for me.
I’m on Windows 10. To get upload working I have to set:
upload_protocol = picotool
upload_port = F:
In addition I have to install WinUSB driver with Zadig:
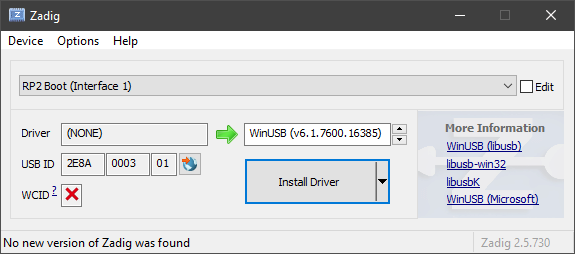
Only when the above is done will PlatformIO upload to the pico and only in BOOTSEL mode.
Without a reset button mounted, putting the Pico in BOOTSEL mode is a PITB.
1 Like
What exactly is BigSur?
macOS 11 (currently 11.3.1) is Big Sur.
BTW - I haven’t used the U8g2 library with SSD1306 OLED but Bodmer’s tft_eSPI display driver is optimized for performance. I use it on ESP32, STM32, and ESP8266 with ST7789 & ILI9341 displays. It’s very fast. The RP2040 (Pico) support is new but will get improved quickly.
I use the Adafruit SSD1306 library with the 128x64 OLEDs but it’s not as fast as tft_eSPI driver.
I am trying to build and run a simple blinky on Windows 10. The u2f file it generates does work when I copy it manually to E: but the platformio upload function claims to upload successfully but doesn’t seem to do anything (doesn’t upload the file and doesn’t reset the board).
Any suggestion?
Edit: The log says “Uploading .pio\build\pico\firmware.bin”. Shouldn’t it be .u2f?
platformio.init
[env:pico]
platform = raspberrypi
board = pico
framework = arduino
upload_protocol = mbed
upload_port = E:
Build/upload log:
Processing pico (platform: raspberrypi; board: pico; framework: arduino)
------------------------------------------------------------------------------------------------------------------------------------------Verbose mode can be enabled via-v, --verboseoption
CONFIGURATION: Redirecting...
PLATFORM: Raspberry Pi RP2040 (1.0.0) > Raspberry Pi Pico
HARDWARE: RP2040 133MHz, 264KB RAM, 2MB Flash
DEBUG: Current (cmsis-dap) External (cmsis-dap, raspberrypi-swd)
PACKAGES:
- framework-arduino-mbed 2.0.0
- tool-openocd-raspberrypi 2.1100.0 (11.0)
- tool-rp2040tools 1.0.2
- toolchain-gccarmnoneeabi 1.90201.191206 (9.2.1)
LDF: Library Dependency Finder → Library Dependency Finder (LDF) — PlatformIO latest documentation
LDF Modes: Finder ~ chain, Compatibility ~ soft
Found 27 compatible libraries
Scanning dependencies…
No dependencies
Building in release mode
Compiling .pio\build\pico\src\main.cpp.o
Linking .pio\build\pico\firmware.elf
Generating UF2 image
C:\Users\User.platformio\packages\tool-rp2040tools\elf2uf2 “.pio\build\pico\firmware.elf” “.pio\build\pico\firmware.uf2”
Checking size .pio\build\pico\firmware.elf
Advanced Memory Usage is available via “PlatformIO Home > Project Inspect”
RAM: [== ] 18.7% (used 50500 bytes from 270336 bytes)
Flash: [ ] 3.5% (used 73136 bytes from 2097152 bytes)
Building .pio\build\pico\firmware.bin
Configuring upload protocol…
AVAILABLE: cmsis-dap, mbed, picotool, raspberrypi-swd
CURRENT: upload_protocol = mbed
Looking for upload disk…
Use manually specified: E:
Uploading .pio\build\pico\firmware.bin
Firmware has been successfully uploaded.
(Some boards may require manual hard reset)
====================================================== [SUCCESS] Took 12.18 seconds ======================================================
Terminal will be reused by tasks, press any key to close it.
Nono don’t do that, that was wrong per above text, remove that line or write upload_protocol = picotool.
Thanks @maxgerhardt . I tried this
[env:pico]
platform = raspberrypi
board = pico
framework = arduino
upload_protocol = picotool
upload_port = E:
But it still trying to upload the .elf. Any idea what am I doing wrong? Do you need to upgrade platform.io to a specific version?
Processing pico (platform: raspberrypi; board: pico; framework: arduino)
------------------------------------------------------------------------------------------------------------------------------------------------------------------------------Verbose mode can be enabled via-v, --verboseoption
CONFIGURATION: Redirecting...
PLATFORM: Raspberry Pi RP2040 (1.0.0) > Raspberry Pi Pico
HARDWARE: RP2040 133MHz, 264KB RAM, 2MB Flash
DEBUG: Current (cmsis-dap) External (cmsis-dap, raspberrypi-swd)
PACKAGES:
- framework-arduino-mbed 2.0.0
- tool-openocd-raspberrypi 2.1100.0 (11.0)
- tool-rp2040tools 1.0.2
- toolchain-gccarmnoneeabi 1.90201.191206 (9.2.1)
LDF: Library Dependency Finder → Library Dependency Finder (LDF) — PlatformIO latest documentation
LDF Modes: Finder ~ chain, Compatibility ~ soft
Found 27 compatible libraries
Scanning dependencies…
No dependencies
Building in release mode
Compiling .pio\build\pico\src\main.cpp.o
Compiling .pio\build\pico\FrameworkArduinoVariant\double_tap_usb_boot.c.o
Compiling .pio\build\pico\FrameworkArduinoVariant\variant.cpp.o
Compiling .pio\build\pico\FrameworkArduino\Interrupts.cpp.o
Compiling .pio\build\pico\FrameworkArduino\Serial.cpp.o
Compiling .pio\build\pico\FrameworkArduino\Tone.cpp.o
Archiving .pio\build\pico\libFrameworkArduinoVariant.a
Compiling .pio\build\pico\FrameworkArduino\USB\PluggableUSBDevice.cpp.o
Compiling .pio\build\pico\FrameworkArduino\USB\USBCDC.cpp.o
Compiling .pio\build\pico\FrameworkArduino\USB\USBSerial.cpp.o
Compiling .pio\build\pico\FrameworkArduino\WMath.cpp.o
Compiling .pio\build\pico\FrameworkArduino\abi.cpp.o
Compiling .pio\build\pico\FrameworkArduino\api\Common.cpp.o
Compiling .pio\build\pico\FrameworkArduino\api\IPAddress.cpp.o
Compiling .pio\build\pico\FrameworkArduino\api\PluggableUSB.cpp.o
Compiling .pio\build\pico\FrameworkArduino\api\Print.cpp.o
Compiling .pio\build\pico\FrameworkArduino\api\Stream.cpp.o
Compiling .pio\build\pico\FrameworkArduino\api\String.cpp.o
Compiling .pio\build\pico\FrameworkArduino\itoa.c.o
Compiling .pio\build\pico\FrameworkArduino\main.cpp.o
Compiling .pio\build\pico\FrameworkArduino\mbed\platform\cxxsupport\mstd_mutex.cpp.o
Compiling .pio\build\pico\FrameworkArduino\pinToIndex.cpp.o
Compiling .pio\build\pico\FrameworkArduino\wiring.cpp.o
Compiling .pio\build\pico\FrameworkArduino\wiring_analog.cpp.o
Compiling .pio\build\pico\FrameworkArduino\wiring_digital.cpp.o
Compiling .pio\build\pico\FrameworkArduino\wiring_pulse.cpp.o
Compiling .pio\build\pico\FrameworkArduino\wiring_shift.cpp.o
Archiving .pio\build\pico\libFrameworkArduino.a
Linking .pio\build\pico\firmware.elf
Generating UF2 image
C:\Users\User.platformio\packages\tool-rp2040tools\elf2uf2 “.pio\build\pico\firmware.elf” “.pio\build\pico\firmware.uf2”
Checking size .pio\build\pico\firmware.elf
Advanced Memory Usage is available via “PlatformIO Home > Project Inspect”
RAM: [== ] 18.7% (used 50500 bytes from 270336 bytes)
Flash: [ ] 3.5% (used 73136 bytes from 2097152 bytes)
Configuring upload protocol…
AVAILABLE: cmsis-dap, picotool, raspberrypi-swd
CURRENT: upload_protocol = picotool
Looking for upload port…
Use manually specified: E:
Forcing reset using 1200bps open/close on port E:
Uploading .pio\build\pico\firmware.elf
rp2040load 1.0.1 - compiled with go1.15.8
…
*** [upload] Error 1
======================================================================== [FAILED] Took 101.96 seconds ========================================================================The terminal process “C:\Users\User.platformio\penv\Scripts\platformio.exe ‘run’, ‘–target’, ‘upload’” terminated with exit code: 1.Terminal will be reused by tasks, press any key to close it.
Is the device in bootloader mode by having pressed the BOOTSEL button before and during USB insertion? Have you loaded libUSB drivers via Zadig if the device shows up as unrecognized in the windows device manager?
Thanks @maxgerhardt , I setup the driver with Zadig and now the upload works. I am not sure why a special driver is needed since the Pico boot mode emulate a disk and requires a simple file copy but there must me a reason.
My next step before starting the application’s is to setup a hardware debugger. Anything that works, a Pico as a debugger or a commercial one if it’s not way way expensive. Is such a platformio/pico compatible debugger available?
Currently, PlatformIO doesn’t support Pico debugging via jlink or stlink. However, it may be able to support a Picoprobe.
The SEGGER driver for a J-Link probe (e.g. Edu Mini) already supports the Pico. You can debug a Pico elf file using a SEGGER J-Link probe & Ozone debugger.
Also, I have debugged the Pico using a Picoprobe with PatformIO Debugger, building with cmake extension. You can use either another Pico (or a Raspberry Pi) as a hardware Picoprobe (see https://datasheets.raspberrypi.org/pico/getting-started-with-pico.pdf).
With a Picoprobe, you’ll need to build OpenOCD with the Picoprobe driver, as detailed in the above link.
Thanks @zpm1066, I think I will wait for a more out-of-the-box platformio debugger for the Pico.
What is a good place to track progress? Is there a thread or an issue to discuss the debugger?
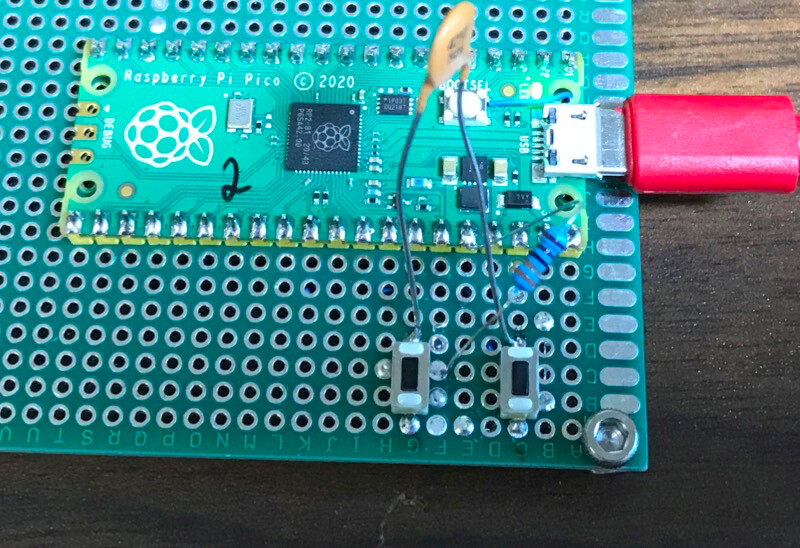
There were several mentioning here about the pain of entering the Boot mode so here is a solution that works for me with my dev Pico board. Clicking on the left button enters the boot mode and clicking on the right button enter the run mode (board reset), everything else works the same.
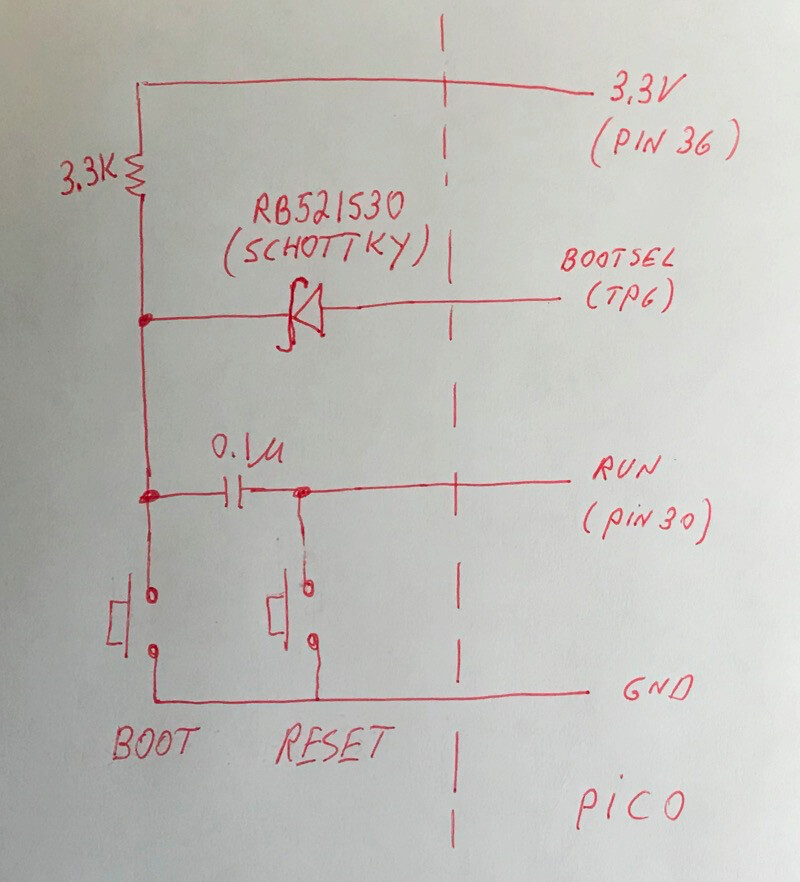
The tricky part is connecting to the BOOTSEL signal. I did by soldering to the onboard BOOTSEL switch.
Principle of operation: The resistor and the diode are to decouple the BOOTSEL signal which also acts as an output and has transitions during the operation of the board from the RUN input. The capacitor is used as a differentiator, issuing a short RUN command when the BOOTSEL is pressed.
If you try it, please post here how it works for you.
(Note: the wiring on the other side of the board is not shown)
It helps to read other users’ posts…
This was already mentioned not far above.
Pico debugger related issues can be tracked in the following thread.
With regard to the BOOTSEL/RESET with the standard Raspberry Pi Pico board, there isn’t really a need to perform any soldering. Just connect a switch to the RUN pin and a GND pin.
To enter the BOOT mode, connect the Pico to a Mac/PC USB port. Hold down the BOOTSEL, then press & release the RESET, and release the BOOTSEL. RPI-RP2 volume will get mounted onto the desktop.
To enter the BOOT mode, connect the Pico to a Mac/PC USB port.
Hold down the BOOTSEL, then press & release the RESET, and release the BOOTSEL.
Thanks @zpm1066 .
That was the goal of my ‘design’ to replace that procedure with a simple click. ![]()
Some STM32 boards have these two buttons next to each other which allows to enter BOOT mode with a rolling finger maneuver.
Hi all, I have a few question few questions regarding platformio/pico. Will post them here to avoid spamming with another thread. Please let me know if I should take them somewhere else.
-
Is https://github.com/Wiz-IO/wizio-pico ahead of the official platformio/pico when it comes to debugger support? Worth trying?
-
I tried to run the second core but could not include “pico/multicore.h”. Will the dual core feature be supported?
-
Any idea how to make the Pico’s printf() directed to Serial? On some environments all it takes is implementing a putc(char) function or similar but not sure how it’s done with the pico?
-
gpio_set_mask() and gpio_clr_mask() do work but gpio_set_dir_out_masked() doesn’t seem to set the pins as outputs. Any idea why?
gpio_set_dir_out_masked(1 << LED_BUILTIN | 1 << LED1_PIN | 1 << LED2_PIN | 1 << LED3_PIN);
-
I was getting many warning during build (not from my code) and had to add this flag to suppress them build_flags = -Wno-ignored-qualifiers. Is this a known issue?
-
Is the compilation of the Pico framwork significantly slower than that of STM32 or I just imagine it?
-
The implementation is called arduino-mbed. Why are they combined? Does it provide both Arduino and mbed APIs?
BTW, I was able to implement a continuous acquisition program with two analog inputs and alternating DMA buffers and it was significantly easier than with STM32, so I expect this platformio/pico combination to be a winner. Thanks for everybody that makes it happen.
Solved:
-
I2C compilation issue:
I fixed the issue with I2C (‘OLED display’):
Strange enough SDA and SCL are not defined in the Arduino-embed core.
I used definitions I2C_SDA and I2C_SCL instead which are defined in the BSP but they could not be resolved during compilation. I now use the PIN_WIRE_SDA and PIN_WIRE_SCL definitions instead which works fine:
#ifndef SDA
    #define SDA PIN_WIRE_SDA
#endif
#ifndef SCL
    #define SCL PIN_WIRE_SCL
#endif
-
Compilation issues caused by include file named “pico.h”
My other issues with Arduino framework and Raspberry Pi Pico have also been solved:
I got many errors during compilation of which I did not understand what was causing them. It appeared to be an include file in my application called
pico.hwith include guard#ifndef PICO_H_. It turned out that the Arduino-embed core uses an include file with exactly the same name and same header guard.
Changing only the name of my header guard proved to be insufficient, even while I explicitly included mypico.hfile from a specific folder. I had to rename my ownpico.hinclude file to something else (and rename the header guard accordingly).
After this my problem was solved and the code compiled successfully.
- The Arduino Core is working at the top of MbedOS. You can use both APIs.
1 Like