Debug an avr 4809 with microUPDI?

sorry what does that bit mean?

I’m not sure if the microUPDI device will also act as a USART1 pass through, I’ll have to check. The code currently on the 4809 accepts chars from an ftdi (which was on USART1) and prints them back to the PC terminal, so I may have to use a different USART in order to have anything to debug.

I was referring to the dropdown menu in the debugger – if you have multiple workspaces loaded, it will show all of them, so care must be taken to select the right project.

grafik

ah thanks, I only have the one workspace.

in the microUPDI page it states


Features

    A 6-pin UPDI programming connector
        UPDI interface for programming and debugging
        Serial interface for communicating with the target over UART

so I’m missing something as my serial port isn’t surrently working. I’ll have to check that out.

What’s the best way to see some basic debug output? In the variables window I’ve put in the name of a variable ‘c’ from the executing code, would I expect it show how the variable changes in that window?

image

I guess I’m going to have to read up now on how the VSCode debug features work.
I’ll see if I can get the serial port working and go from there.

thanks a lot for all the help,
Paul

Hm the way I see it, purely flashing and debugging the target is covered by just the UPDI pin, the serial connection is just for convenience – with debugging you’ll be able to see the state of all variables when the chip is halted (but no UART output). That should be good for now.

What happens when you place a breakpoint in line 16 (by clicking on the linenumber) and pressing the play button? Does the pyAVRdbg script see an incoming connection and crashes or does it work?

perhaps not so good now, I get this in the pio UI:

and this in the win cmd window :


C:\Users\Paul\Downloads\pyAVRdbg-master\pyAVRdbg-master>python main.py
INFO:pyedbglib.hidtransport.hidtransportbase:Manufacturer: ATMEL
INFO:pyedbglib.hidtransport.hidtransportbase:Product: mEDBG CMSIS-DAP
INFO:pyedbglib.hidtransport.hidtransportbase:Serial Number: MICROUPDIPROGRAMMERX
INFO:pymcuprog.deviceinfo.deviceinfo:Looking for device atmega4809
INFO:pymcuprog.nvm:UPDI baud rate: 900000bps
INFO:root:Event recived
PC: 218
INFO:root:Recived break event
INFO:root:No event
Waiting for GDB session 127.0.0.1:12555
Connected by ('127.0.0.1', 64822)
-> $qSupported#37
<- +
INFO:root:AVR running state False
Supported
<- $PacketSize=1000#f1
INFO:root:No event
-> ++$?#3f
<- +
INFO:root:AVR running state False
<- $S00#b3
INFO:root:No event
-> +$Hc-1#09
<- +
INFO:root:AVR running state False
<- $#00
INFO:root:No event
-> +$qC#b4
<- +
INFO:root:AVR running state False
C
<- $#00
INFO:root:No event
-> +$qOffsets#4b
<- +
INFO:root:AVR running state False
Offsets
<- $Text=000;Data=000;Bss=000#24
INFO:root:No event
-> +$Hg0#df
<- +
INFO:root:AVR running state False
<- $#00
INFO:root:No event
-> +$g#67
<- +
INFO:root:AVR running state False
['0x0', '0x0', '0x0', '0x0', '0x0', '0x0', '0x0', '0x0', '0x0', '0x0', '0x0', '0x0', '0x0', '0x0', '0xfa', '0x4b', '0xce', '0x3f', '0x20', '0x0', '0x0', '0x0', '0x0', '0x0', '0x0', '0x60', '0xc8', '0x4b', '0xcd', '0x3f', '0x20', '0x0']
['0x21']
['0xcd', '0x3f']
<- $0000000000000000000000000000fa4bce3f2000000000000060c84bcd3f200021cd3f#1c
INFO:root:No event
-> +$p22#d4
<- +
INFO:root:AVR running state False
218
0xda
0x1b4
000001b4
b4010000
<- $b4010000#b7
INFO:root:No event
-> +$!#21
<- +
INFO:root:AVR running state False
<- $#00
INFO:root:No event
-> +$qSymbol::#5b
<- +
INFO:root:AVR running state False
Symbol::
<- $OK#9a
INFO:root:No event
-> +$qRcmd,696e6974#07
<- +
INFO:root:AVR running state False
Rcmd,696e6974
<- $#00
INFO:root:No event
-> +
INFO:root:No event
-> $k#6b
<- +
INFO:root:AVR running state False

C:\Users\Paul\Downloads\pyAVRdbg-master\pyAVRdbg-master>

Hmm maybe it doesn’t support flashing the target.

I also see the script has exited.

Can you upload the firmware via the UPDI adapter via pyupdi as you’ve done per Error using pyupdi, just to check if you can flash normally?

If that works you can also add per docs the directive

build_mode = debug
debug_load_mode = manual

to not trigger the firmware upload via the GDB server and build the firwmare in debug mode. Try uploading the firmware first, start the script again and then try debugging again.

I forgot, I was previously using pyupdi to upload code but this is no longer physically connected with the microupdi device in its place, so do I need to make further changes to pio.ini so that code uploads happen via the microupdi device?
pio.ini


[platformio]
; Default build target
default_envs = ATmega4809_pyupdi_upload

; Parameters used for all environments
[env]
platform = atmelmegaavr
framework = arduino
; Chip in use
board = ATmega4809
; Clock frequency in [Hz]
board_build.f_cpu = 16000000L
; Oscillator type (internal or external)
board_hardware.oscillator = internal
; Arduino pinout variant
board_build.variant = 40pin-standard

; Unflag build flags
;build_unflags =

; Extra build flags PK - see https://github.com/MCUdude/MegaCoreX/blob/master/PlatformIO.md for options 
;build_flags =

; Monitor port is auto detected. Override here
;monitor_port = 
; Serial monitor baud rate
monitor_speed = 9600

; MIGHT WANT TO REFERENCE THE HELP PAGE AGAIN and put in some more options(flags) https://docs.platformio.org/en/latest/core/userguide/device/cmd_monitor.html
monitor_flags = 
  --echo

[env:ATmega4809_pyupdi_upload]
; Upload protocol for UPDI upload - from PIO help pages ; see bottom of this page https://github.com/MCUdude/MegaCoreX/blob/master/PlatformIO.md for install

platform = atmelmegaavr

board = ATmega4809
upload_protocol = custom
upload_speed = 115200
upload_port = COM9
upload_flags = 
    -d
    atmega4809
    -c
    $UPLOAD_PORT
    -b
    $UPLOAD_SPEED
upload_command = pyupdi $UPLOAD_FLAGS -f $SOURCE


; run the following command to set fuses
; pio run -e fuses_bootloader -t fuses
; run the following command to set fuses + burn bootloader
; pio run -e fuses_bootloader -t bootloader
;[env:fuses_bootloader]
; Upload protocol for used to set fuses/bootloader
;upload_protocol = ${env:Upload_UPDI.upload_protocol}
;upload_flags =

; Hardware settings
board_hardware.bod = 2.7v
board_hardware.eesave = yes
board_hardware.uart = no_bootloader
board_hardware.rstpin = reset

debug_tool = custom
debug_server =
debug_port = 127.0.0.1:12555


sorry crossed replies, I’ll try what you’ve suggested.
thanks.

Can you replace this section with

upload_protocol = custom
upload_flags =
    -C
    $PROJECT_PACKAGES_DIR/tool-avrdude-megaavr/avrdude.conf
    -p
    $BOARD_MCU
    -c
    xplainedmini_updi
    -Pusb
    -b115200
upload_command = avrdude $UPLOAD_FLAGS -U flash:w:$SOURCE:i

and try a normal upload? (pyAVRdbg script must be stopped in the background if running)

Per GitHub - MCUdude/microUPDI: DIY UPDI programmer with open source hardware! this should be AVRdude invocation needed to transport the firmware. A good sanity check if the upload is generally working before debugging.

ok tried the above replacing sections of PIO.ini. Kept the microUPDI connected and uploading via that produces this success output:

Executing task: C:\Users\Paul\.platformio\penv\Scripts\platformio.exe run --target upload <

Processing ATmega4809_pyupdi_upload (platform: atmelmegaavr; board: ATmega4809; framework: arduino)
---------------------------------------------------------------------------------------------------------------------------------------------------------------------------------------------------------------------------------Verbose mode can be enabled via `-v, --verbose` option
CONFIGURATION: https://docs.platformio.org/page/boards/atmelmegaavr/ATmega4809.html
PLATFORM: Atmel megaAVR (1.4.0) > ATmega4809
HARDWARE: ATMEGA4809 16MHz, 6KB RAM, 48KB Flash
PACKAGES:
 - framework-arduino-megaavr-megacorex 1.0.7
 - tool-avrdude-megaavr 2.60300.210128 (6.3.0)
 - toolchain-atmelavr 2.70300.201015 (7.3.0)
LDF: Library Dependency Finder -> http://bit.ly/configure-pio-ldf
LDF Modes: Finder ~ chain, Compatibility ~ soft
Found 10 compatible libraries
Scanning dependencies...
Dependency Graph
|-- <src>
Building in release mode
Checking size .pio\build\ATmega4809_pyupdi_upload\firmware.elf
Advanced Memory Usage is available via "PlatformIO Home > Project Inspect"
RAM:   [          ]   1.6% (used 98 bytes from 6144 bytes)
Flash: [=         ]   7.8% (used 3841 bytes from 49152 bytes)
Configuring upload protocol...
AVAILABLE: custom
CURRENT: upload_protocol = custom
Uploading .pio\build\ATmega4809_pyupdi_upload\firmware.hex

avrdude: AVR device initialized and ready to accept instructions

Reading | ################################################## | 100% 0.10s

avrdude: Device signature = 0x1e9651 (probably m4809)
avrdude: NOTE: "flash" memory has been specified, an erase cycle will be performed
         To disable this feature, specify the -D option.
avrdude: erasing chip
avrdude: reading input file ".pio\build\ATmega4809_pyupdi_upload\firmware.hex"
avrdude: writing flash (3842 bytes):

Writing | ################################################## | 100% 1.27s

avrdude: 3842 bytes of flash written
avrdude: verifying flash memory against .pio\build\ATmega4809_pyupdi_upload\firmware.hex:
avrdude: load data flash data from input file .pio\build\ATmega4809_pyupdi_upload\firmware.hex:
avrdude: input file .pio\build\ATmega4809_pyupdi_upload\firmware.hex contains 3842 bytes
avrdude: reading on-chip flash data:

Reading | ################################################## | 100% 1.02s

avrdude: verifying ...
avrdude: 3842 bytes of flash verified

avrdude: safemode: Fuses OK (E:FF, H:FF, L:FF)

avrdude done.  Thank you.

================================================================================================== [SUCCESS] Took 3.78 seconds ==================

Also my USART1 working again, accepting and returning char strings to PC terminal.

I added this section to PIO.ini

[env:debug]
debug_tool = custom
debug_server =
debug_port = 127.0.0.1:12555
build_mode = debug
debug_load_mode = manual


but although the code loads and runs ( i can interact through serial monitor over usart1), If I try to debug, it still collapses.

We’ve made a good effort and thanks for that, might there be anything else worth trying?

thanks
Paul

Very good! So the microUPDI works can connect to the chip :slight_smile:

So the script pyAVRdbg just stops like it did above there? What’s the last full output of the script when a debug session is started? Maybe something can be seen from that or at the very least, and issue can be opened with that log so that it may be investigated by the author.

i got the following from the python script and below that some output from the PIO debug console


C:\Users\Paul\Downloads\pyAVRdbg-master\pyAVRdbg-master>python main.py
INFO:pyedbglib.hidtransport.hidtransportbase:Manufacturer: ATMEL
INFO:pyedbglib.hidtransport.hidtransportbase:Product: mEDBG CMSIS-DAP
INFO:pyedbglib.hidtransport.hidtransportbase:Serial Number: MICROUPDIPROGRAMMERX
INFO:pymcuprog.deviceinfo.deviceinfo:Looking for device atmega4809
INFO:pymcuprog.nvm:UPDI baud rate: 900000bps
INFO:root:Event recived
PC: 529
INFO:root:Recived break event
INFO:root:No event
Waiting for GDB session 127.0.0.1:12555
Connected by ('127.0.0.1', 49737)
-> $qSupported#37
<- +
INFO:root:AVR running state False
Supported
<- $PacketSize=1000#f1
INFO:root:No event
-> ++$?#3f
<- +
INFO:root:AVR running state False
<- $S00#b3
INFO:root:No event
-> +$Hc-1#09
<- +
INFO:root:AVR running state False
<- $#00
INFO:root:No event
-> +$qC#b4
<- +
INFO:root:AVR running state False
C
<- $#00
INFO:root:No event
-> +$qOffsets#4b
<- +
INFO:root:AVR running state False
Offsets
<- $Text=000;Data=000;Bss=000#24
INFO:root:No event
-> +$Hg0#df
<- +
INFO:root:AVR running state False
<- $#00
INFO:root:No event
-> +$g#67
<- +
INFO:root:AVR running state False
['0x0', '0x0', '0x0', '0x0', '0x0', '0x0', '0x0', '0x0', '0x0', '0x0', '0x0', '0x0', '0x0', '0x0', '0x6a', '0x4e', '0xce', '0x3f', '0x16', '0x0', '0xec', '0x3f', '0xec', '0x3f', '0x0', '0x60', '0x4f', '0x4e', '0xcd', '0x3f', '0x16', '0x0']
['0x2']
['0xcd', '0x3f']
<- $00000000000000000000000000006a4ece3f1600ec3fec3f00604f4ecd3f160002cd3f#3c
INFO:root:No event
-> +$p22#d4
<- +
INFO:root:AVR running state False
530
0x212
0x424
00000424
24040000
<- $24040000#8a
INFO:root:No event
-> +$!#21
<- +
INFO:root:AVR running state False
<- $#00
INFO:root:No event
-> +$qSymbol::#5b
<- +
INFO:root:AVR running state False
Symbol::
<- $OK#9a
INFO:root:No event
-> +$qRcmd,696e6974#07
<- +
INFO:root:AVR running state False
Rcmd,696e6974
<- $#00
INFO:root:No event
-> +
INFO:root:No event
-> $k#6b
<- +
INFO:root:AVR running state False

C:\Users\Paul\Downloads\pyAVRdbg-master\pyAVRdbg-master>

debug console output:

undefinedWarning! Ignore unknown configuration option `build_mode` in section [env:debug]

No symbol "target" in current context.
WARNING: Error executing command 'gdb-set target-async on'
PlatformIO Unified Debugger -> http://bit.ly/pio-debug
PlatformIO: debug_tool = custom
PlatformIO: Initializing remote target...
0x00000424 in __vector_29 ()
    at C:\Users\Paul\.platformio\packages\framework-arduino-megaavr-megacorex\cores\MegaCoreX/WInterrupts.c:154
154	IMPLEMENT_ISR(PORTF_PORT_vect, PF)
Current language:  auto; currently c++
C:\Users\Paul\.platformio\.cache\.piodebug-n125miqx/.pioinit:14: Error in sourced command file:
Target does not support this command.


When the error message appears, can you check whether the referenced file is there post the content?

At this location:

C:\Users\Paul.platformio.cache

this is what I see:

is any of that any good?

Hm it might delete it as soon as you click okay. What’s the examplatory content of the .pioinit file in the two .piodebug-x folders?

yes I ctrl clicked the file in the debug console and it doesn’t exist. From the pioinit file in the _u74 folder it has this ;

echo PlatformIO Unified Debugger -> http://bit.ly/pio-debug\n
echo PlatformIO: debug_tool = custom\n
echo PlatformIO: Initializing remote target...\n

define pio_reset_halt_target
    monitor reset halt
end

define pio_reset_run_target
    monitor reset
end

target extended-remote 127.0.0.1:12555
monitor init
load
pio_reset_halt_target
tbreak main

define pio_restart_target
   pio_reset_halt_target
   tbreak main
   continue
end
echo PlatformIO: Initialization completed\n

and from the _0al folder, this:

echo PlatformIO Unified Debugger -> http://bit.ly/pio-debug\n
echo PlatformIO: debug_tool = custom\n
echo PlatformIO: Initializing remote target...\n

define pio_reset_halt_target
    monitor reset halt
end

define pio_reset_run_target
    monitor reset
end

target extended-remote 127.0.0.1:12555
monitor init
load
pio_reset_halt_target
tbreak main

define pio_restart_target
   pio_reset_halt_target
   tbreak main
   continue
end
echo PlatformIO: Initialization completed\n

Mhm… Line 14 is monitor init. Maybe there’s an equivalent. Let’s test what happens when it’s commented out.

Can you add this to the environent you’re debugging:

debug_init_cmds =
  target extended-remote $DEBUG_PORT
  $INIT_BREAK
  $LOAD_CMDS

should disable all interaction with monitor but maybe also doesn’t reset the chip… See what it does and maybe press the reset button, too.

You may also leave out the $LOAD_CMDS to disable flashing via GDB.

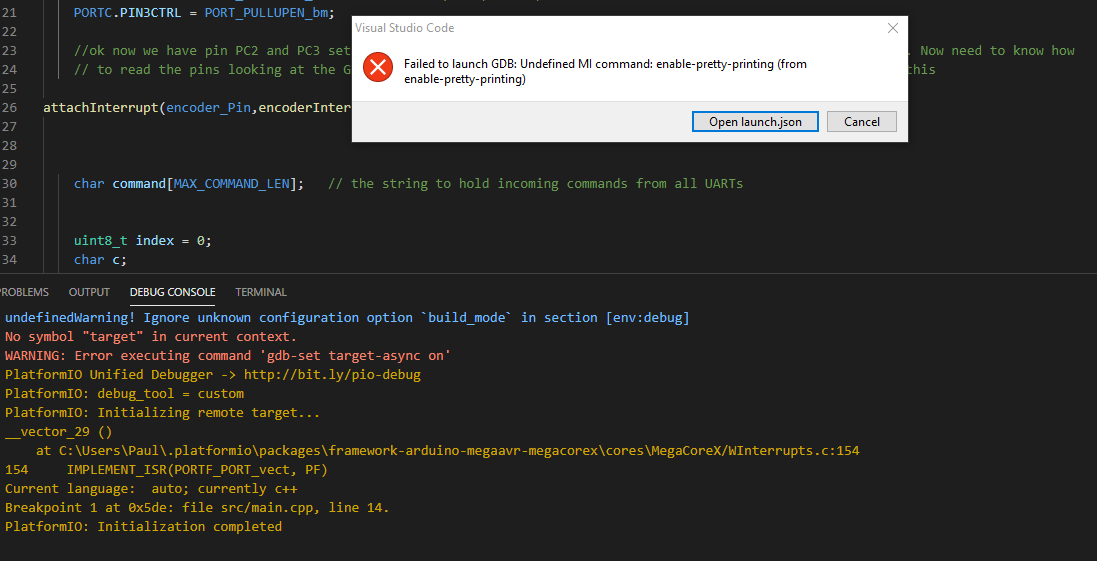
ok so i added debug_init_cmds as follows in PIO.ini, leaving out $LOAD_CMDS

[env:debug]
debug_tool = custom
debug_server =[
debug_port = 127.0.0.1:12555
build_mode = debug
debug_load_mode = manual
debug_init_cmds =
  target extended-remote $DEBUG_PORT
  $INIT_BREAK
  

python output:

INFO:pyedbglib.hidtransport.hidtransportbase:Manufacturer: ATMEL
INFO:pyedbglib.hidtransport.hidtransportbase:Product: mEDBG CMSIS-DAP
INFO:pyedbglib.hidtransport.hidtransportbase:Serial Number: MICROUPDIPROGRAMMERX
INFO:pymcuprog.deviceinfo.deviceinfo:Looking for device atmega4809
INFO:pymcuprog.nvm:UPDI baud rate: 900000bps
INFO:root:Event recived
PC: 529
INFO:root:Recived break event
INFO:root:No event
Waiting for GDB session 127.0.0.1:12555
Connected by ('127.0.0.1', 49974)
-> $qSupported#37
<- +
INFO:root:AVR running state False
Supported
<- $PacketSize=1000#f1
INFO:root:No event
-> ++$?#3f
<- +
INFO:root:AVR running state False
<- $S00#b3
INFO:root:No event
-> +$Hc-1#09
<- +
INFO:root:AVR running state False
<- $#00
INFO:root:No event
-> +$qC#b4
<- +
INFO:root:AVR running state False
C
<- $#00
INFO:root:No event
-> +$qOffsets#4b
<- +
INFO:root:AVR running state False
Offsets
<- $Text=000;Data=000;Bss=000#24
INFO:root:No event
-> +$Hg0#df
<- +
INFO:root:AVR running state False
<- $#00
INFO:root:No event
-> +$g#67
<- +
INFO:root:AVR running state False
['0x0', '0x0', '0x0', '0x0', '0x0', '0x0', '0x0', '0x0', '0x0', '0x0', '0x0', '0x0', '0x0', '0x0', '0x6a', '0x4e', '0xce', '0x3f', '0x20', '0x0', '0x0', '0x0', '0x0', '0x0', '0x0', '0x60', '0x38', '0x4e', '0xcd', '0x3f', '0x20', '0x0']
['0x21']
['0xcd', '0x3f']
<- $00000000000000000000000000006a4ece3f2000000000000060384ecd3f200021cd3f#c2
INFO:root:No event
-> +$p22#d4
<- +
INFO:root:AVR running state False
529
0x211
0x422
00000422
22040000
<- $22040000#88
INFO:root:No event
-> +$!#21
<- +
INFO:root:AVR running state False
<- $#00
INFO:root:No event
-> +$qSymbol::#5b
<- +
INFO:root:AVR running state False
Symbol::
<- $OK#9a
INFO:root:No event
-> +$m5de,40#fb
<- +
INFO:root:AVR running state False
5de
40
0
INFO:root:Reading from address 0x0005DE
bytearray(b'!\xf4\xe5\x01"\x96\xf5\x01\x11\x81\x00\xe0\xdc\xcf\xea\xe0\xee\x16\xf1\x04\t\xf4\xbb\xc0\xf0\xe1\xef\x16\xf1\x04\t\xf0m\xc0\xe7\xcfx\xe0\xe7.\xf1,\x81,\x91,\xa1,`\xe1\xb6.p\xc0?\xe91\x0f:1(\xf49\xea')
21f4e5012296f501118100e0dccfeae0ee16f10409f4bbc0f0e1ef16f10409f06dc0e7cf78e0e72ef12c812c912ca12c60e1b62e70c03fe9310f3a3128f439ea
<- $21f4e5012296f501118100e0dccfeae0ee16f10409f4bbc0f0e1ef16f10409f06dc0e7cf78e0e72ef12c812c912ca12c60e1b62e70c03fe9310f3a3128f439ea#ed
INFO:root:No event
-> +
INFO:root:No event
-> $qRcmd,7265736574#37
<- +
INFO:root:AVR running state False
Rcmd,7265736574
<- $#00
INFO:root:No event
-> +$k#6b
<- +
INFO:root:AVR running state False

C:\Users\Paul\Downloads\pyAVRdbg-master\pyAVRdbg-master>

and from the PIO UI